Add your first external booking
(4 minutes)
If you hire out your venue then watch this video to learn how to manage your extenal bookings in Hubb.
Sorry, your browser is unable to play this type of file.
You can still
download it
If you have not done so, we recommend watching our previous videos about resources. Firstly, the
overview and secondly our
video about adding events for your Church. Those videos will help you get fully up to speed with how our resources system works.
Many Churches have rooms or a hall they let out to clubs, groups or social projects. We have features to help you manage your rooms and equipment bookings for all your church activities and your external bookings. Although the church and external bookings calendars are integrated, we make sure that your external bookings do not show up on your public-facing church calendar.
How to make a booking for an external event
-
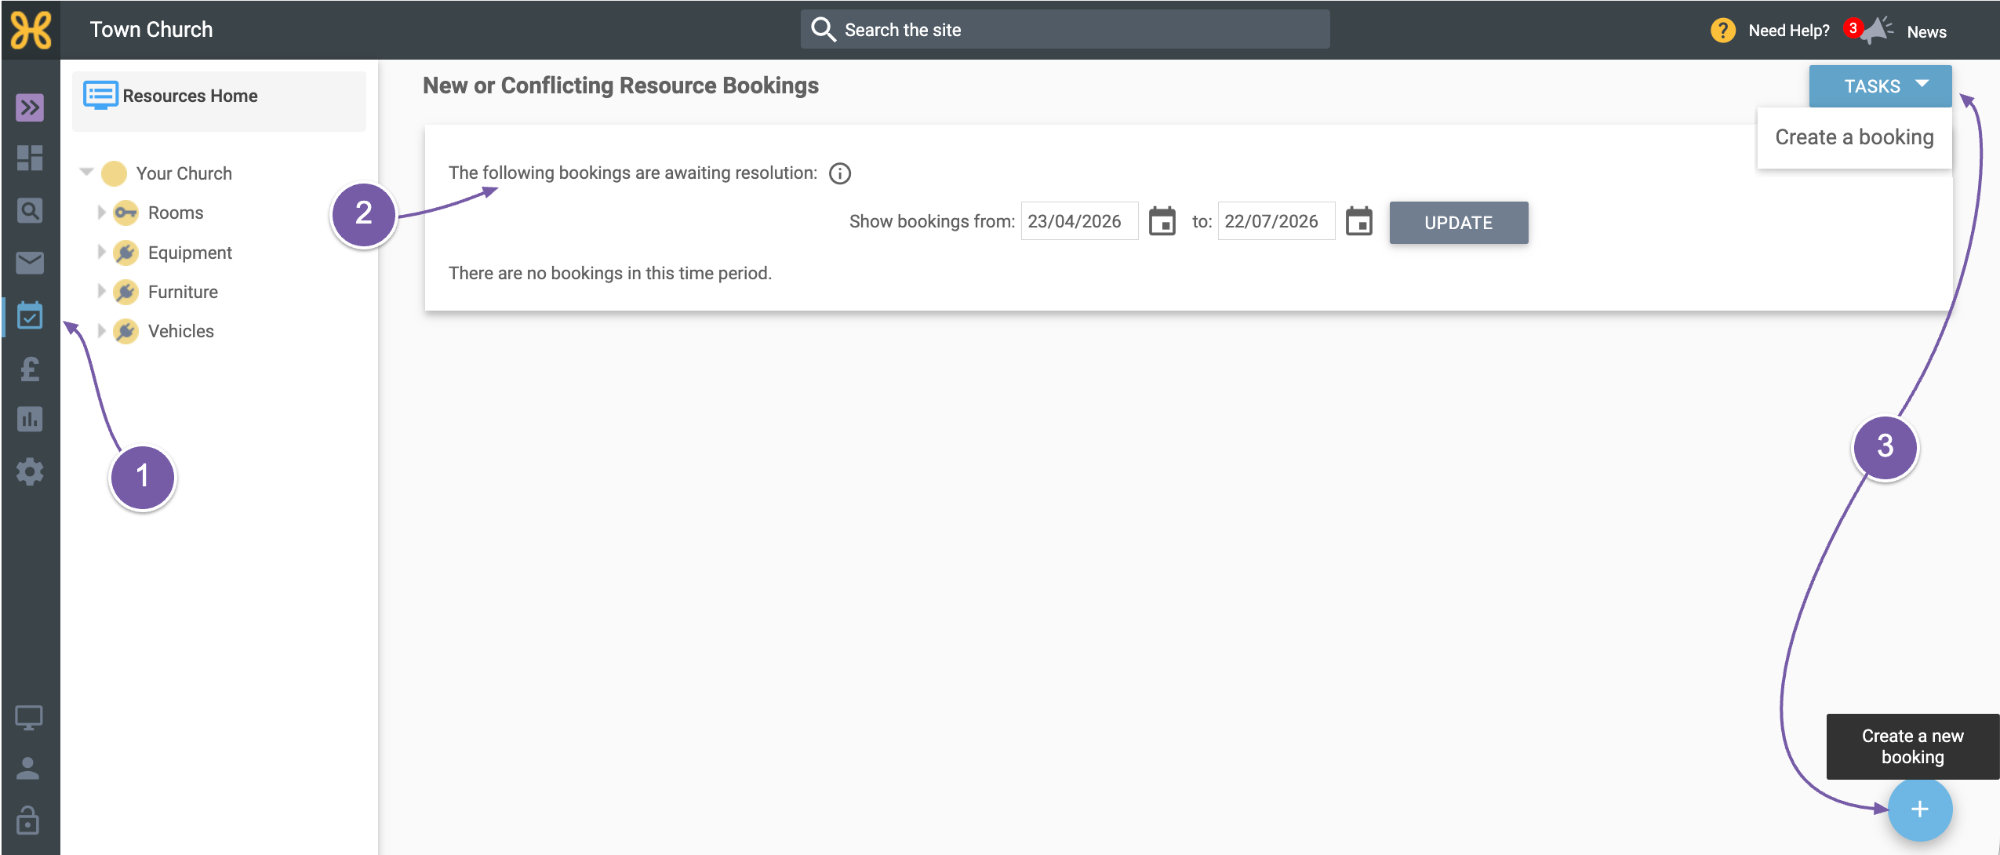
Head over to the “Resources” tab on the left of the screen.
-
We come to the “Resources” homepage where you can see any new pending bookings that people have requested or any conflicts that you as a bookings manager need to sort out.
-
To make your first external booking simply click the blue “+” icon at the bottom right-hand corner of the screen to add a new booking or use the task at the top right of the screen.
-
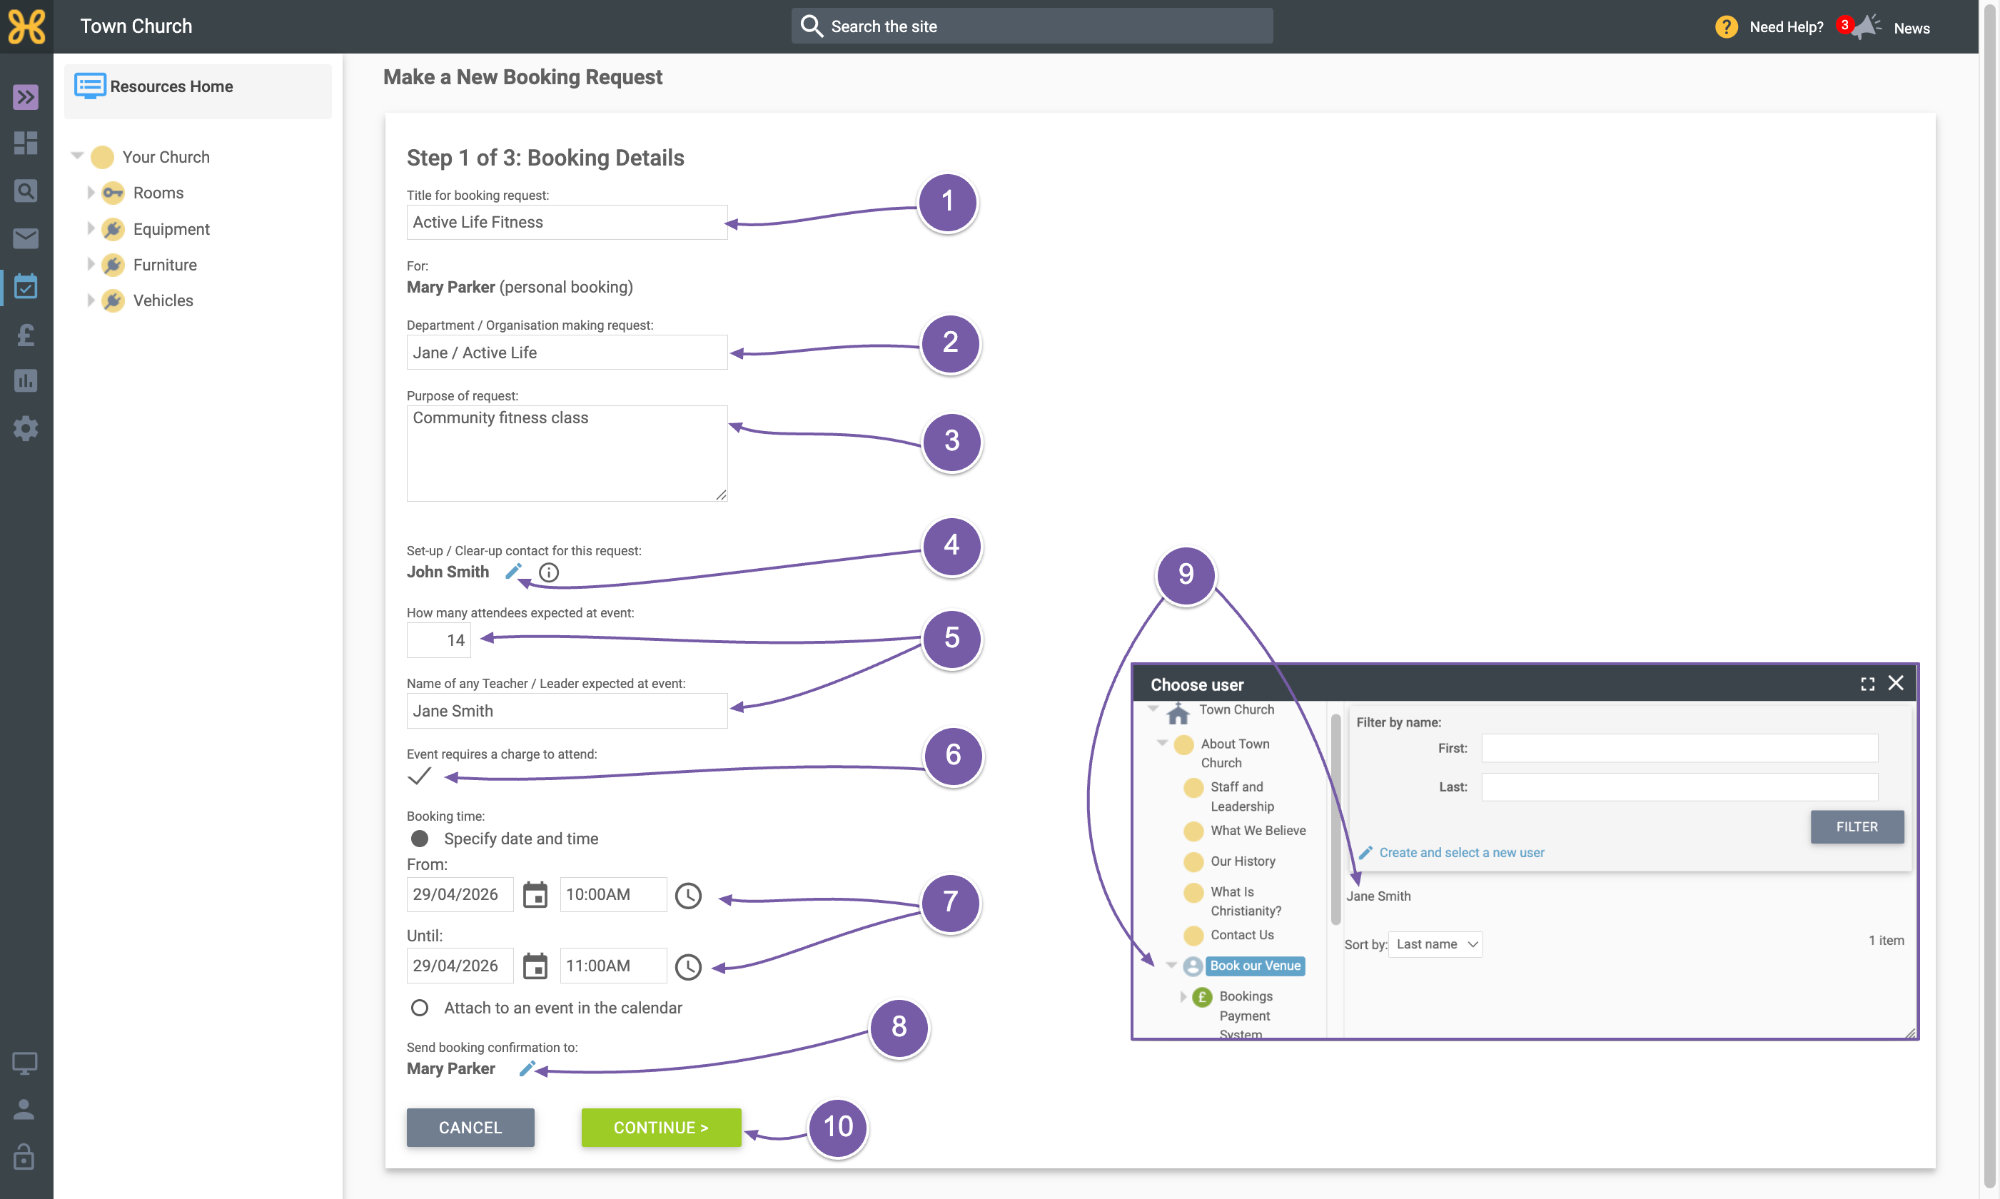
In this example we'll add the booking for a fitness class that a member of the local community runs - called “Active Life”.
-
The next few boxes are just for information to help other people who manage bookings. We'll put the organisation name that we're making this booking for.
-
We will also add the purpose of the booking.
-
Use the pencil icon to edit who is the set-up and clear-up contact for the event. You can leave this blank if you like, but we've added John from the staff and leadership group as he is our facilities manager.
-
Again, to help others who manage bookings, we'll add the number of expected attendees and the leader of the booking.
-
We'll also tick that it requires a charge to attend.
-
Next, the most crucial part of the page is the date and time. Because this is an external event, we'll just set the time and date option and not use the option to pick from an existing event. This booking is for next Wednesday from 10:00 am to 11:00 am.
-
Lastly, we can choose to send a booking confirmation email to someone. If you have the person booking as a contact in your database, you can click on the “Pencil” icon and pick the person.
-
Why not add your booking contacts to a group in the site manager so you can quickly email all your bookers with important information. When you come to make your booking, you can easily breeze through this page and just put the information you need.
-
Now we can click continue.
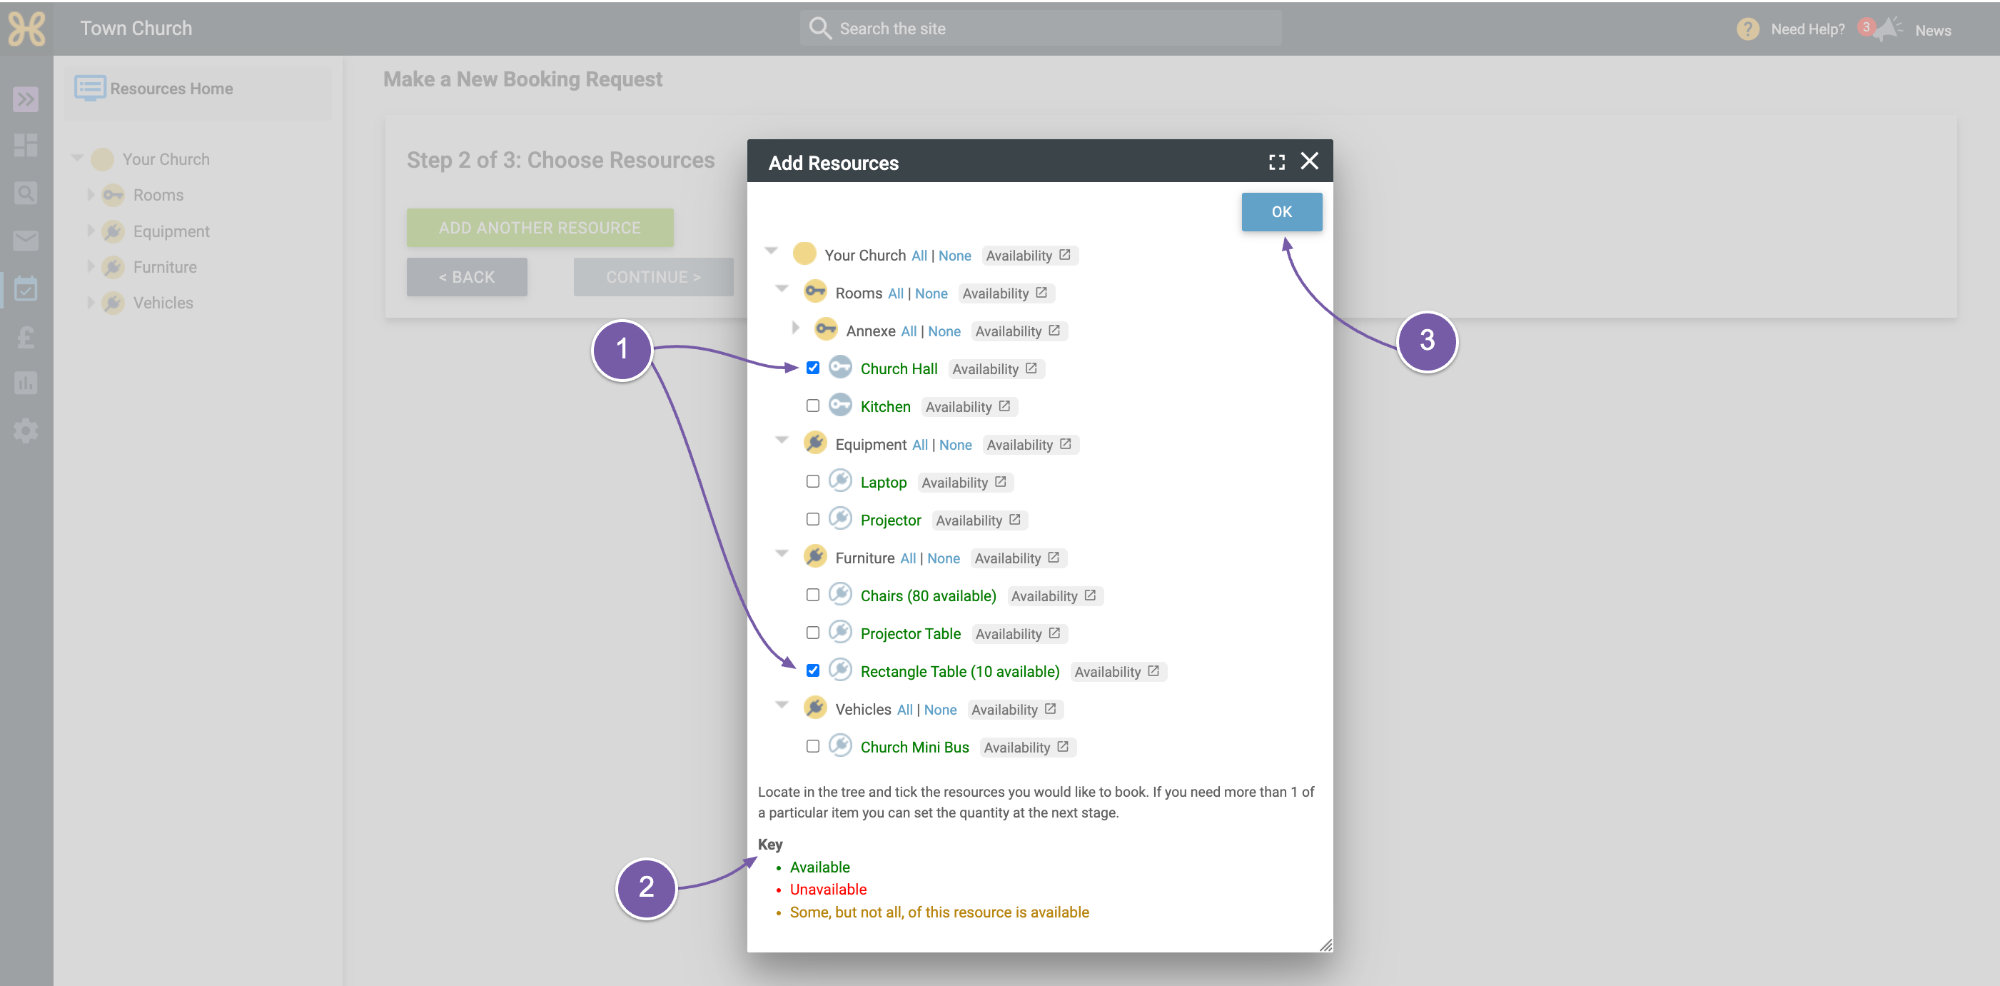
Now you can start to pick the resources you would like to book.
-
Just browse through the folder structure and select the resources for the booking. We will choose the Church Hall from the rooms folder and rectangle table from the furniture folder so the leader can put their music player on it.
-
At this stage, based on the time of the event, we show you the availability of each resource and you can see the key at the bottom.
-
Click “OK”.
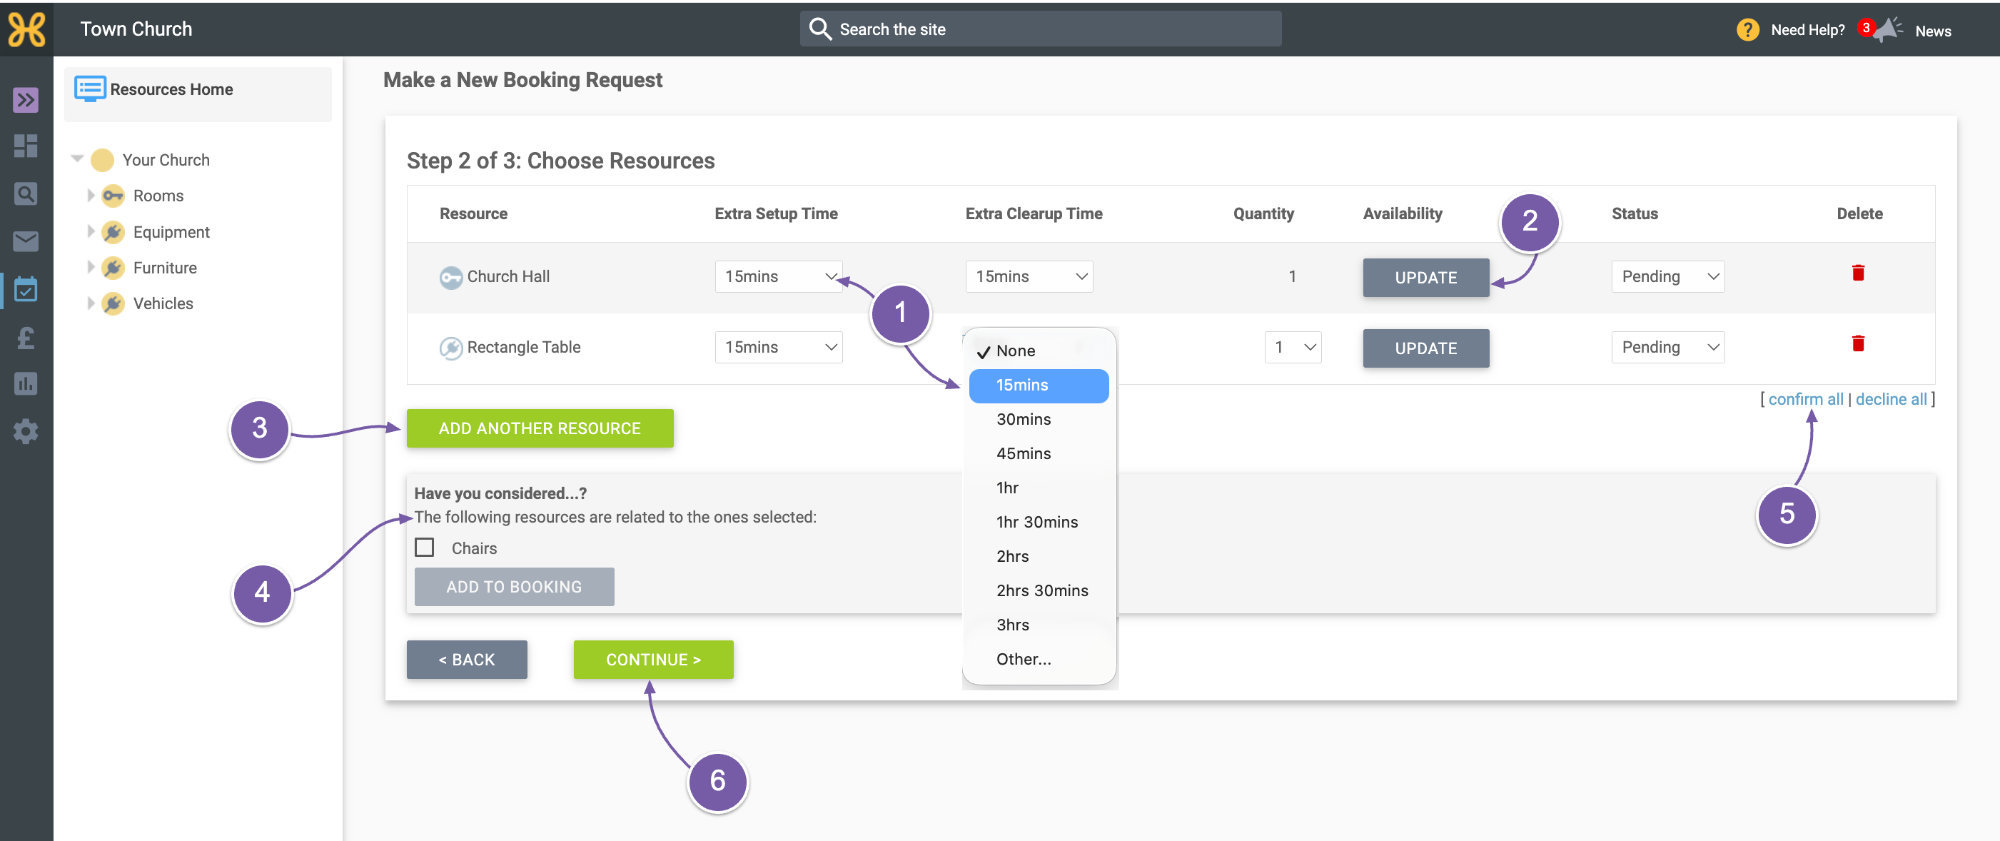
We now come to a screen where you can add some setup and clear up time to your resources and pick the quantity of what you would like to book. If you add setup or clear up time to the booking, it will mean that the resources you add these two will not be bookable by others. This can help ensure no booking overlaps and every booking has enough time to set up and pack away.
-
We'll add 15 minutes of setup and clear up time to each resource.
-
We now need to recheck the availability of resources. Clicking any of the “Update” buttons will update every resource's availability.
-
There are options to add another resource if you've forgotten any
-
We also display the related items
-
When you have added all the resources and confirmed their availability, you can click to "confirm all"
-
Then click continue.
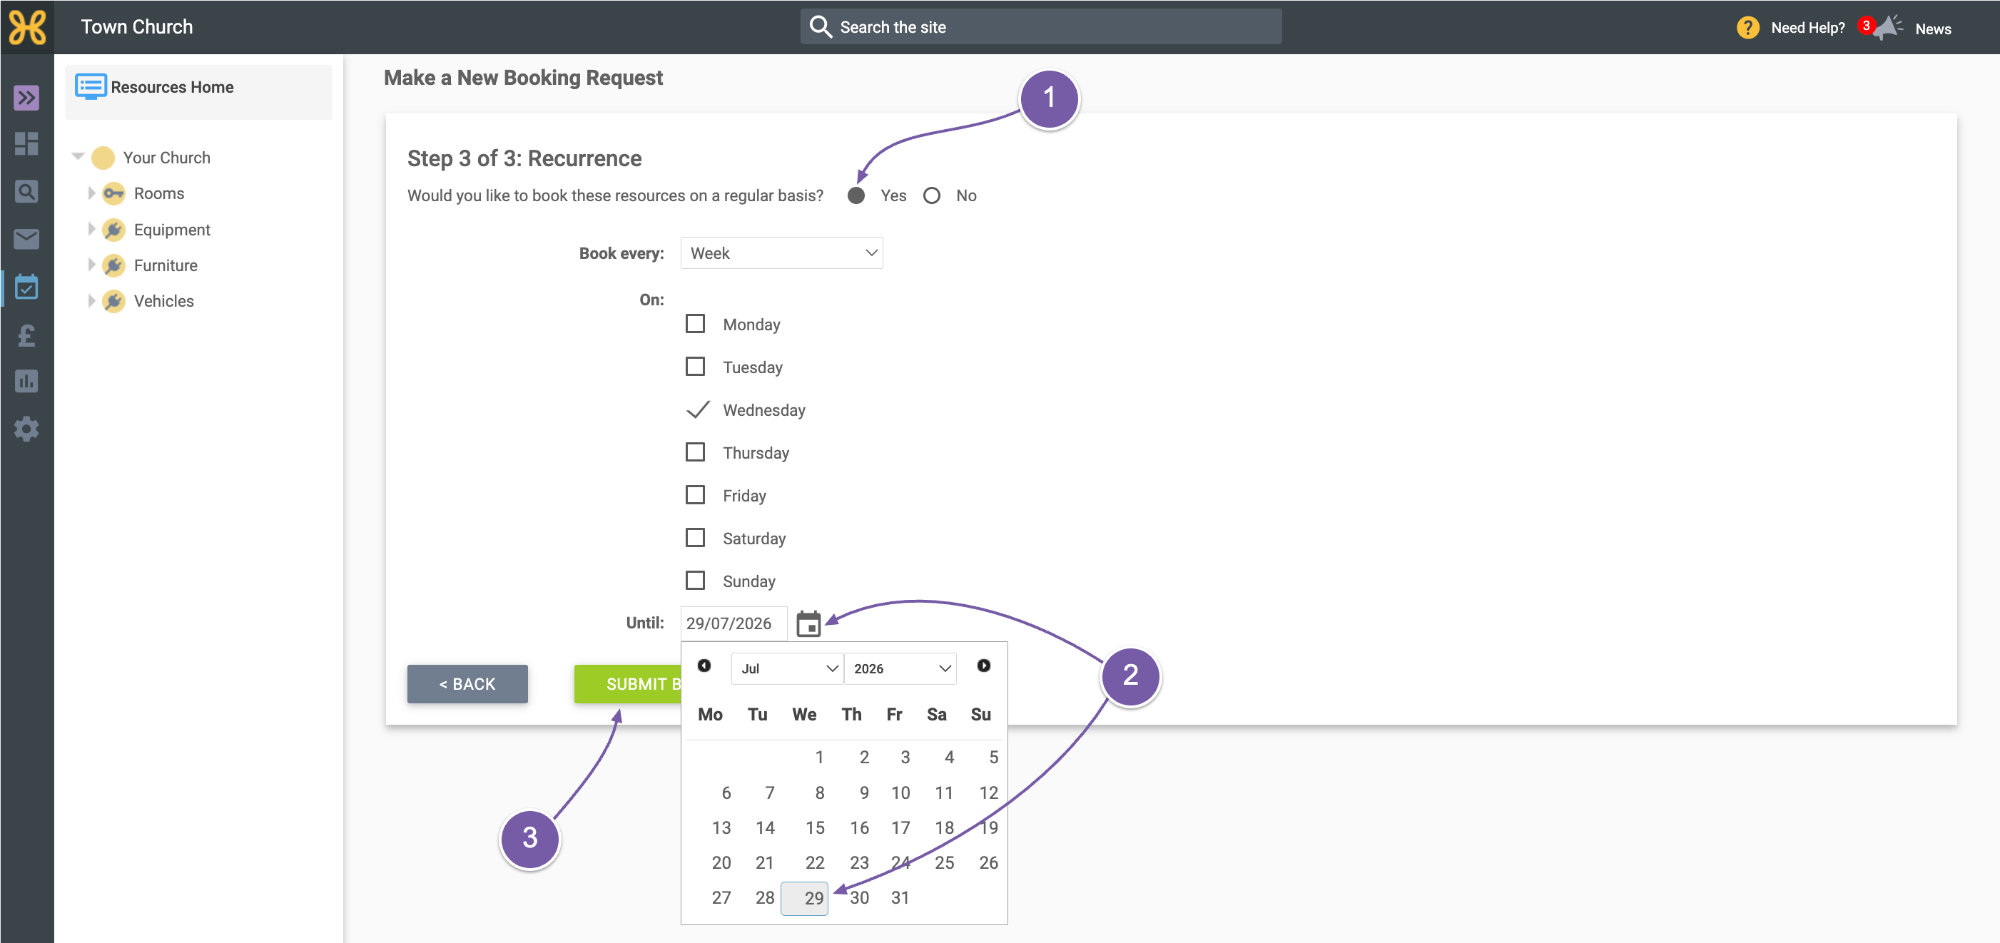
To help you save time, we allow you to set up this booking as a recurring series of bookings.
-
As this is a weekly booking, we'll select “Yes”
-
Set the recurrence - we're just going to set this to a few months later
-
Then click submit booking.
-
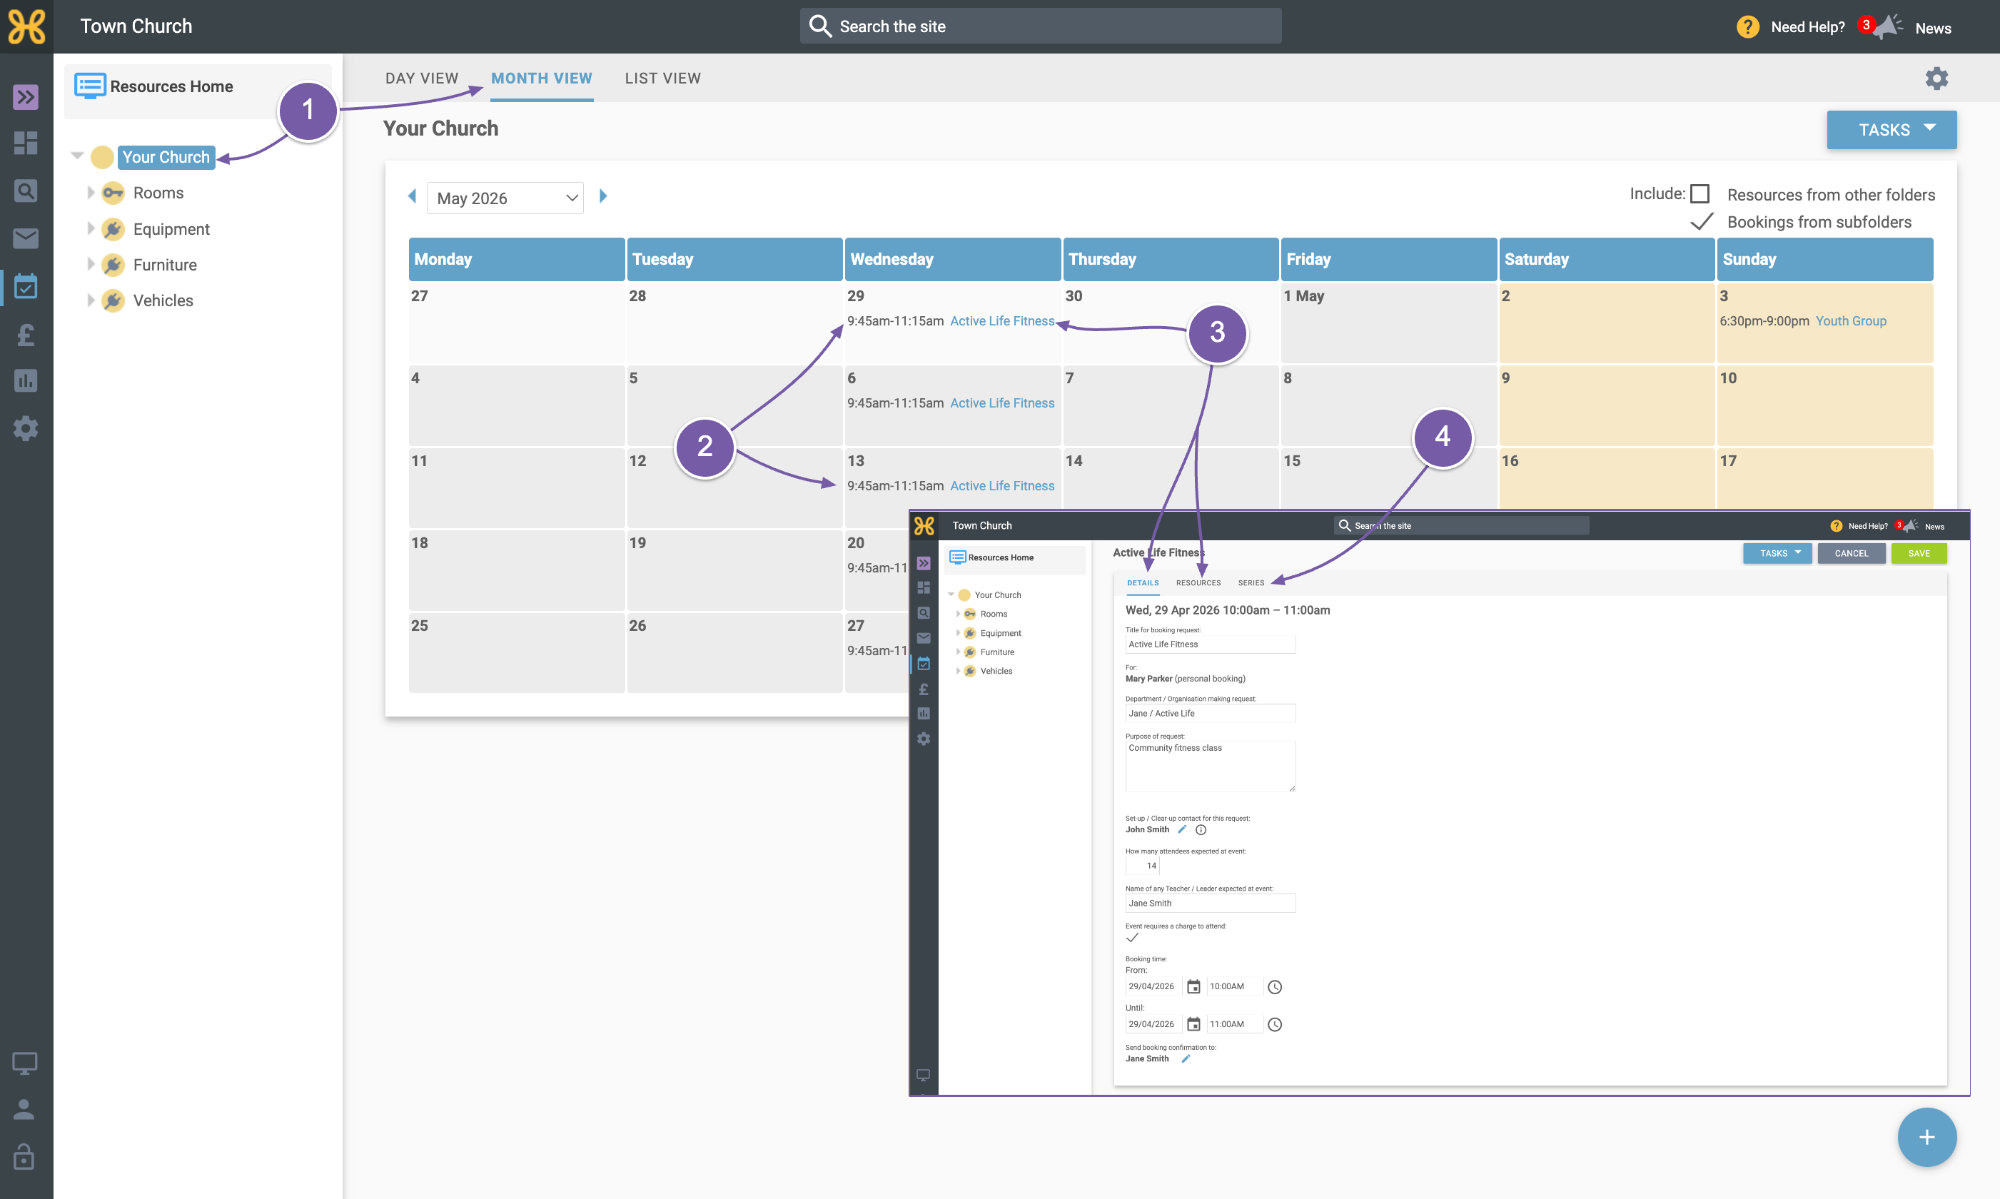
We're now finished and we can go back to the monthly view
-
You can see our booking on the resources calendar
-
If you need to edit anything, just choose the booking and edit the details or resources
-
You can also see the other events in the series.
Thanks for watching and we hope this video and guide will help you get all your external bookings into Hubb.