Add another person to your trial site and give them permissions
(10 minutes)
You don't have to launch hubb.church on your own! Why not get a helper to work on some of the site for you.
Sorry, your browser is unable to play this type of file.
You can still
download it
Before going through this guide, we strongly recommend you watching our
permissions overview video that explains how it works and make sure you only give access to people for what they need and to give them a simple user interface to look after the part of your Hubb system and will manage or help with.
To
get another person set up on your Hubb site, we need to first get their details in the system. The best way to do this for one person, or if you just need to add a few people, is to create their profile yourself from within the web office.
-
To do this, go to the top group and click on the “Members” tab.
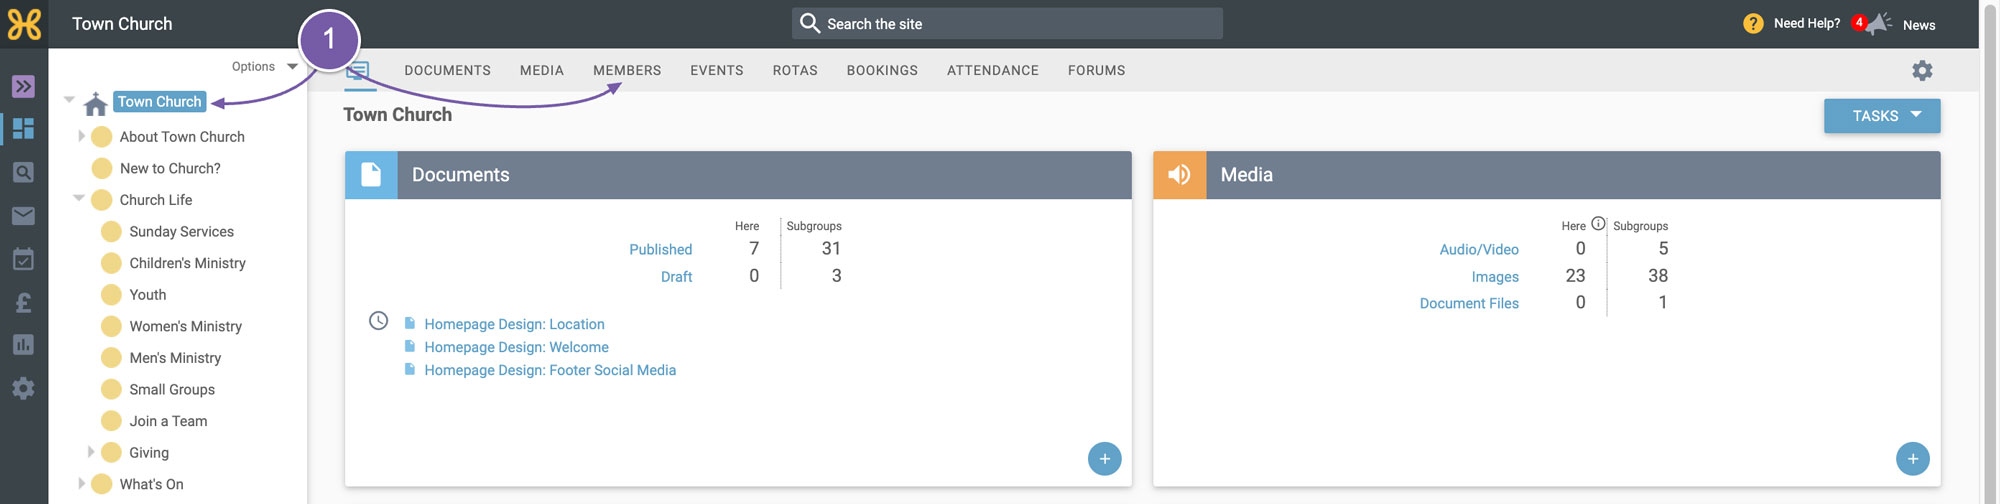
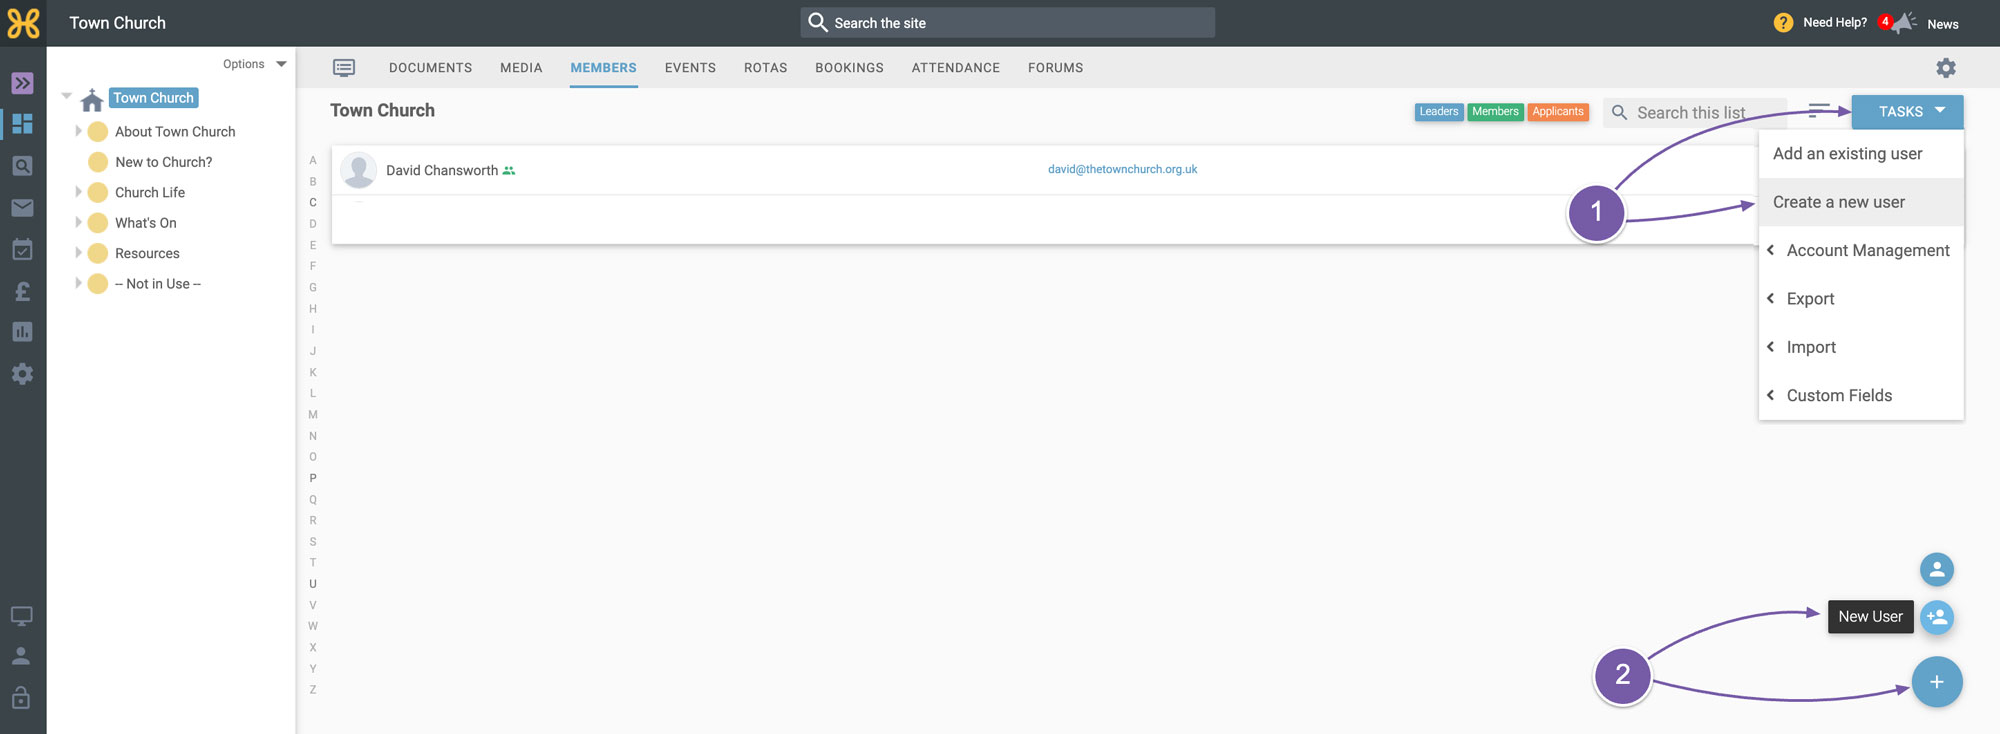
To add a new person, there are a couple of ways you can do it.
-
You can go to the “Tasks” and click on “Create a New User”
-
Or you can hover over the “+” icon at the bottom right-hand corner of the screen and click on “Add New User”.
Either of these options will bring up the create user wizard.
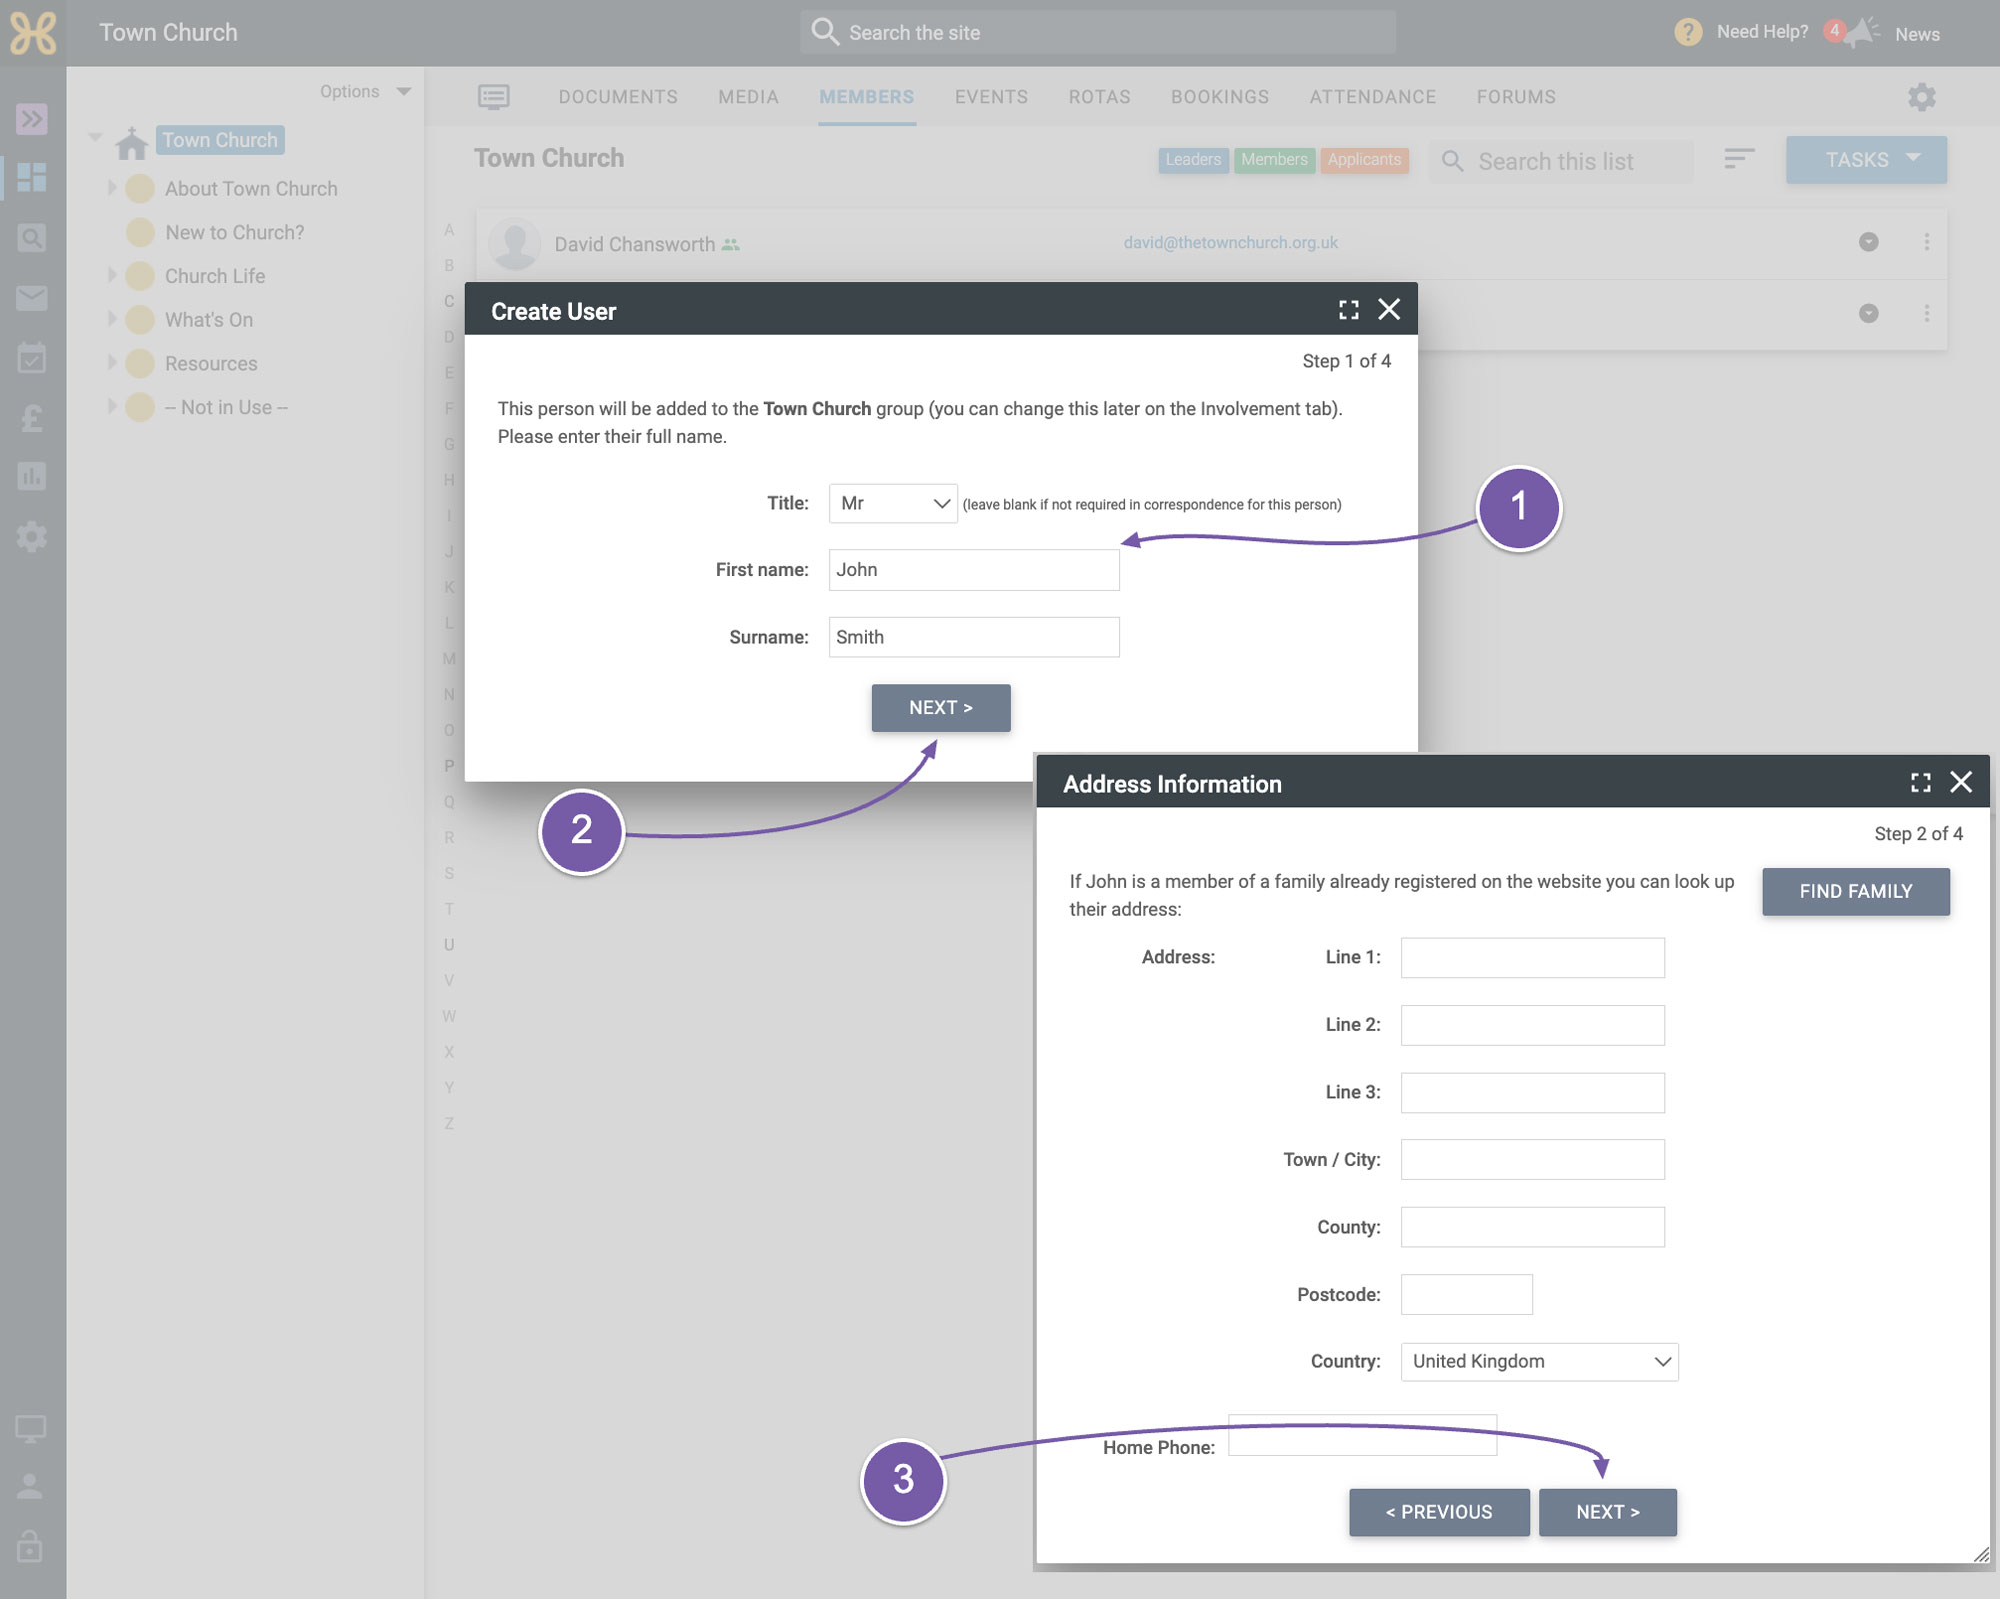
At this point, we don't need to worry about putting all of the details in for the person we are adding. This is because they will be able to log in and update their personal information themselves. Really, we just need their name, email address, enable the login access and create their account.
So, let's go through the create user wizard:
-
Add in the title, first name and surname.
-
Then click “Next”
-
You can add in address details, but again, I'm going to leave this for the person to add themselves. So, just scroll down and click “Next”
-
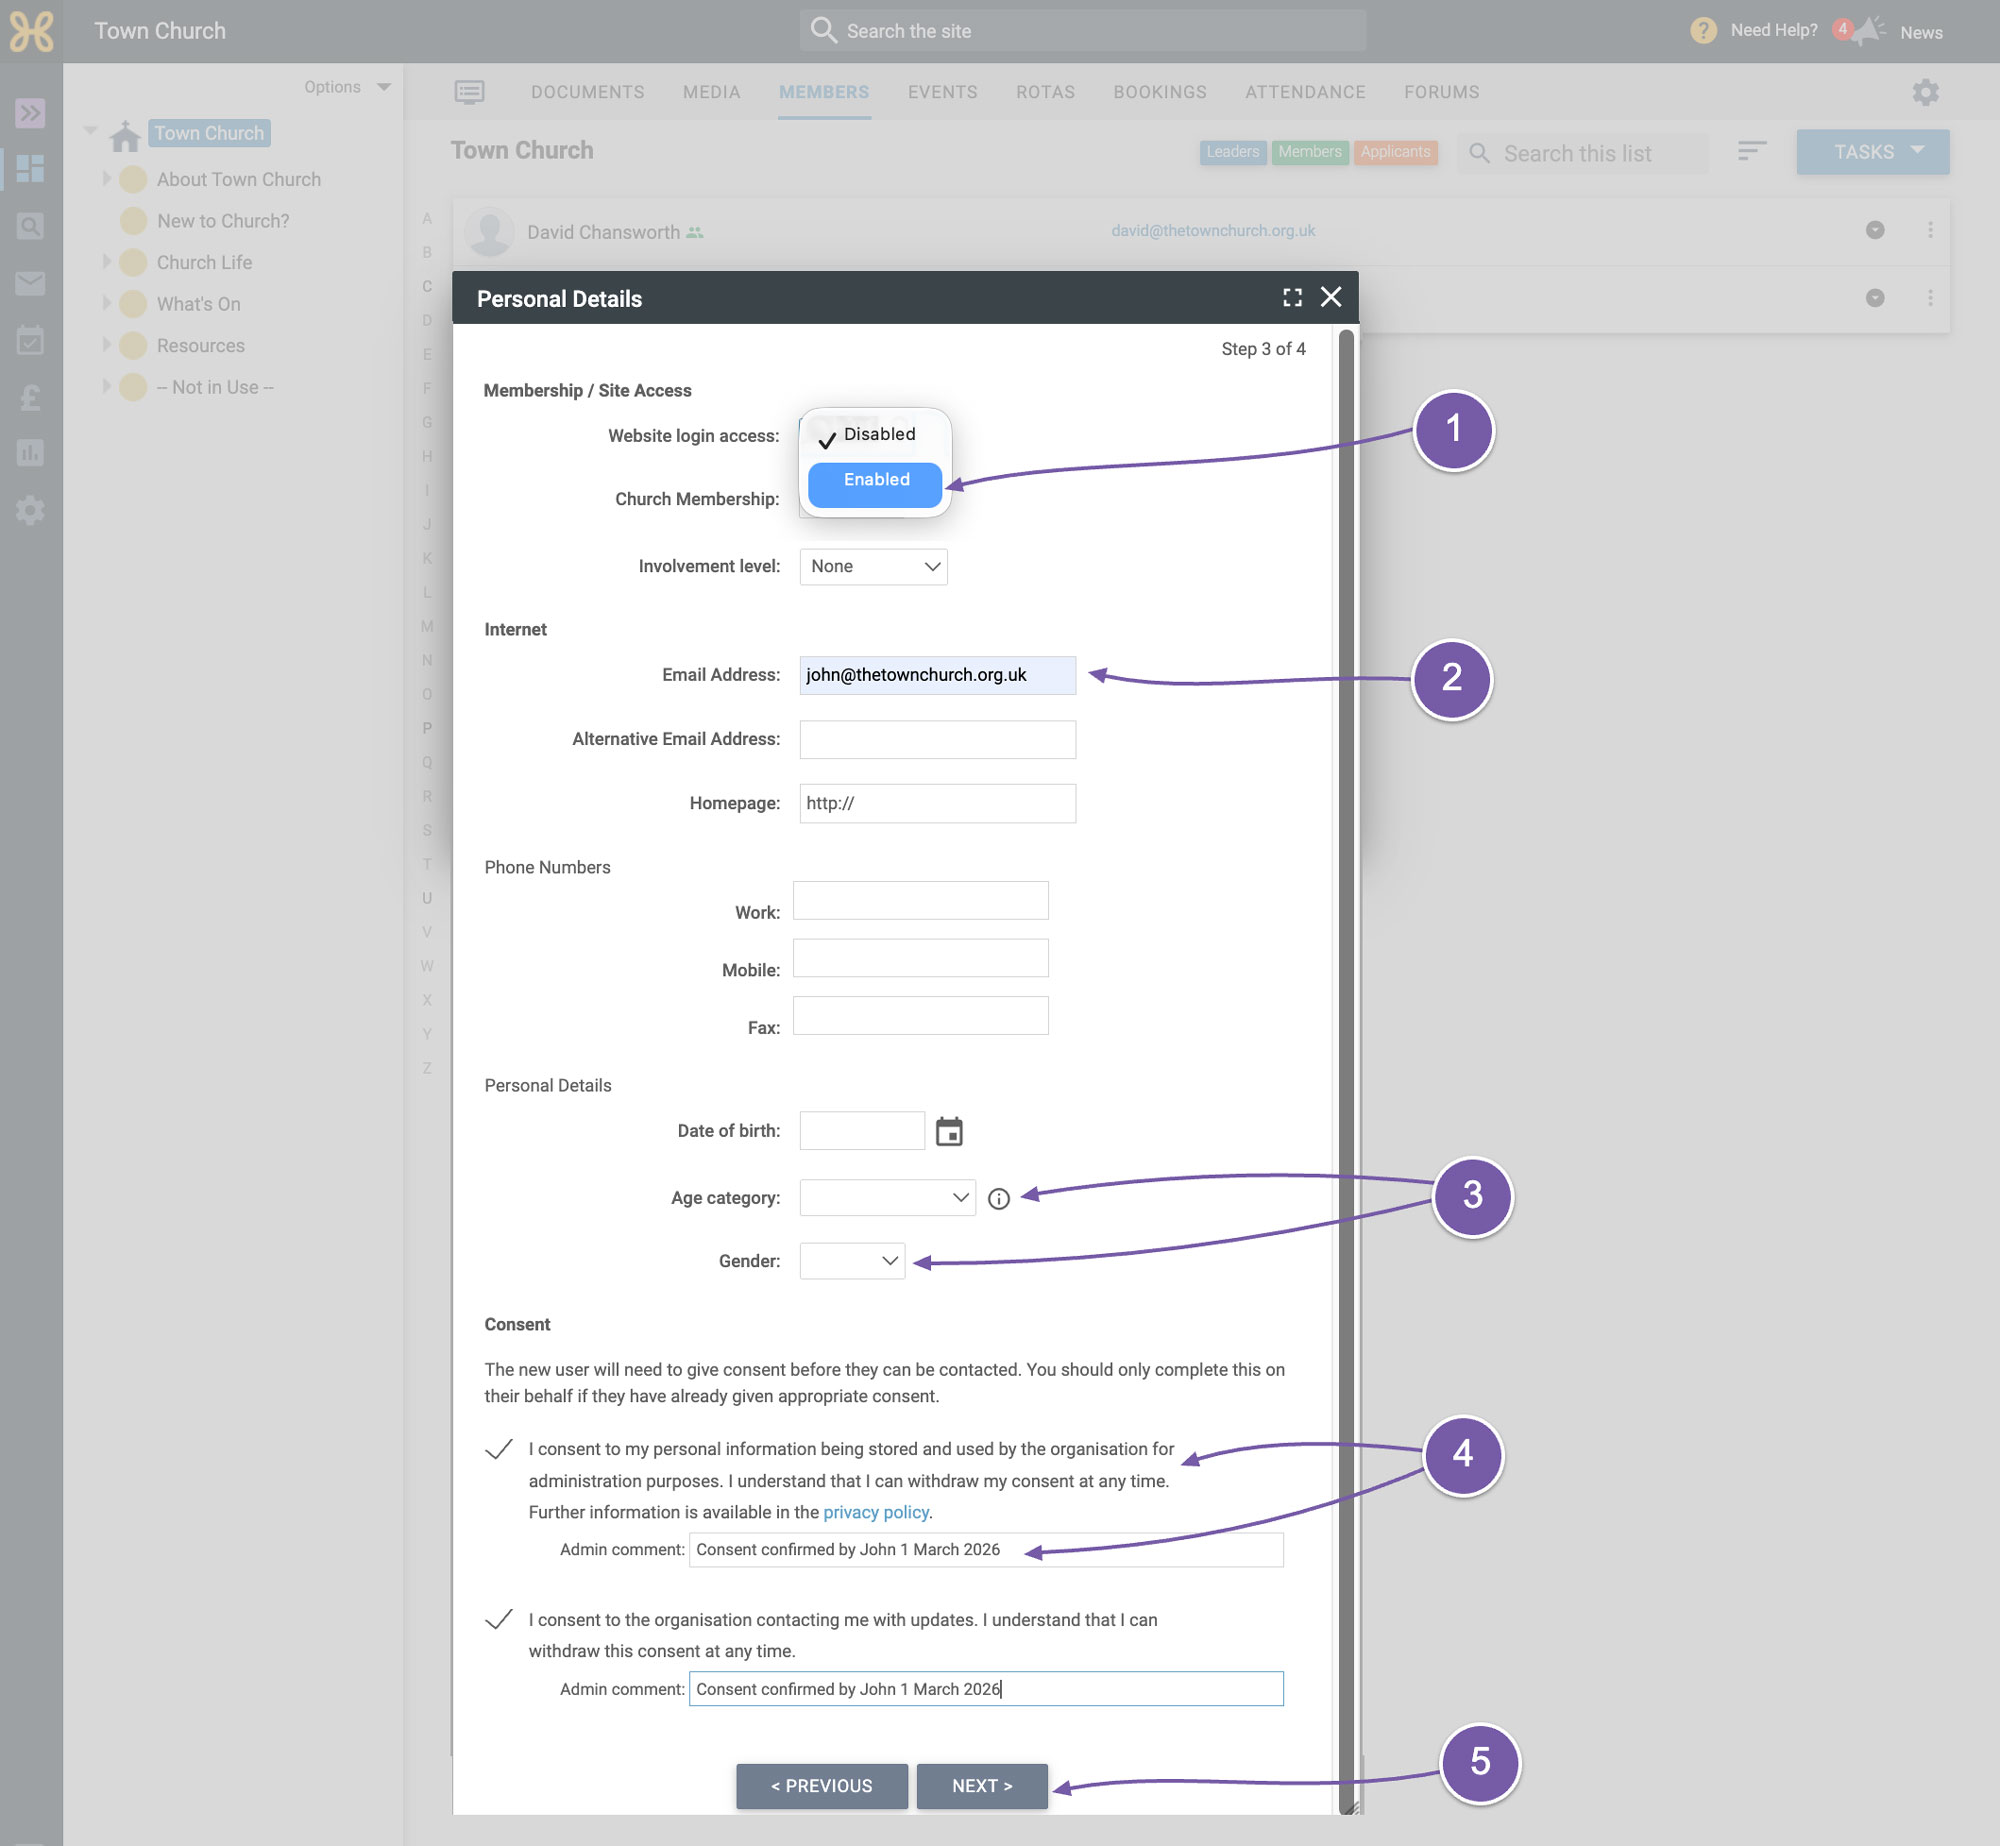
Here we need to set their account to have login access
-
and lower down their email address
-
If you want, you can add other details to their account like their gender and age category.
-
For data protection purposes, you can tick the consent boxes and put an admin note to say that you have their permission to add their data to the system. Of course, we recommend you actually get that permission before filling these settings in.
-
Then scroll right down to the end of the box and click “Next”.
-
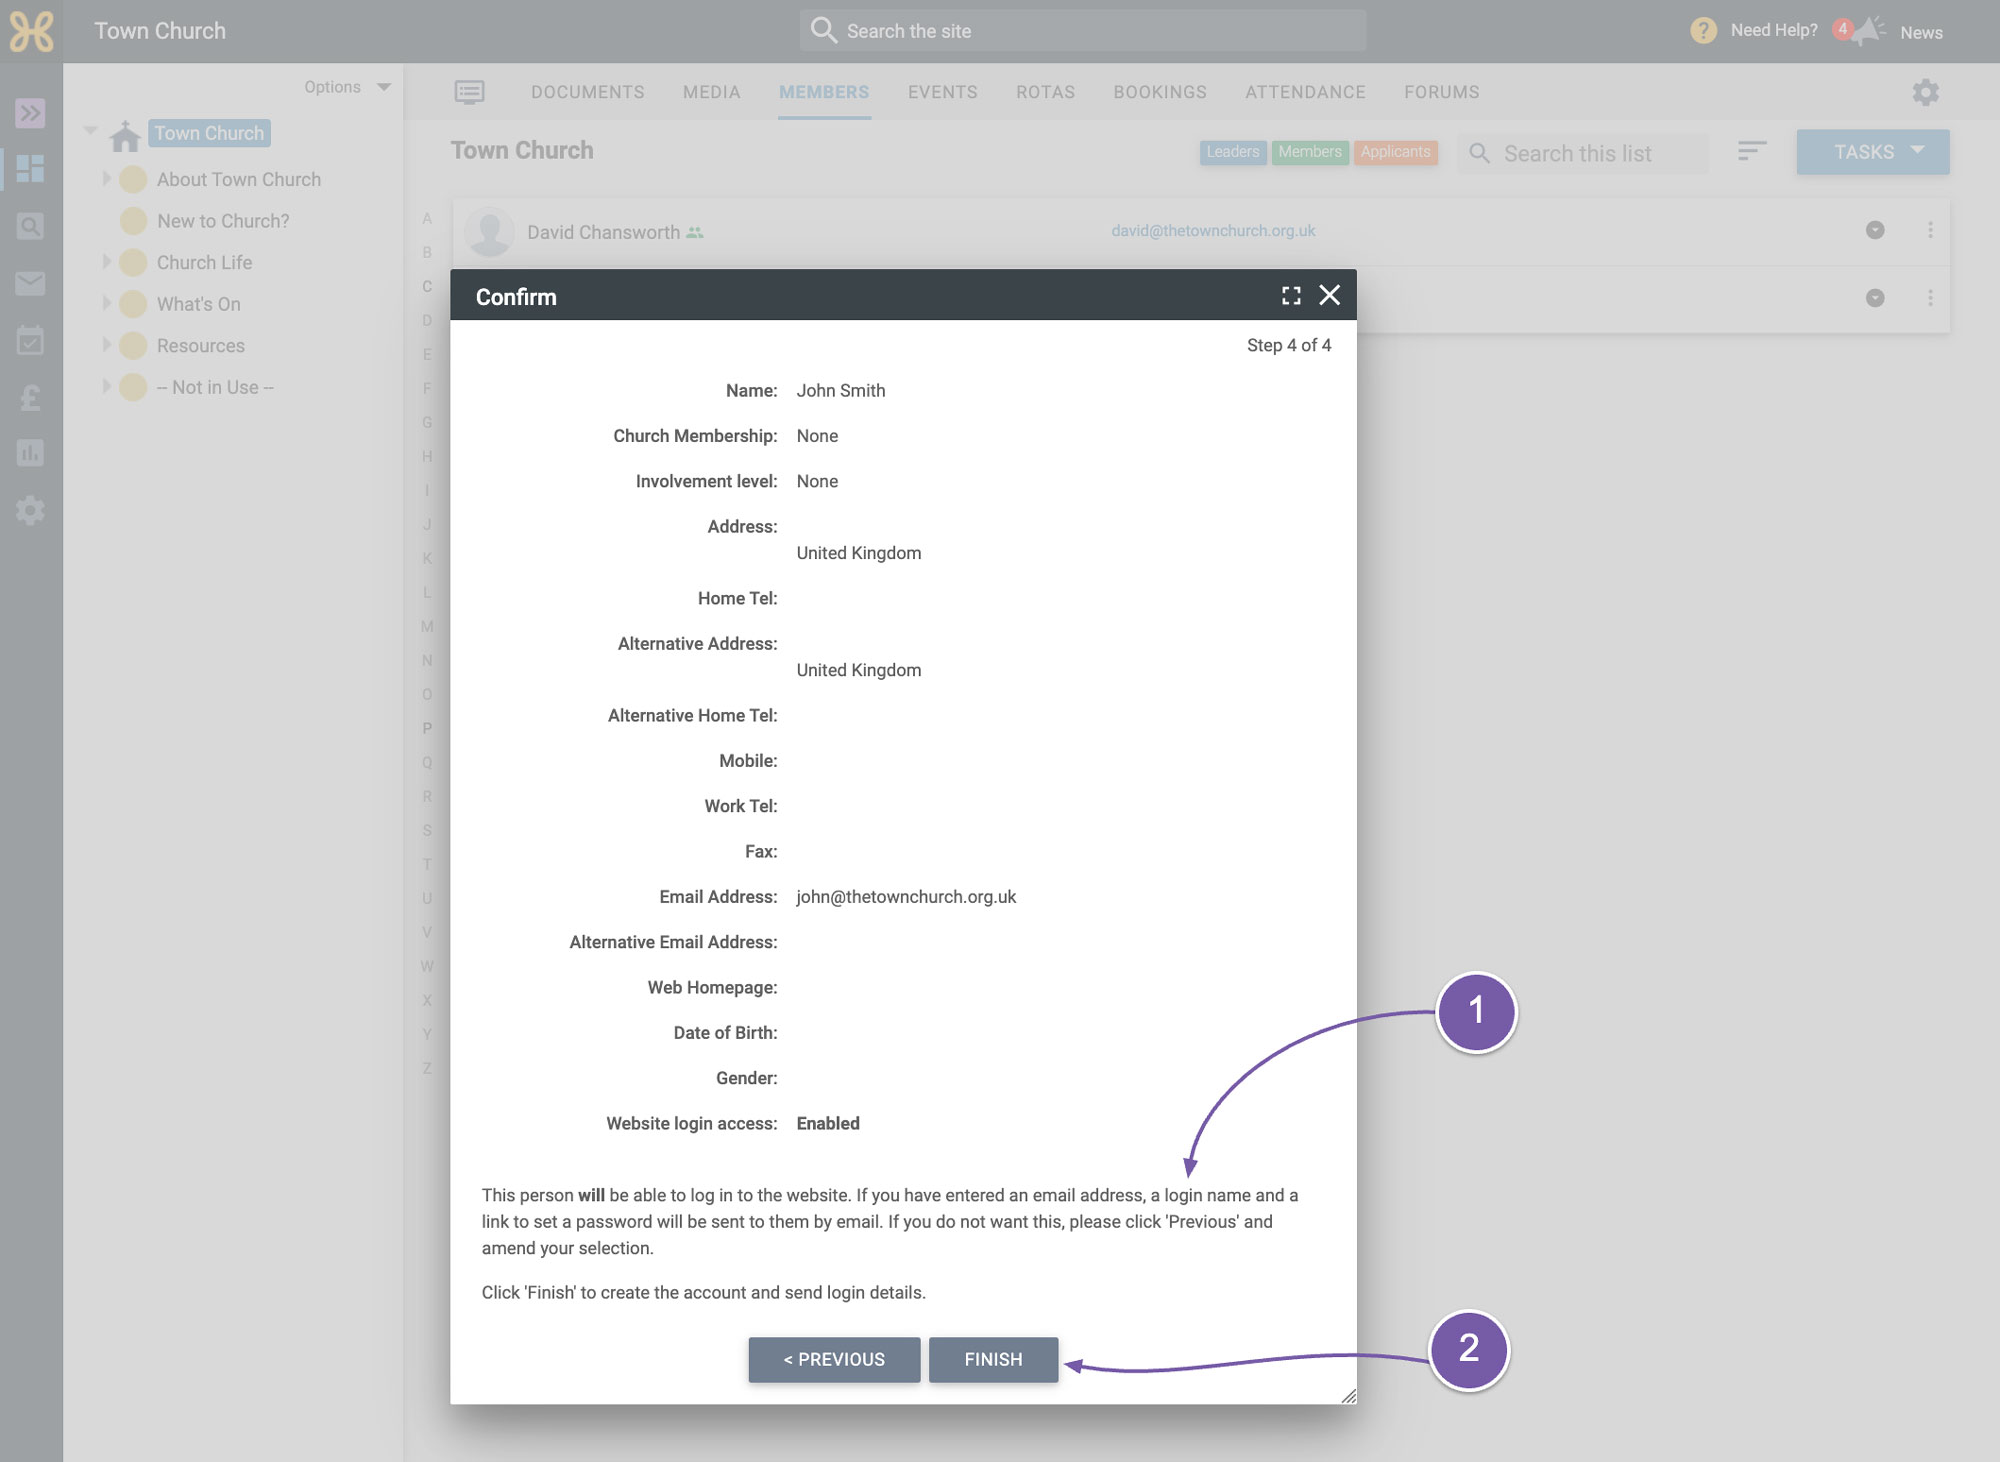
You then get to review the information you have put in and you can see the notice that says “A login name and a link to set a password will be sent to them by email”.
-
To complete this process, you just need to click on the “Finish” button. See the final confirmation that the user has been created and continue to see the person has been added to the member database.
Again, I want to recommend that you watch our “
Permissions Overview” video to get a good understanding of how permissions work and how you can use them to only give access to what people need and give them a simple user interface.
We now need to go and
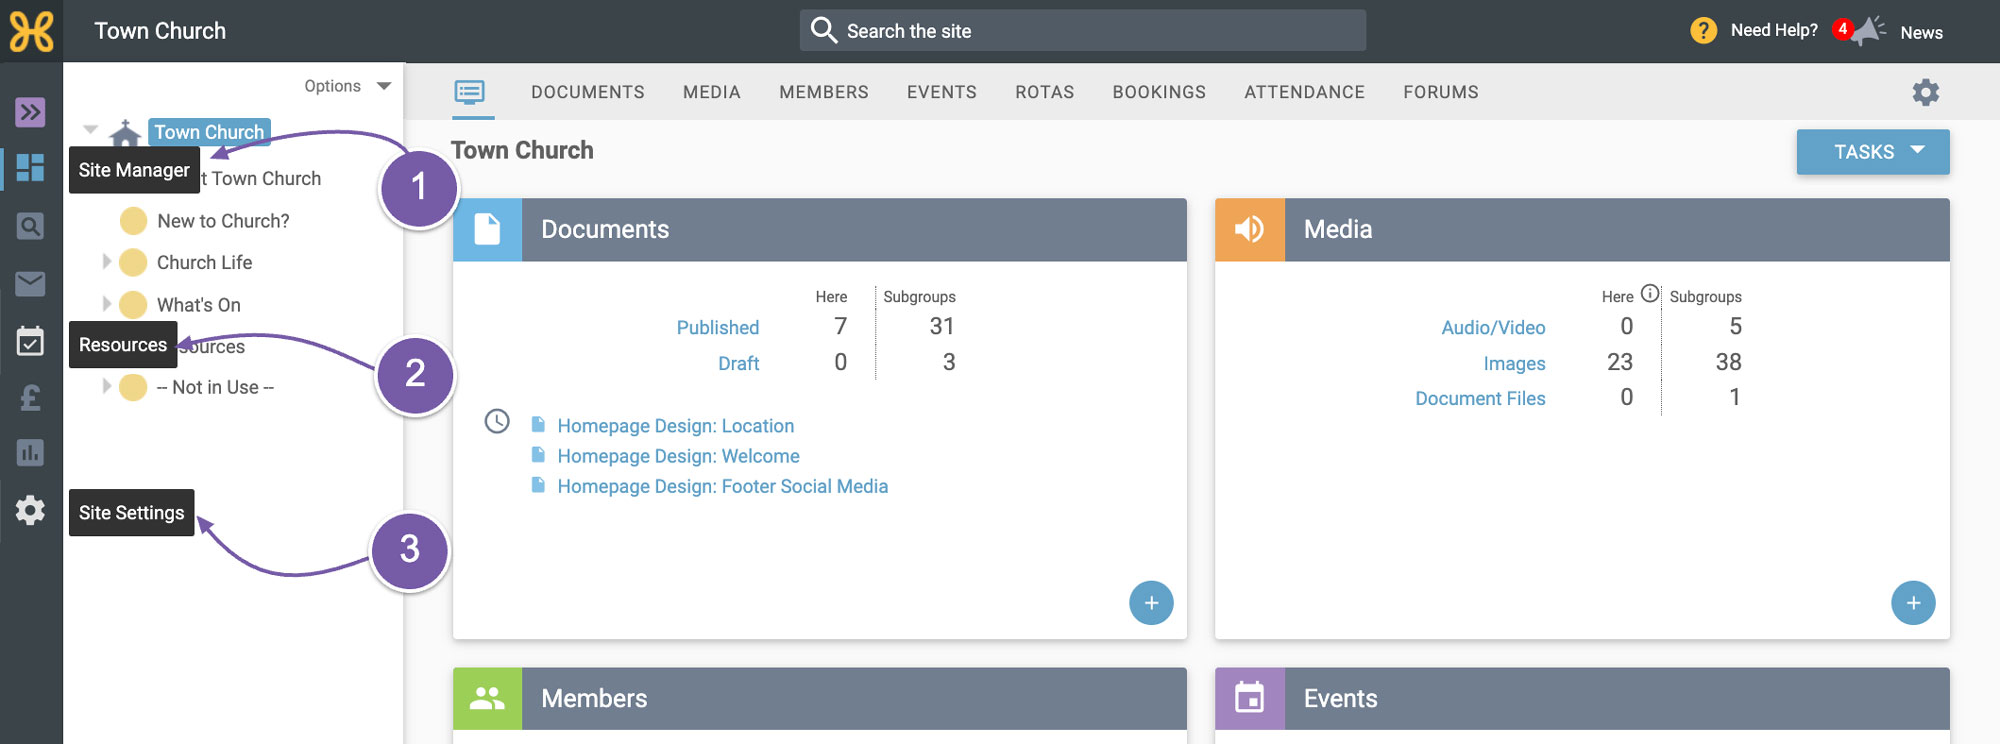
give our new users some permissions to help with managing the Hubb system. To do this, there are three places we can give them permissions:
-
The "Site Manager"
-
"Resources"
-
and "Site Settings”
We will go through each of these and you can decide whether to give all of the permissions available or give a slimmed down set.
-
Firstly, we will look at the “Site Manager Permissions”.
-
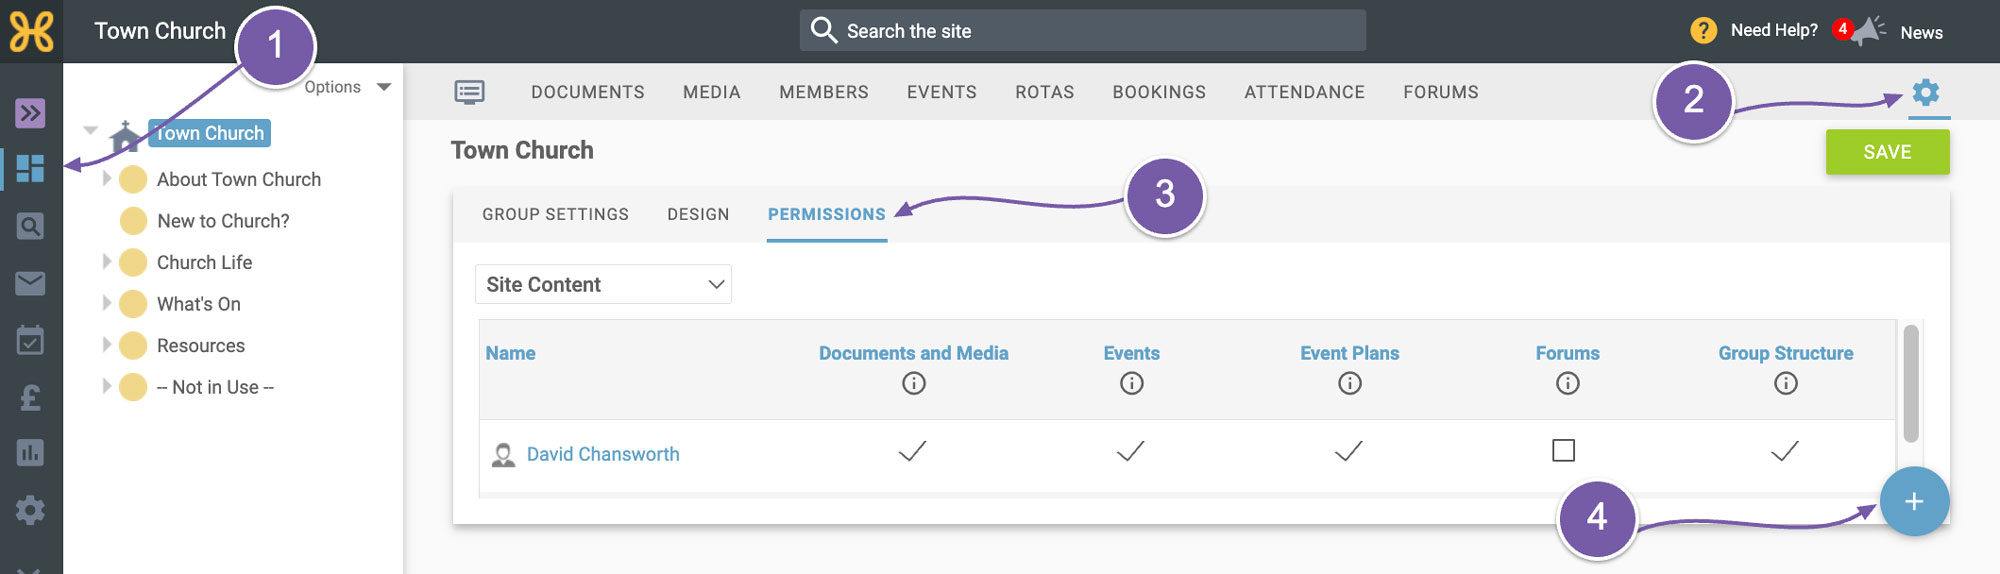
To set Site Manager permissions, you need to click on the "Group Settings" tab for the group and subgroups you want to give permissions on
-
Then click on the “Permissions” tab.
-
Here you need to click on the blue “+” icon at the bottom right of the screen to bring up the user picker
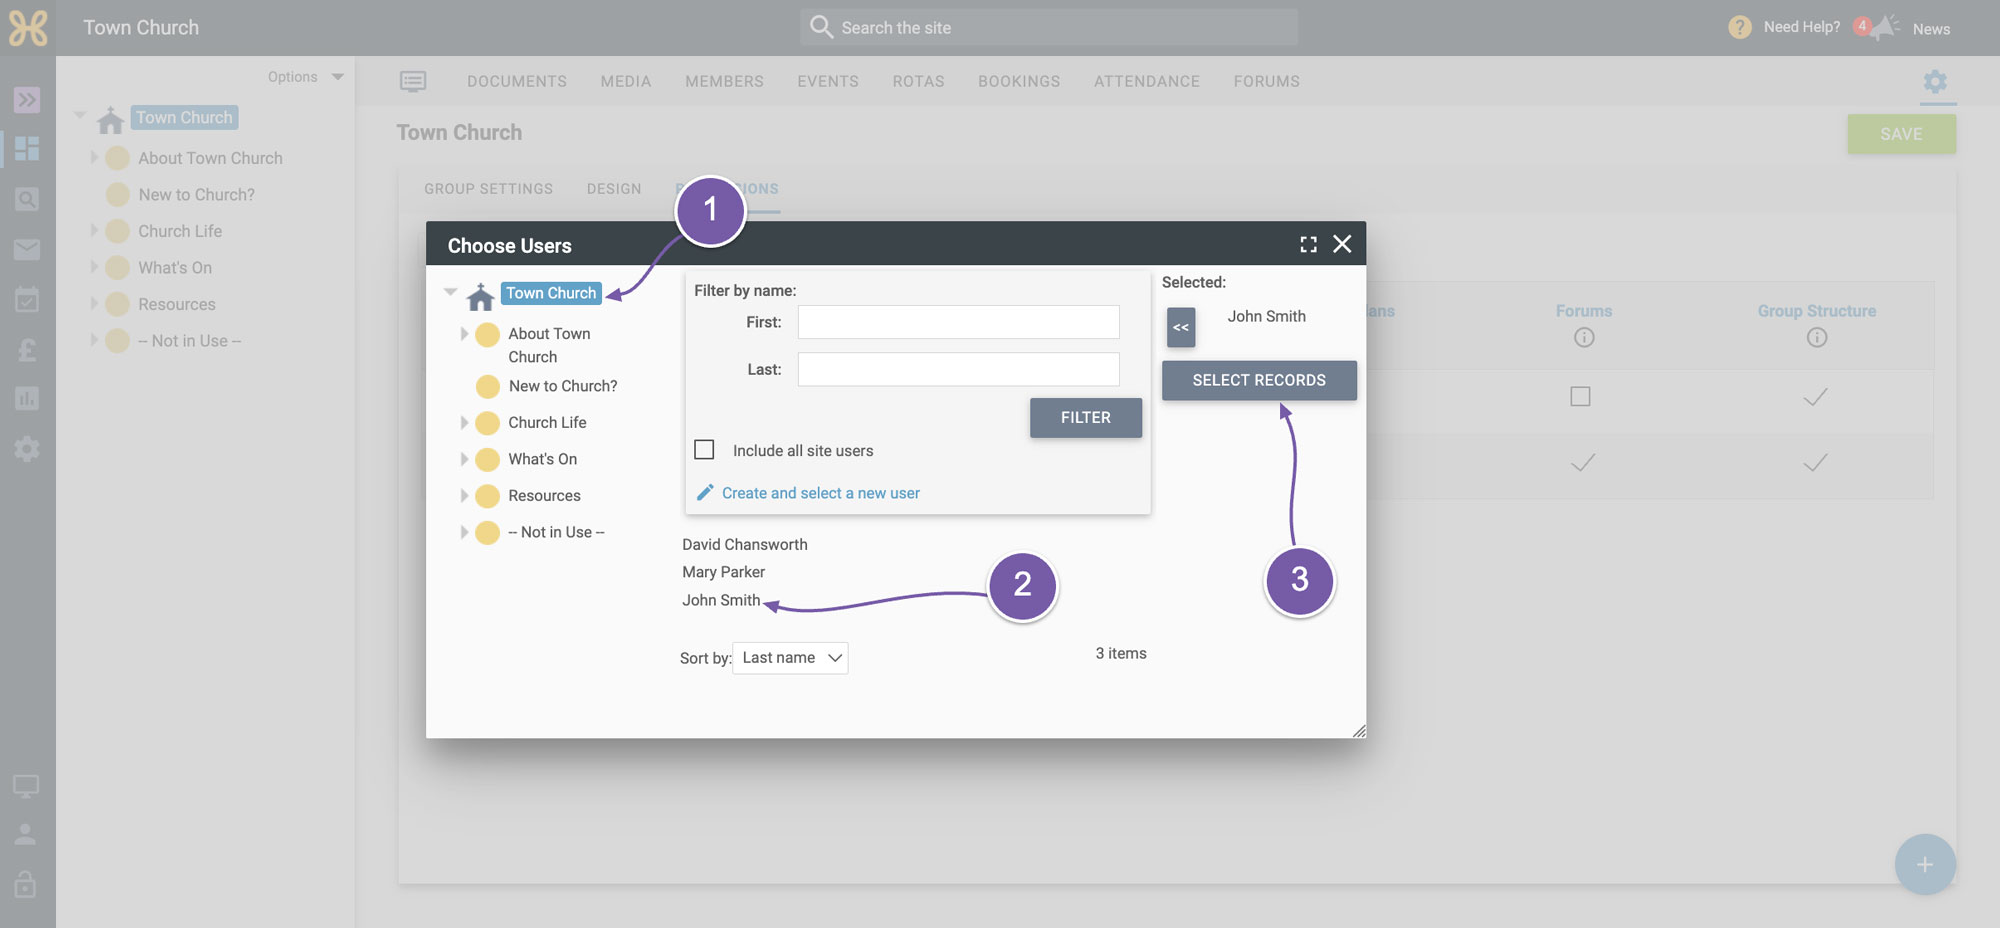
Find the person you want to add by:
-
Selecting on the group they are in
-
Clicking on their name
-
Then clicking on the “Select Records” button
-
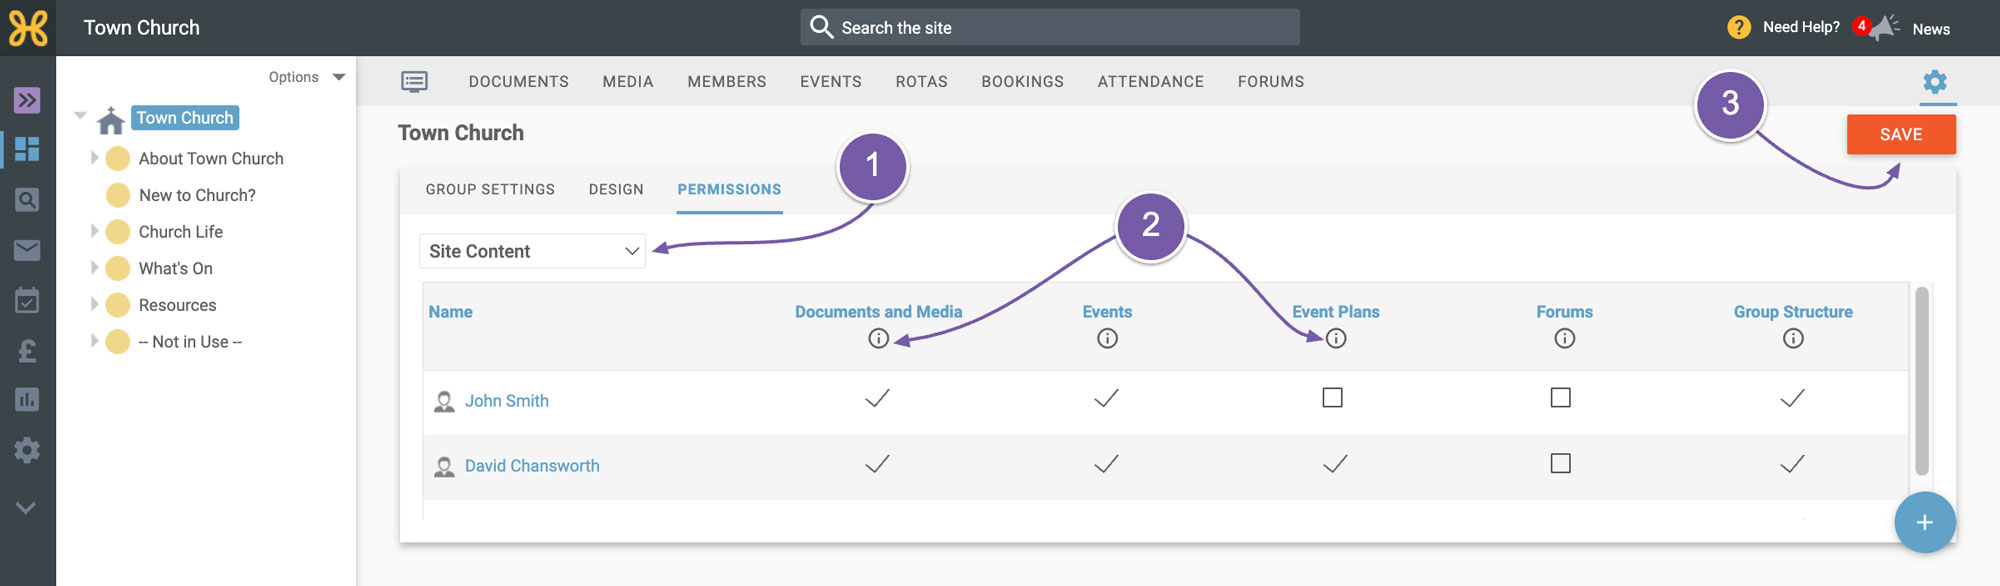
You are now on the "Site Content" dropdown. These permissions allow people to edit the content of the website without giving access to the people data or church admin features. Perfect for assigning to your volunteers or staff who are just managing the website. You can select any of these permissions to give to the user.
-
If you need to know what each permission does, you can click on the “Info” icon under each permission title. Tick the relevant permissions for your new user.
-
When you are done, you must click “Save” before moving on to give more permissions.
-
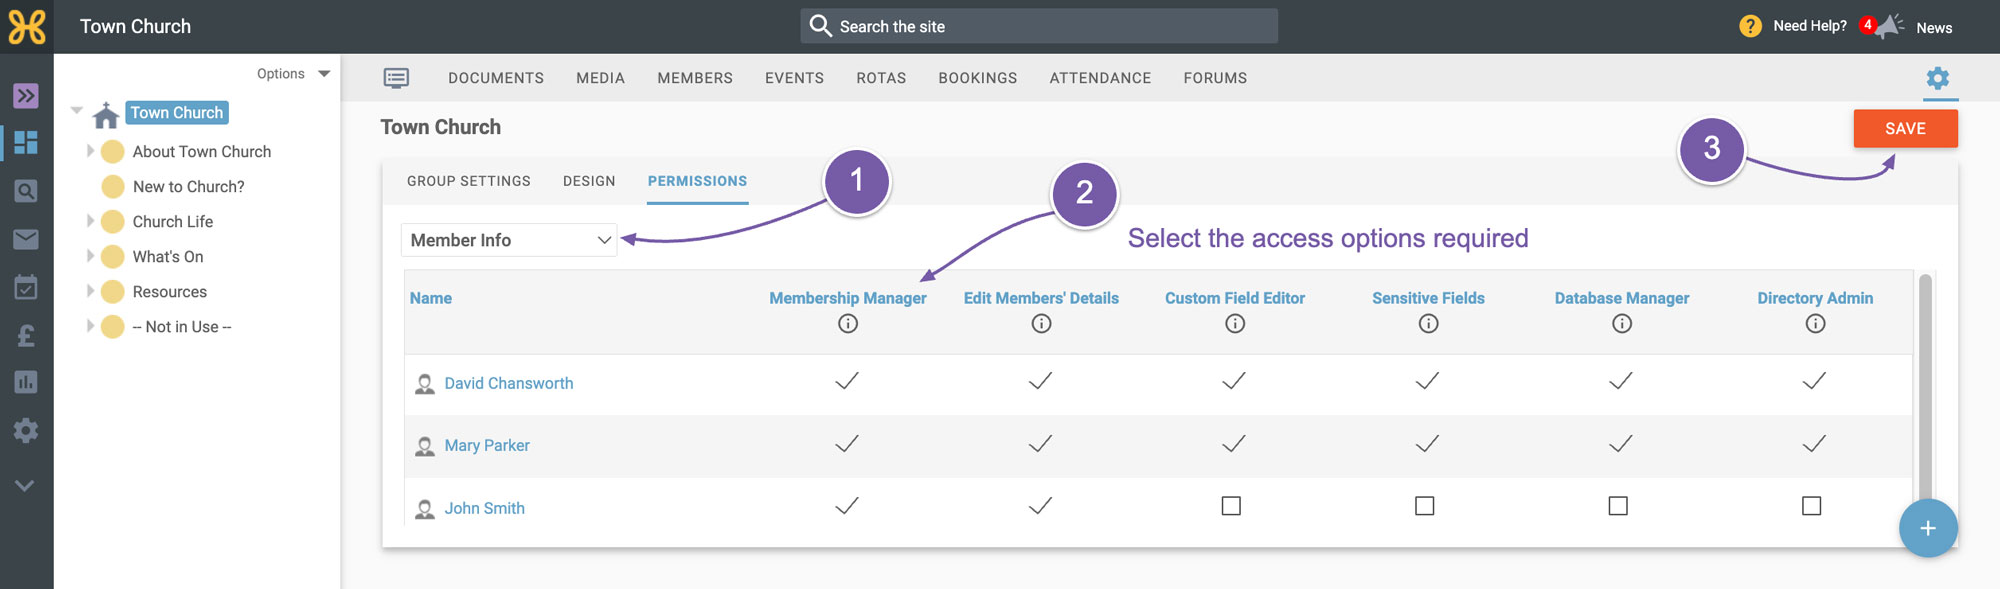
To give more Site Manager permissions, we can select another permission set from the dropdown on the top left of the permissions area. The next permission set is “Member Info” which give access to your members' data that is stored in the Hubb.
-
You can go ahead and choose the access you give to people.
-
Click "Save"
-
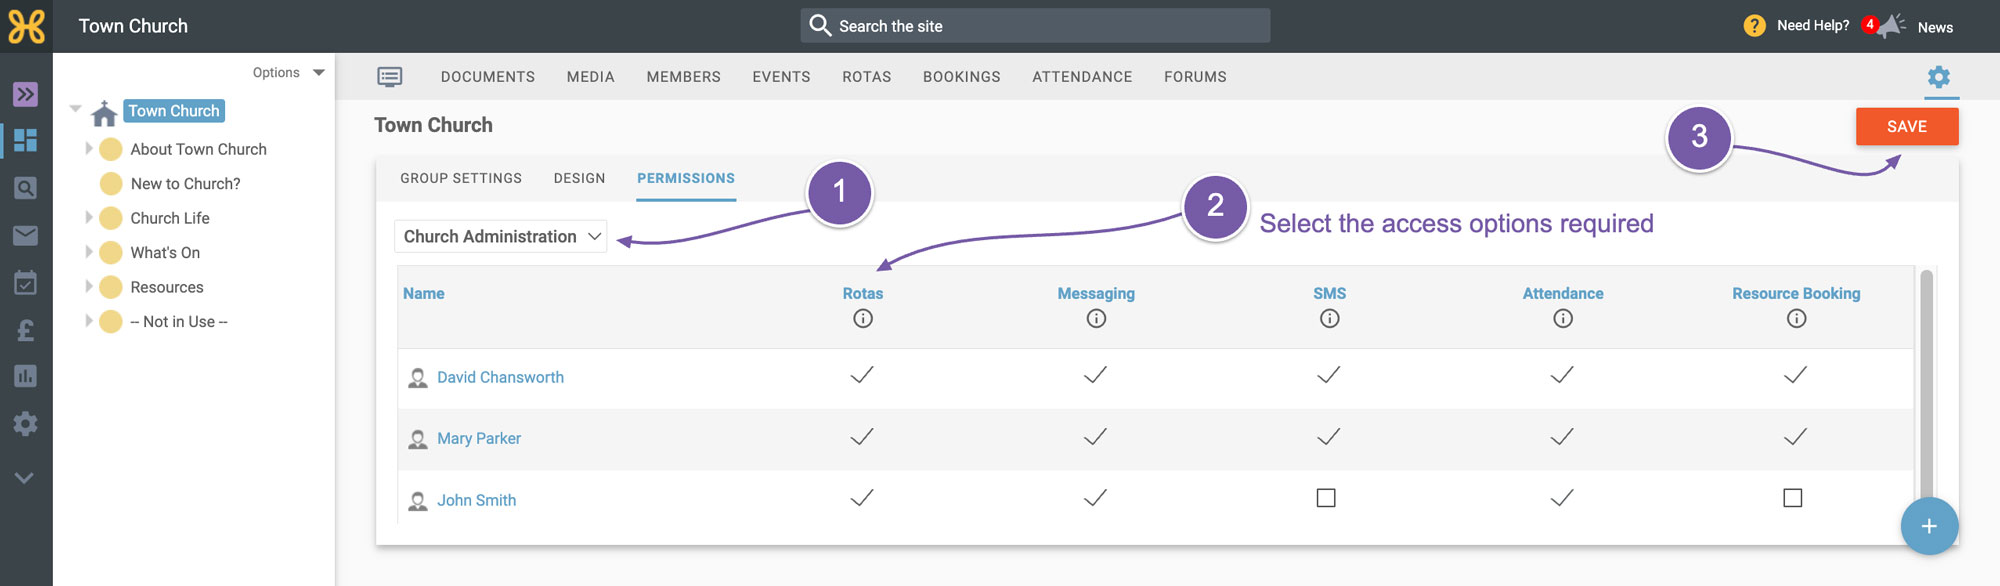
Then move on to the next permission set, which is "Church Administration". These are the features for running the activities that go on at the church.
-
Again, select any of these permissions and click on the “Info” icon for more information
-
Click "Save"
-
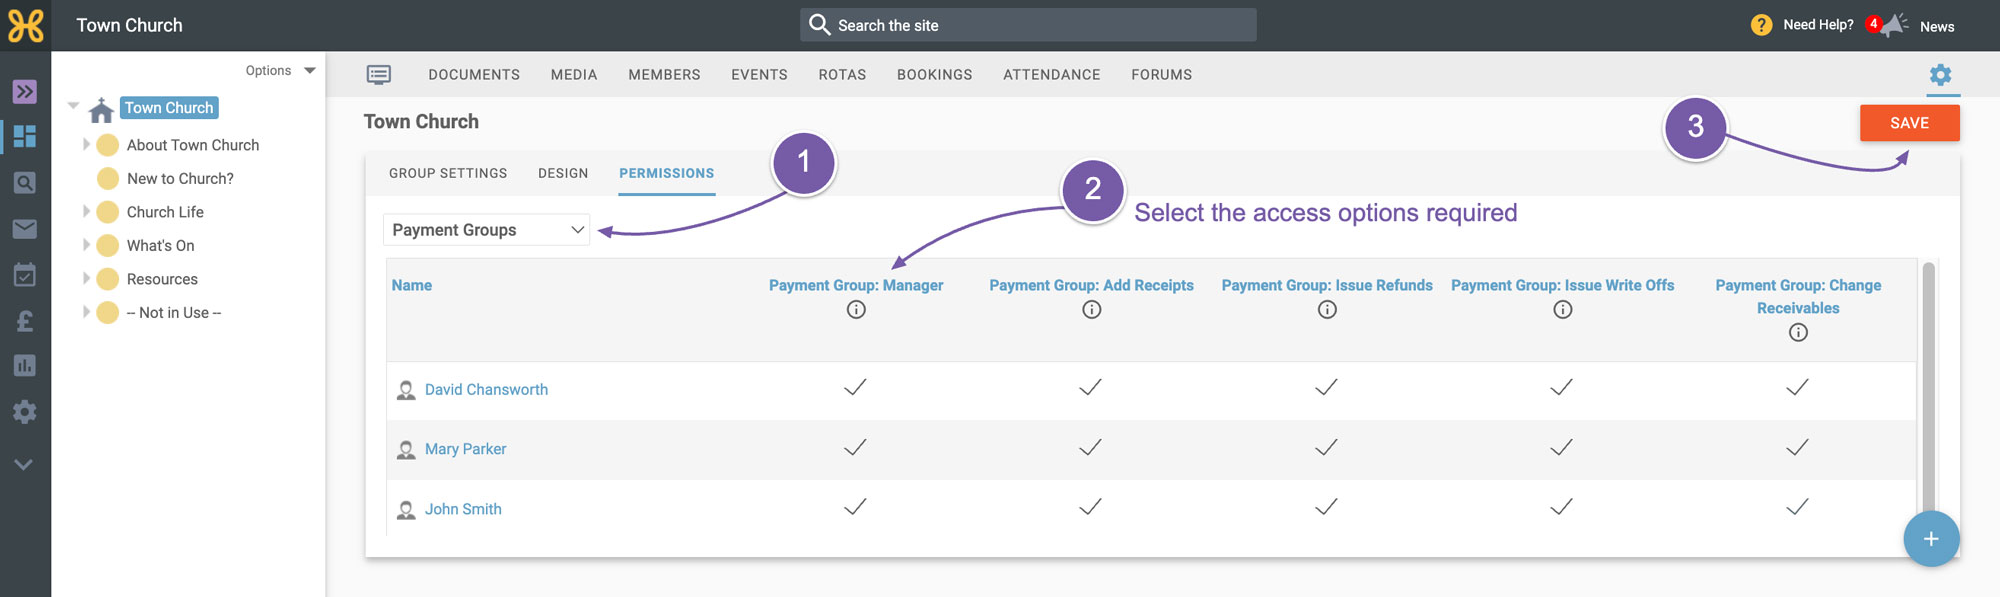
The last permission set is “Payment Groups” - special groups in Hubb that allow you to take money for online donations or event bookings.
-
When you are done adding these permissions,
-
Click on "Save"
The next area is the
“Resources” area.
"Resources" is where you manage your rooms, equipment and any other resources you need to track in order to help track who's using what for your church activities and any external bookings you make at your church. We will focus on this area fully on a later video, but for now, you just need to know how to give another person access to it so they can get started and help you manage your Hubb site.
-
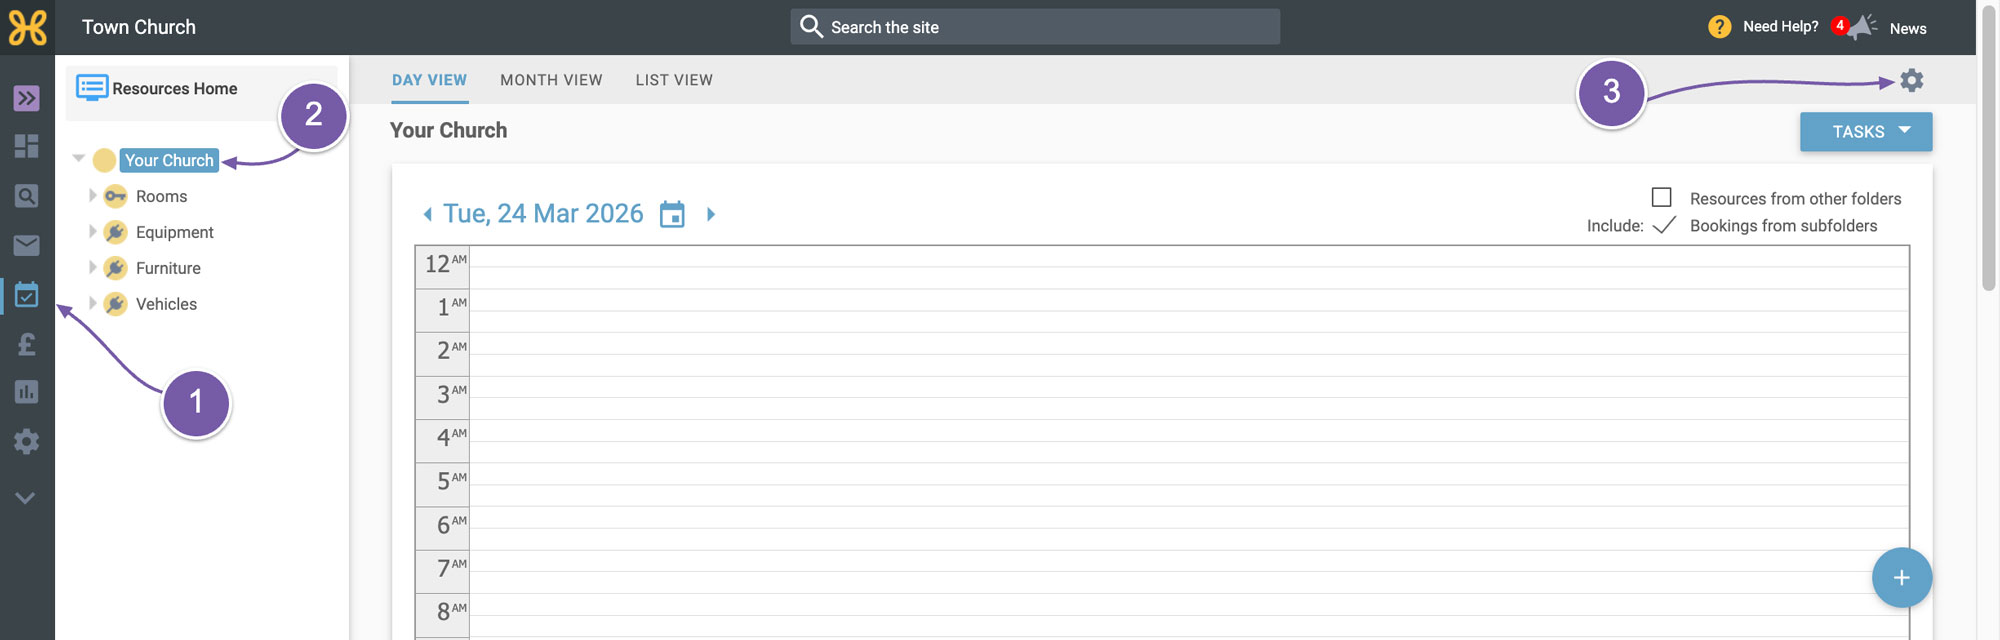
To give permissions for resources, click on the resources icon on the far left of the screen
-
Select the top group in the “Resources” tree
-
Then click on the “Settings” icon at the top right
-
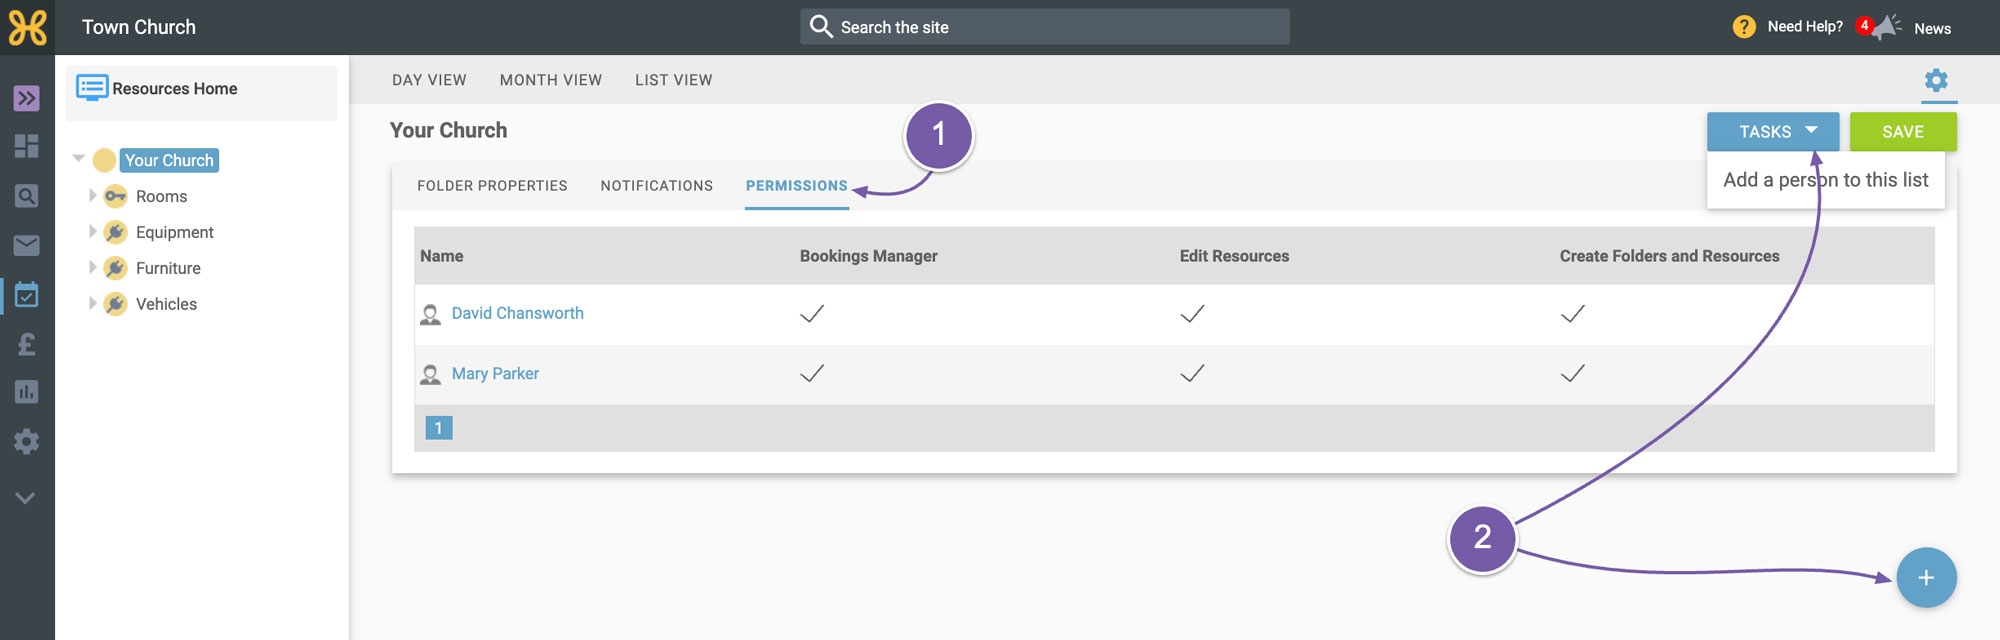
Next, click on the “Permissions” tab
-
Click on the blue “+” icon at the bottom right of the screen - or use the "Tasks" button at the top right.
-
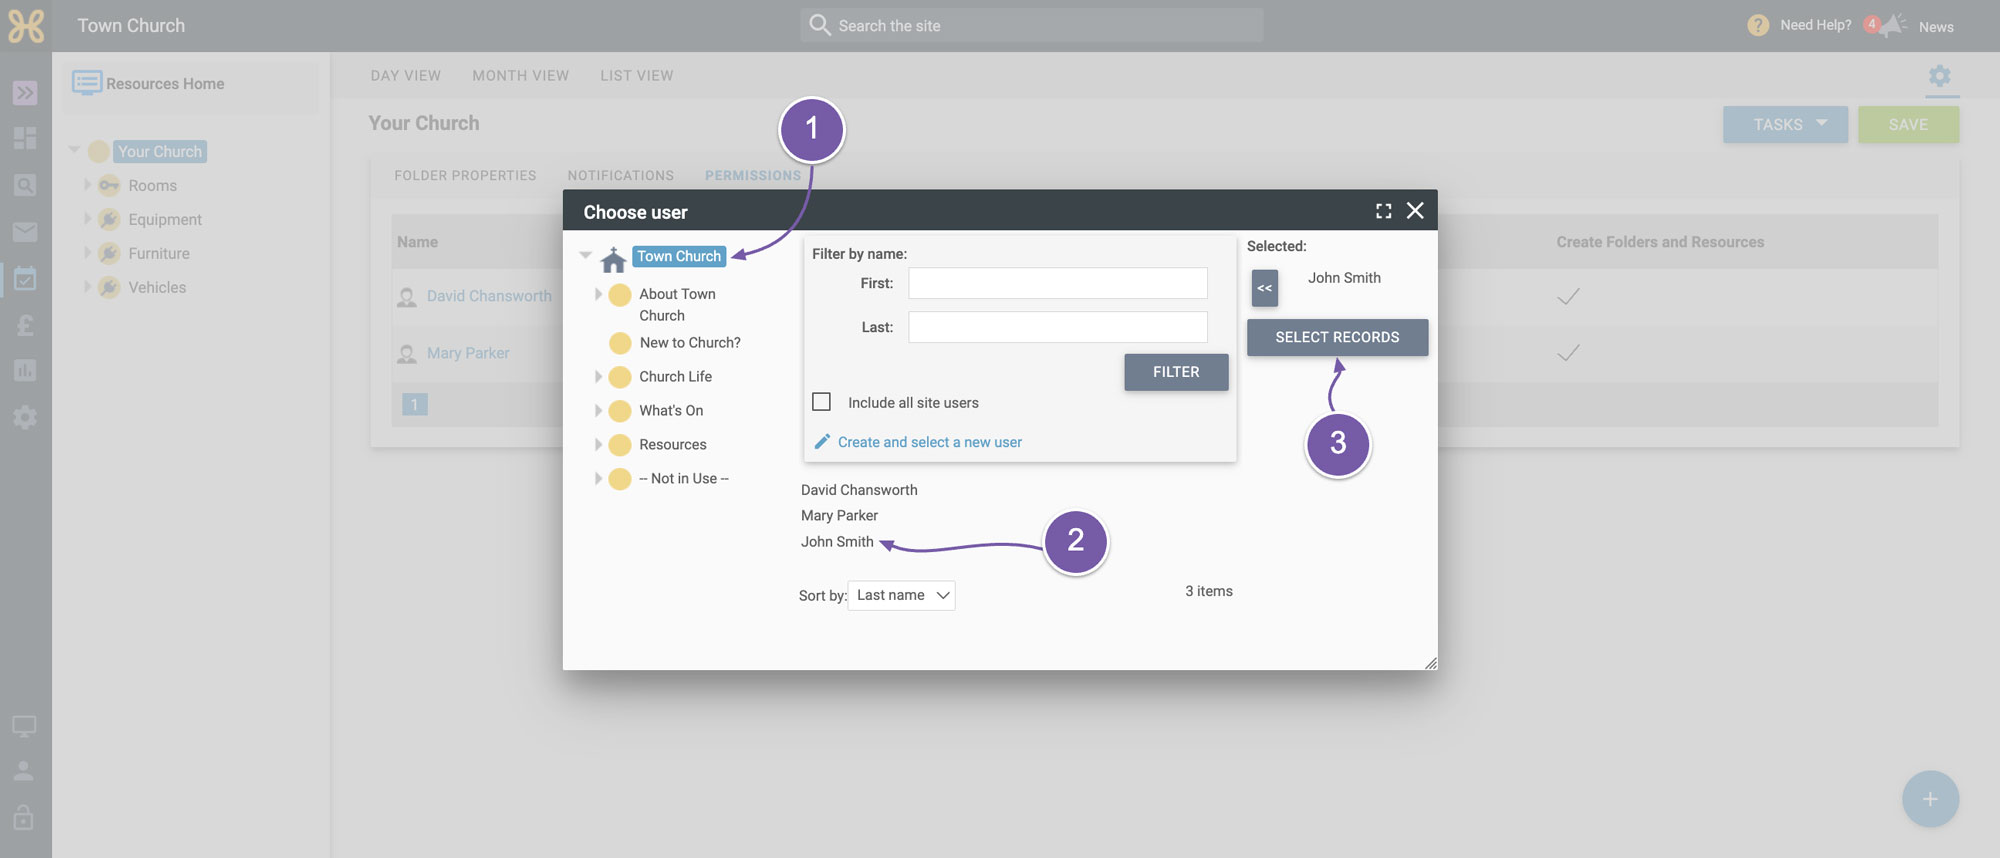
Navigate to find the user you wish to give permissions for
-
Click on their name
-
Then click “Select Records”
-
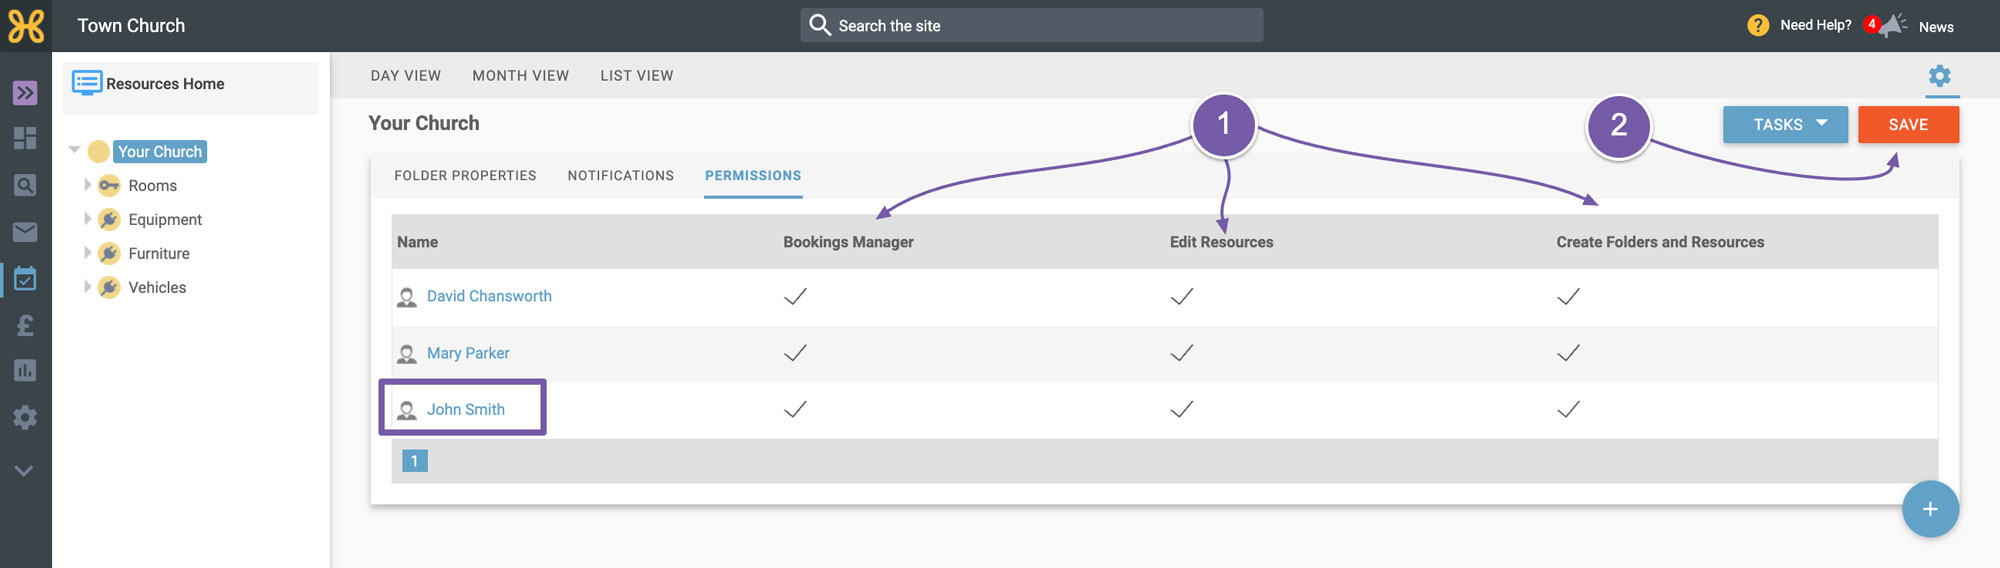
When their name appears in the list, select the permissions you would like to give. In this example, we have made them a bookings manager, which allows them to accept or reject bookings, manage existing bookings and create new ones. We've also let them edit and create resources and folders so they can keep the list of resources we have up to date.
-
Finally, click “Save”
The last thing to do is to give the user
"Site Settings" permissions.
-
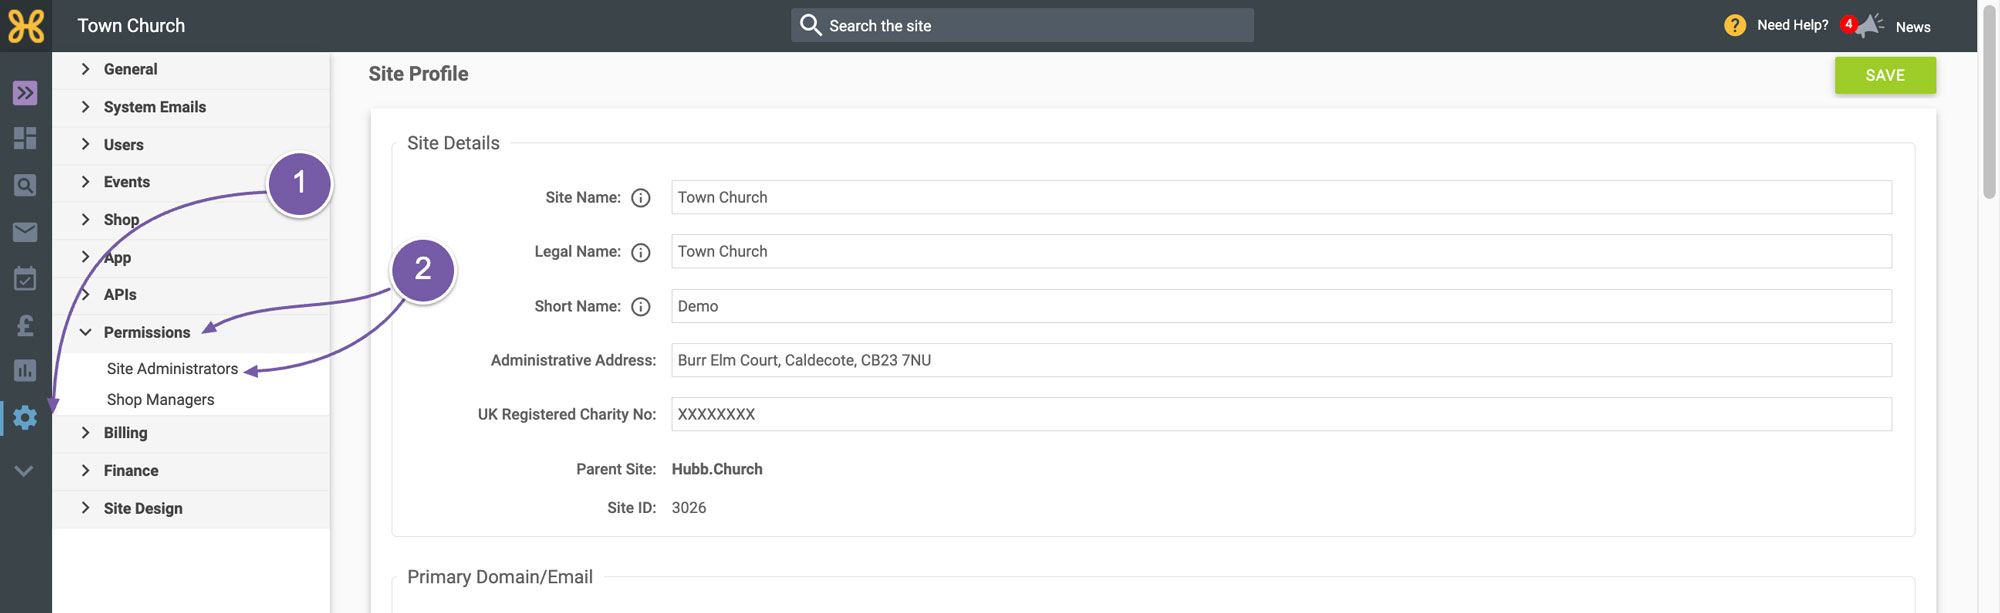
To do this, we have to go to the “Site Settings"
-
Select “Permissions”, and “Site Administrators”
-
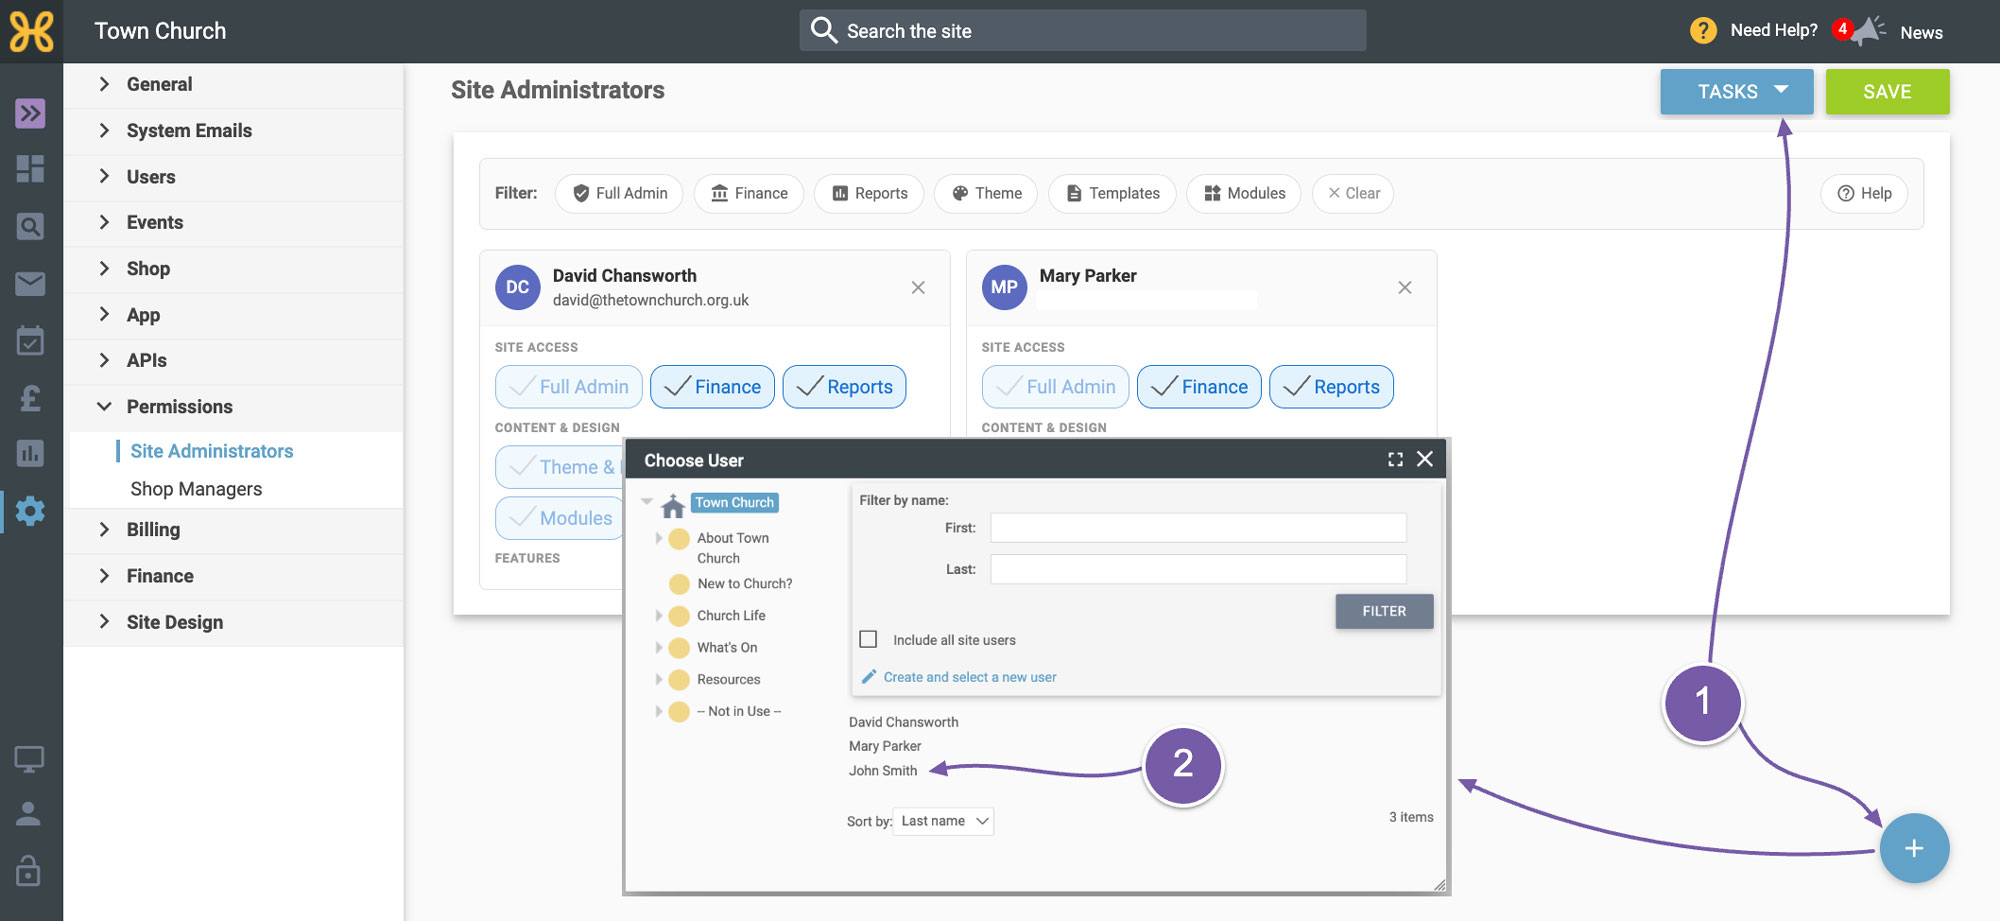
Next, click on the blue “+” icon at the bottom right of the screen or use the task at the top right.
-
Navigate to find the user you wish to give permissions for. Click on their name and the page will refresh with their name in the list.
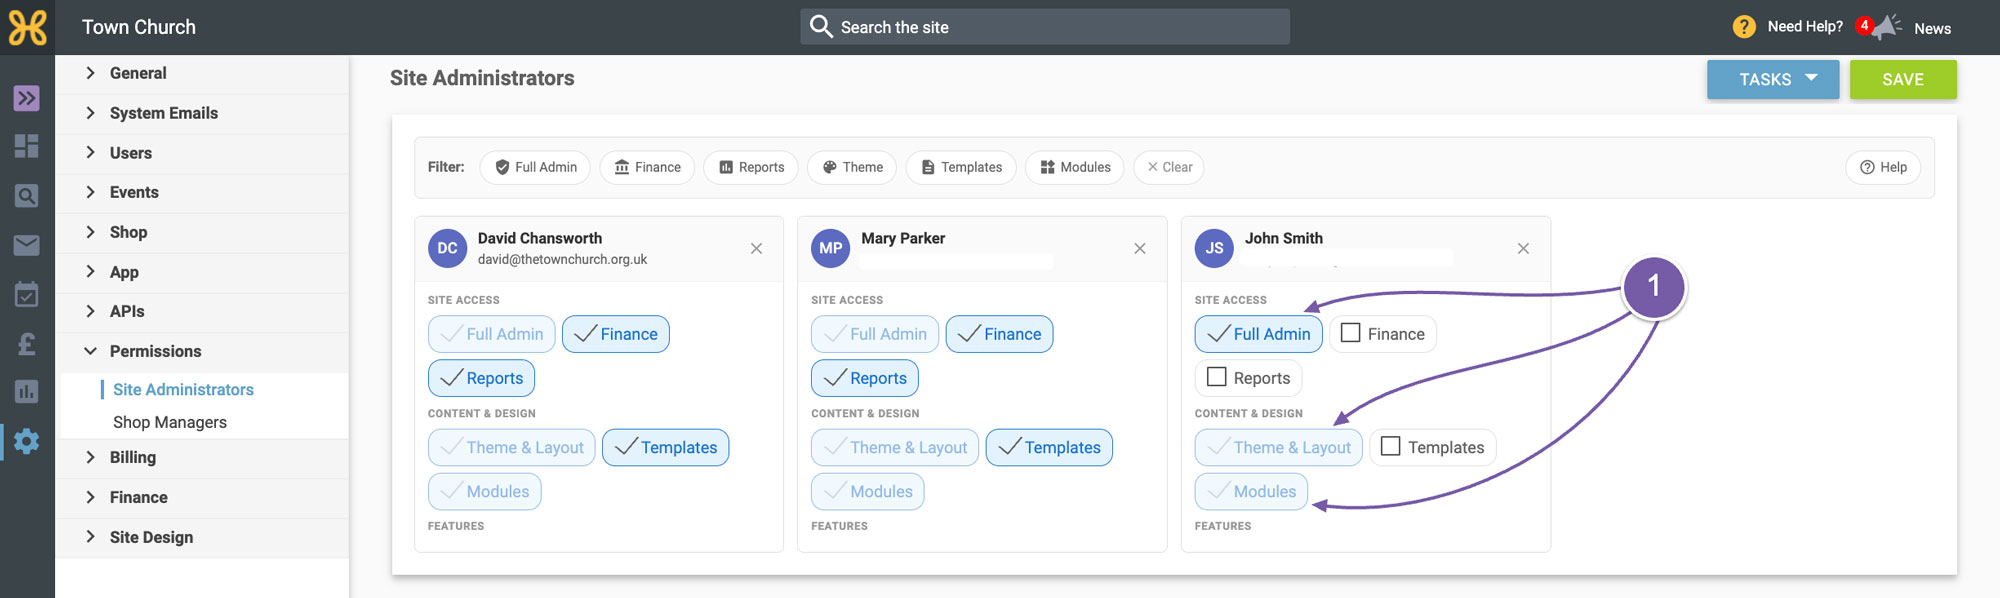
By default, we give people the full administrator permissions, which allows them to edit the site settings.
-
This permission auto assigns the design permissions called Theme and Layout, (which is our old design area) and Modules, which allows them to add Hubb modules to web pages to display feeds like a calendar or audio video feed. You can choose to remove these permissions or add them.
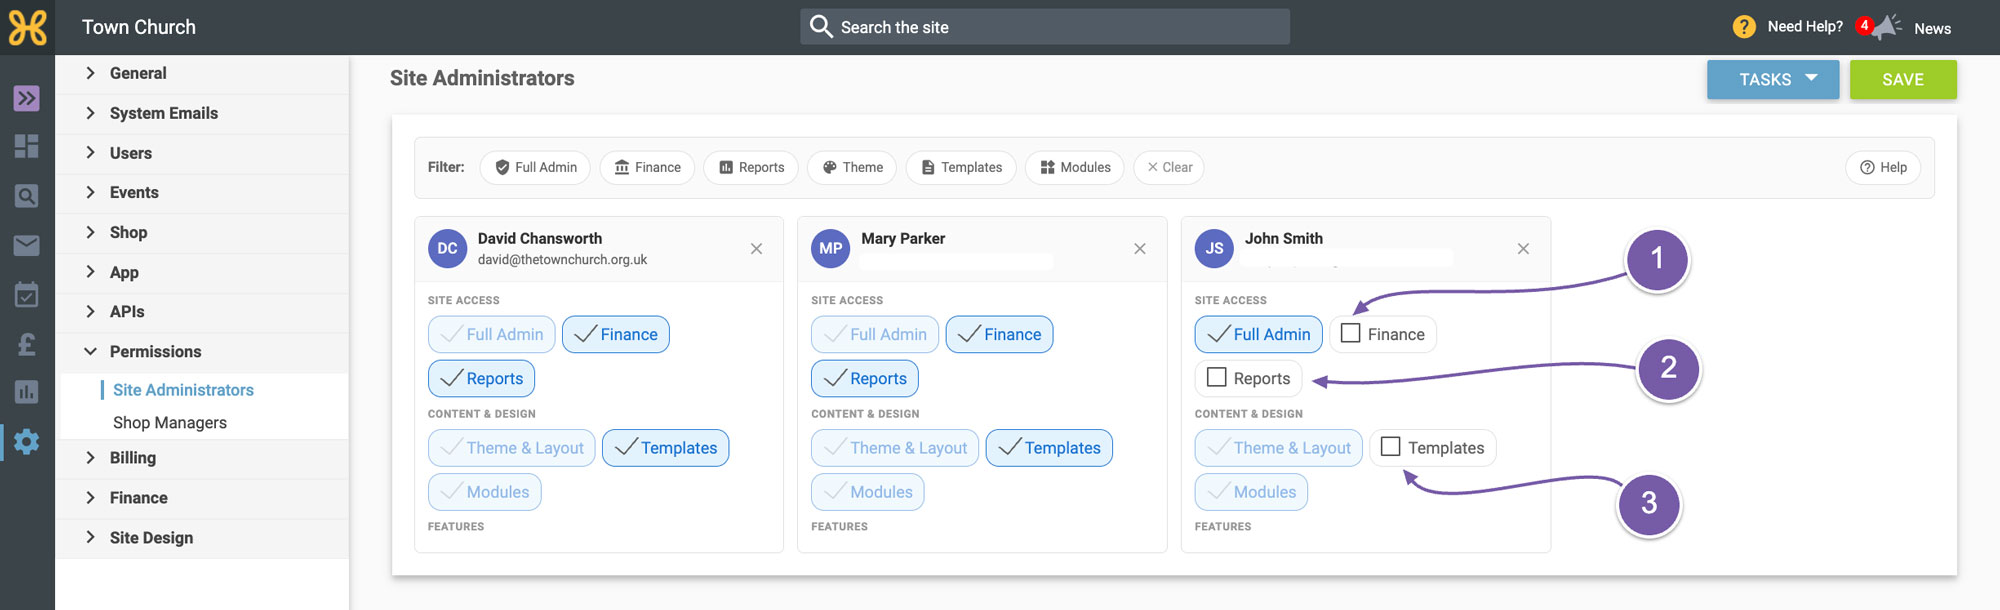
You can also add the following permissions to a person as required:
-
“Finance” gives them access to the finance area of your Hubb system. This is where you can manage all transactions in the site, import offline transactions and manage gift aid
-
“Reports” permission enables the reports area to be active for the user
-
“Template Access” gives permission to edit the design templates that your site is using. As this is a code-based design area, you really want to limit the permissions to as few people as possible. And if you need help with editing the layout of the website, just contact our support team.
So now you can add a person to your Hubb site and give them permissions to help you manage the website, admin and operations that go on in your church.