How the 'Book our Venue' page works
(8 minutes)
Learn about how our venue booking page works, and how to add your own room details, images and setup the enquiry form notification.
Sorry, your browser is unable to play this type of file.
You can still
download it
We know that many churches have rooms or halls they book out for external customers, and we wanted to give every church that starts with Hubb a good page to profile their venue, take enquiries and take payment for bookings.
-
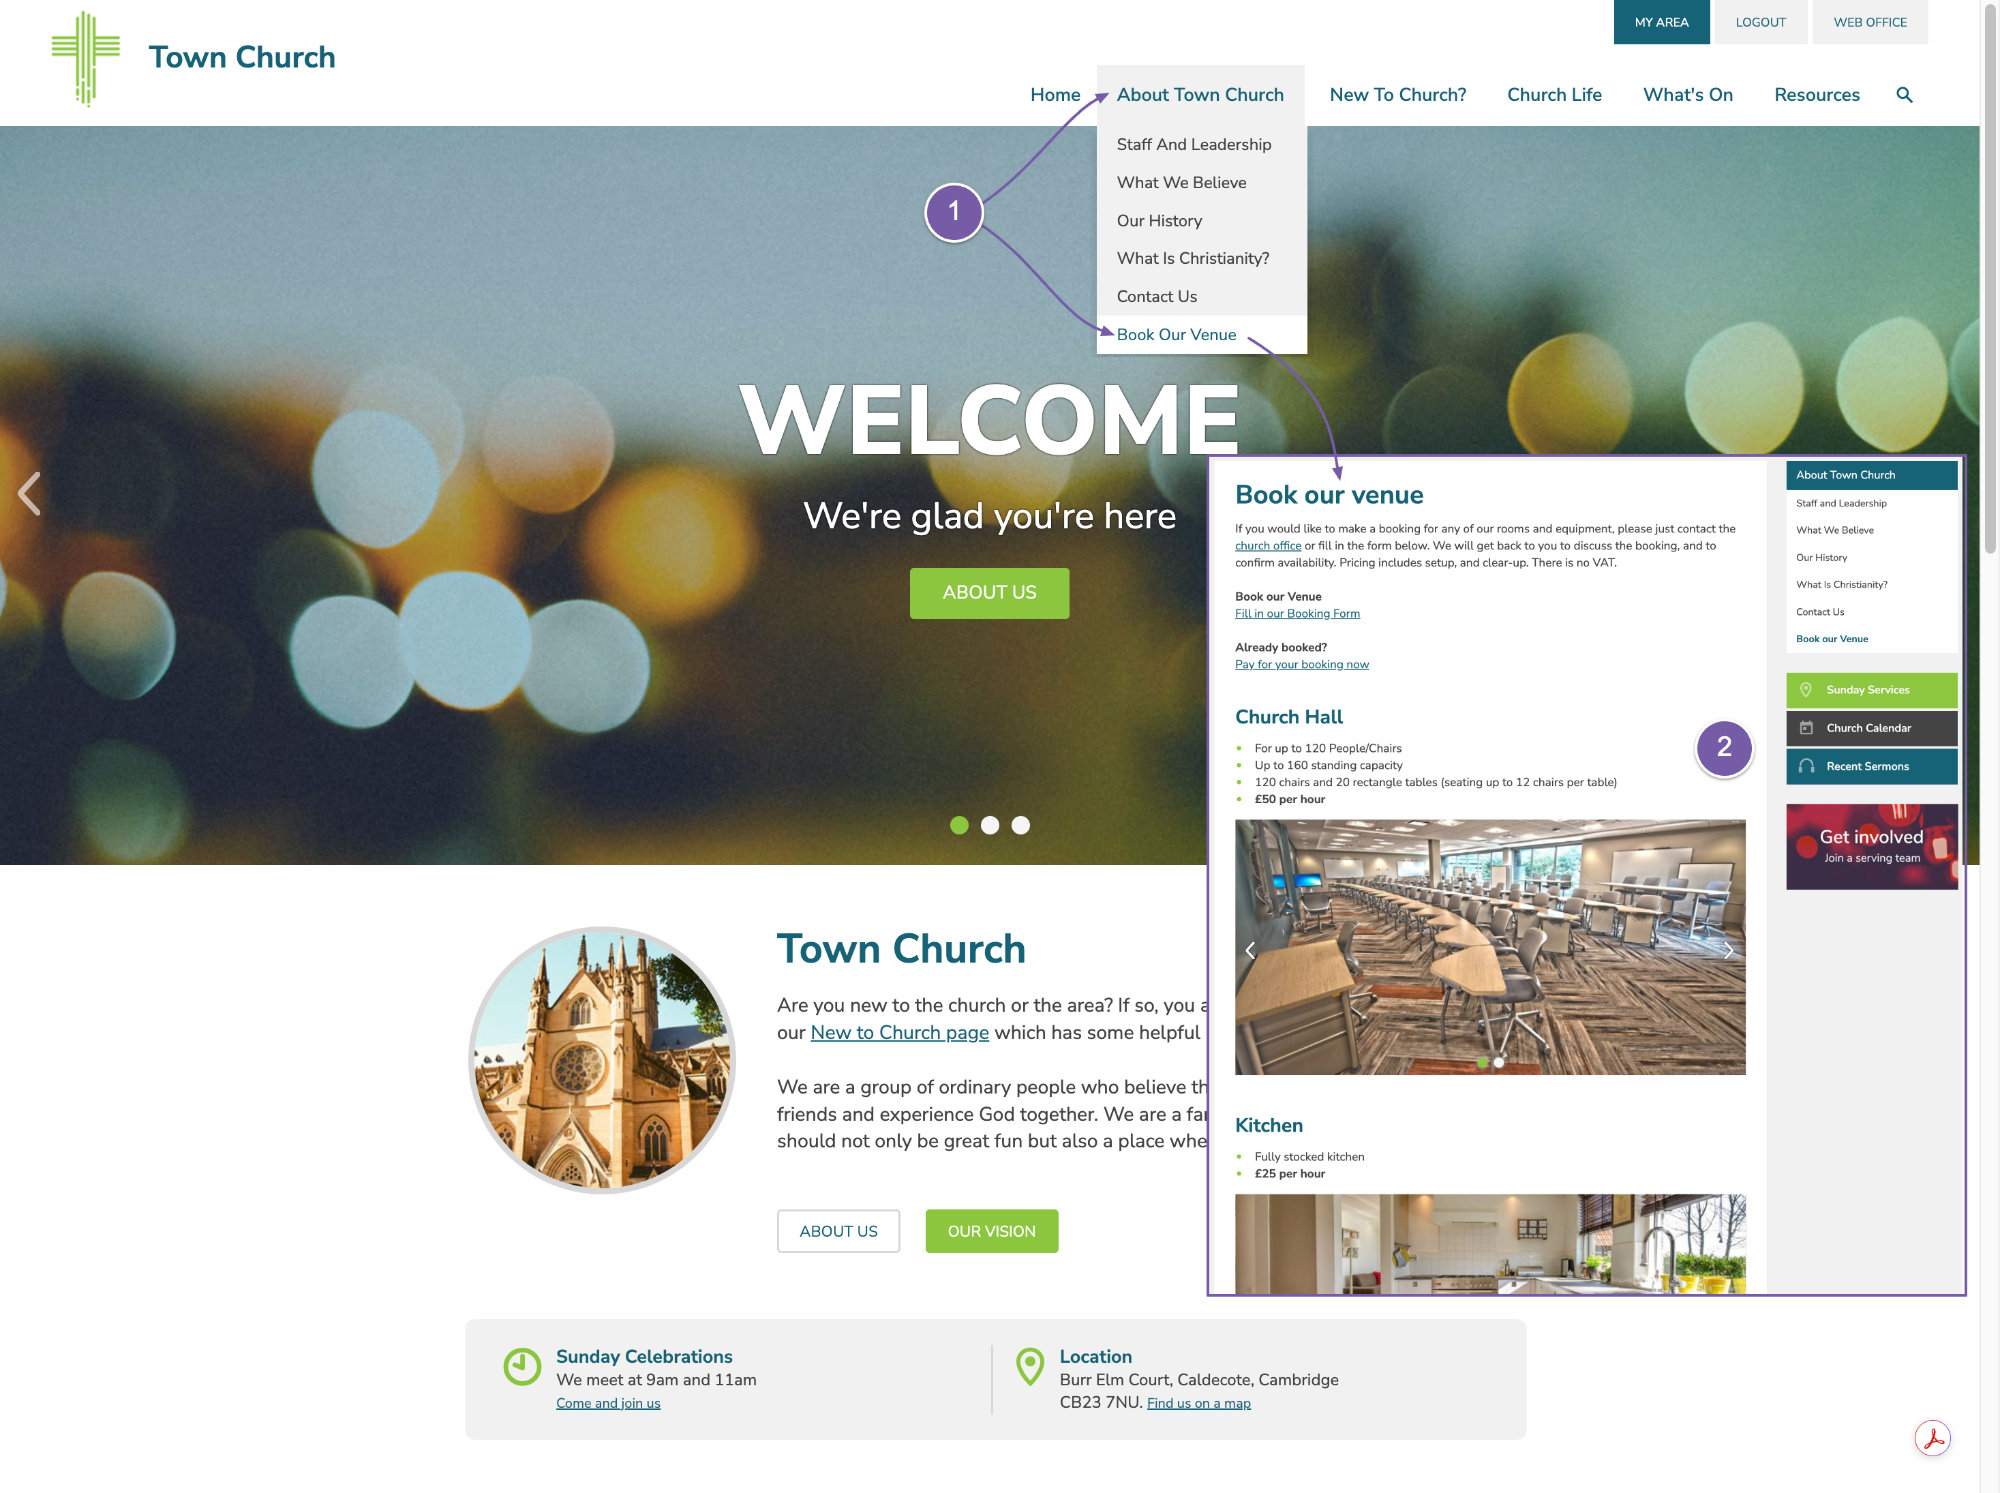
On the trial site, under “About Us”, we have “Book our Venue” page.
-
This page shows a slideshow of the rooms, and information about the rooms and their costs.
-
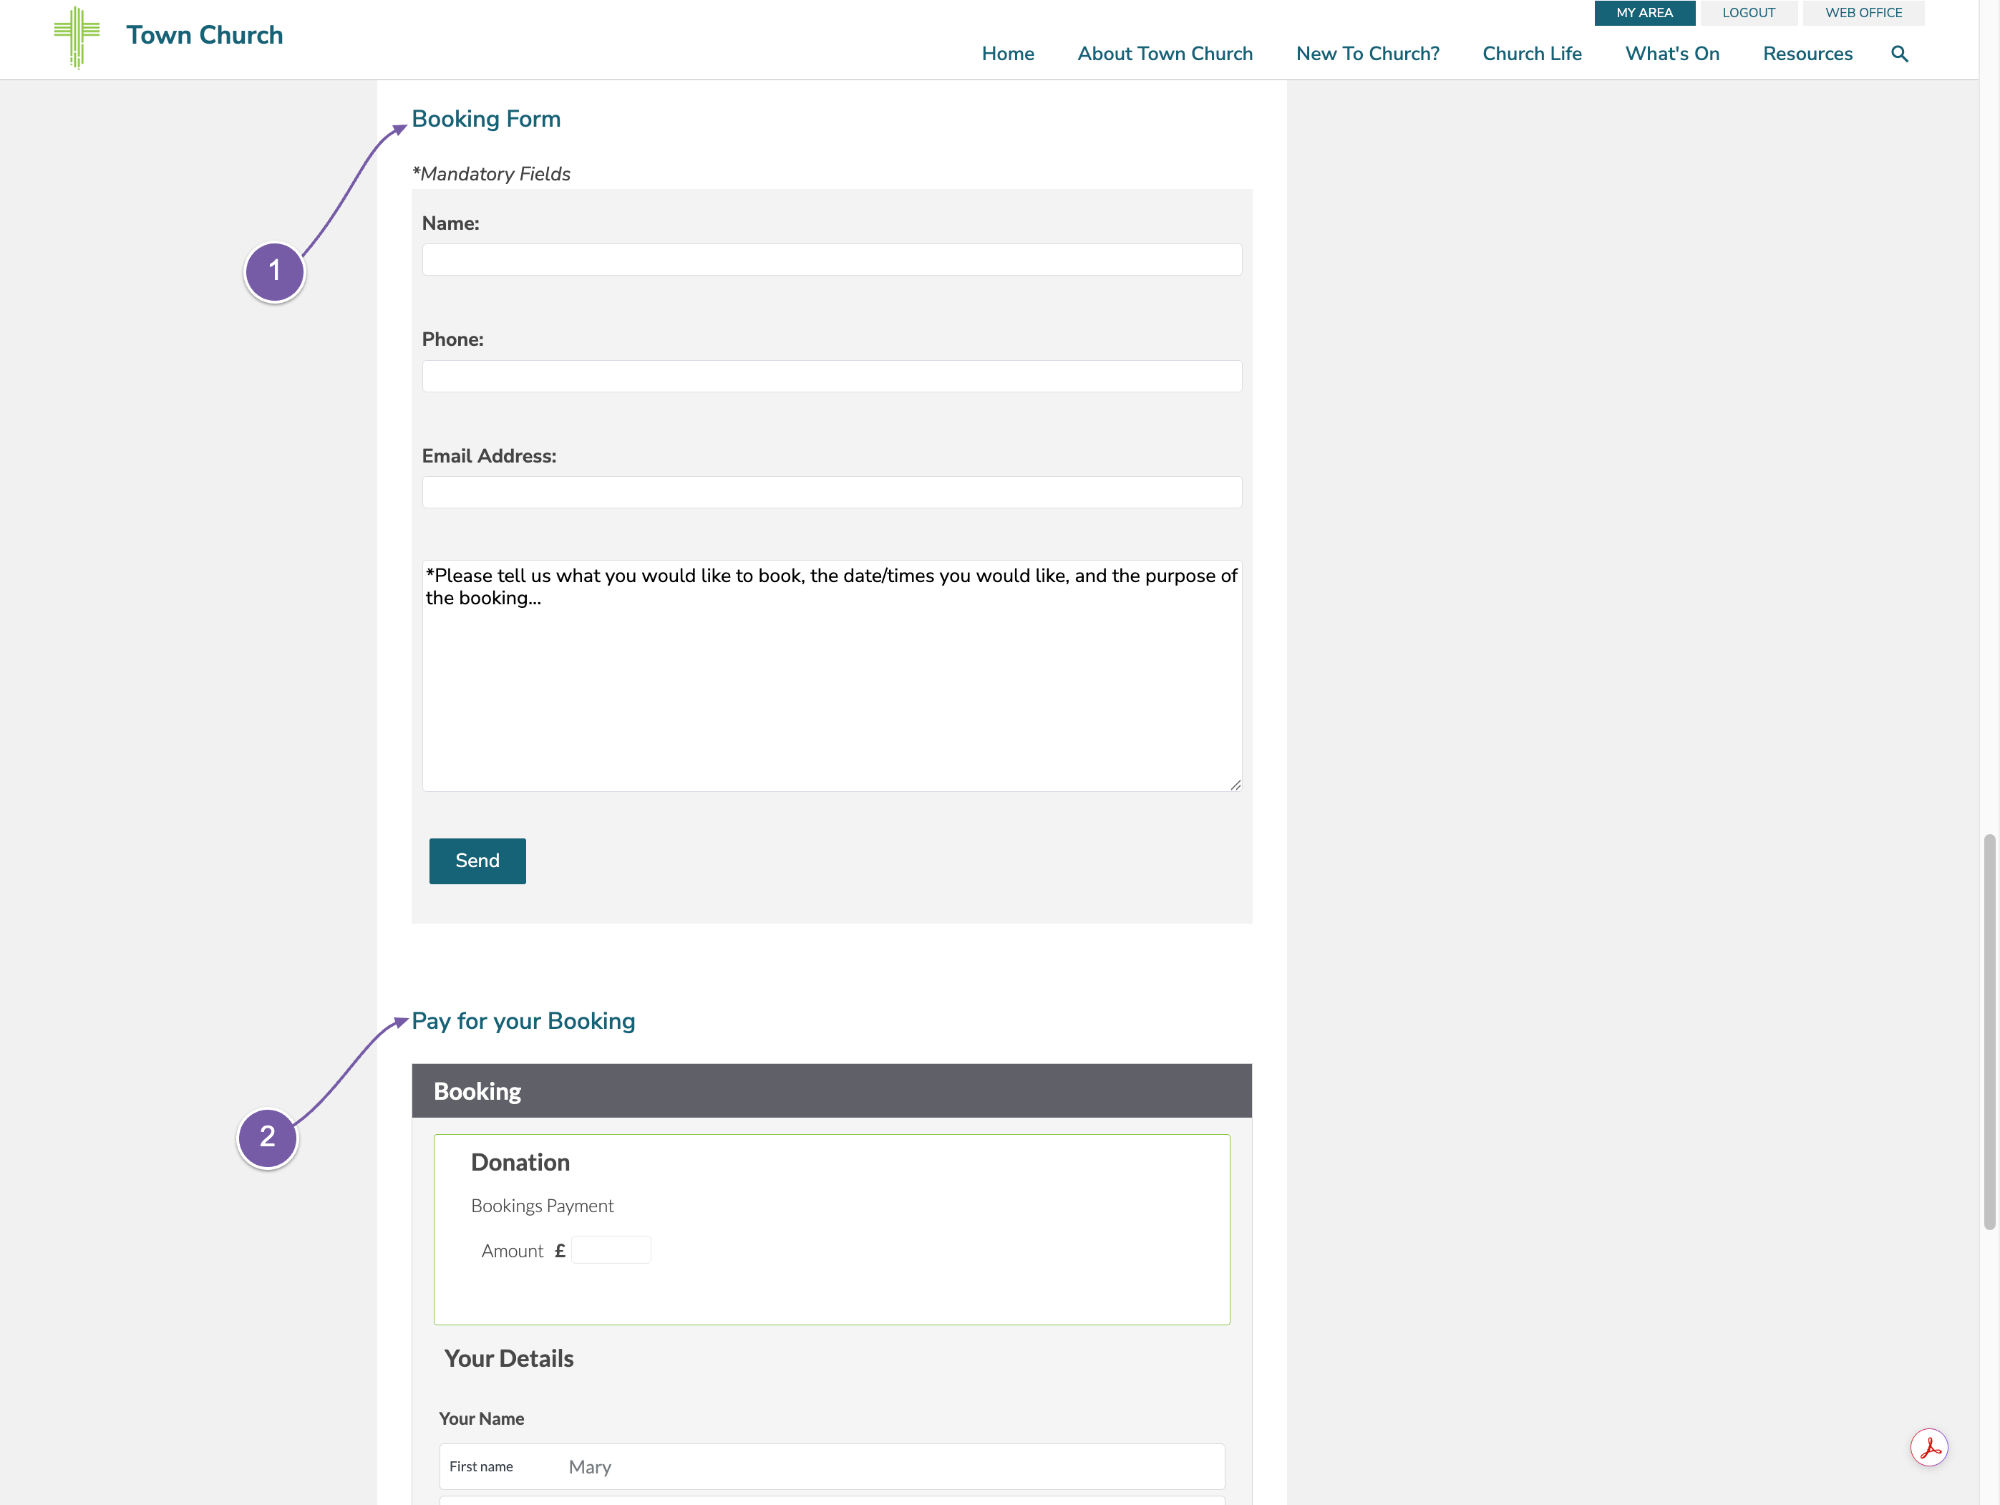
Below that information, there is a booking form that just sends a message from the enquirer to the church. Nothing is confirmed, so you can review the request and decline it if it’s not appropriate, or if the rooms are not available.
-
Right at the bottom of the page there is a payment form. If you use our payment processing for your giving, you can also take payment for your bookings. All you need to do is give the link to your page to people who book, and ask them to make a payment on this page.
Let’s go to the Web Office and find this group so you can manage its contents.
-
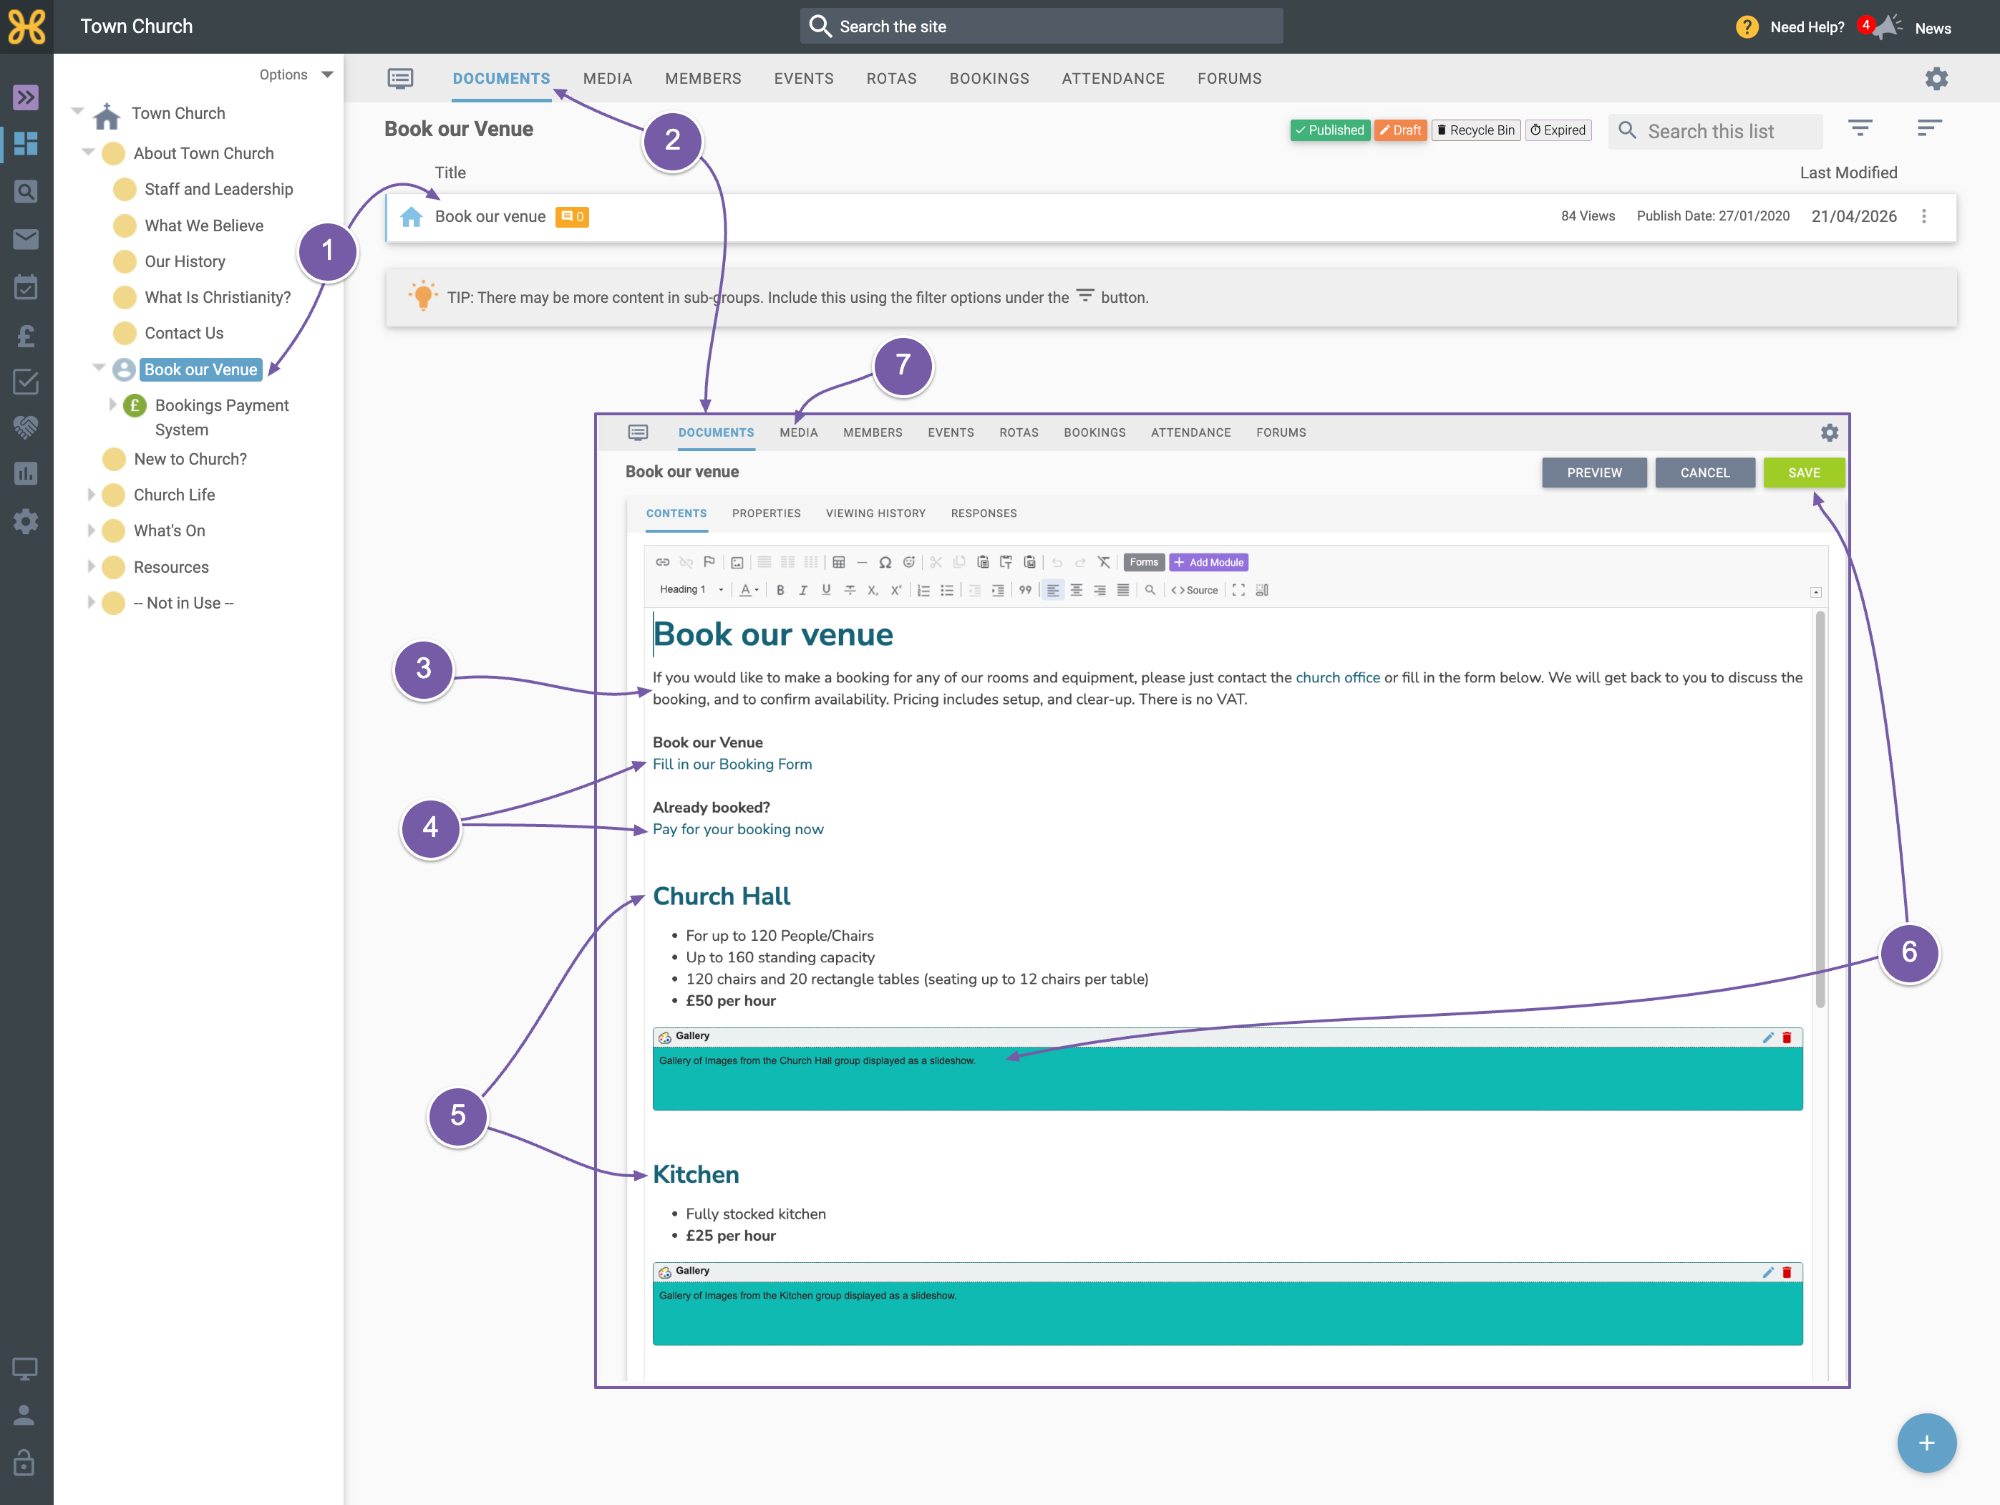
The “Book our Venue” group has one article.
-
You can go to that article by clicking on “Documents” and selecting it to go into editing mode.
-
Again, like with any page, you can edit the text to suit you.
-
We have quick links near the top of the page that go to the booking form and the payment section lower down the page.
-
Then we have the details of the rooms available. You can write what you want about the rooms.
-
To add your own images to the Gallery you need to save your progress so far
-
Then go to the “Media” tab for this group.
-
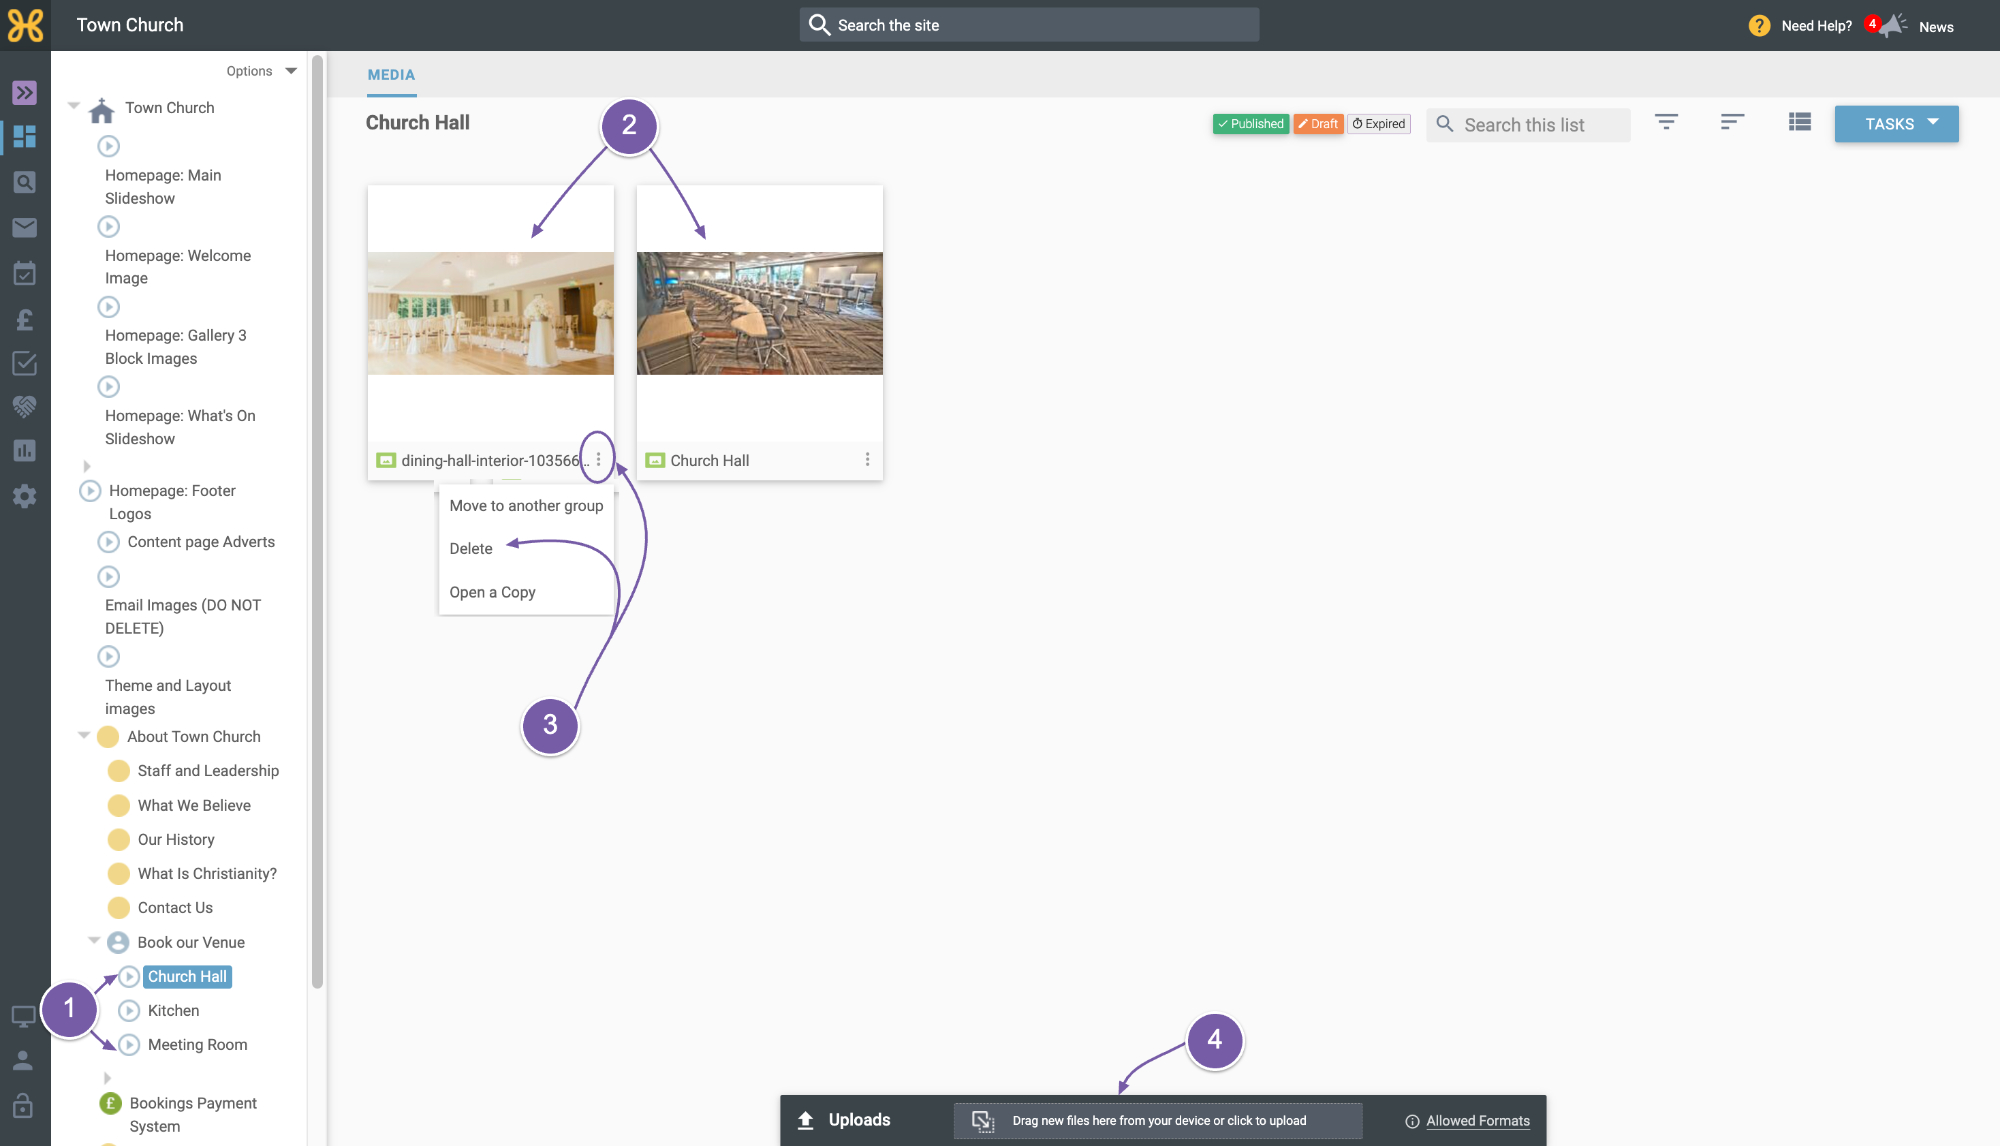
You will see in the Group Tree there are Media folders that appear - one for each room.
-
In the article, you may have noticed there was a Gallery module that was giving a slideshow for each room. Each module is picking up the images from the relevant Media folder. The images should be using our Feature Image size of 800 x 400 pixels.
-
To personalise this page, just remove the dummy images from the Media group
-
and add your own.
If you need to set up more rooms, then you first need to create new Media folders for the rooms you’re adding.
To do this:
-
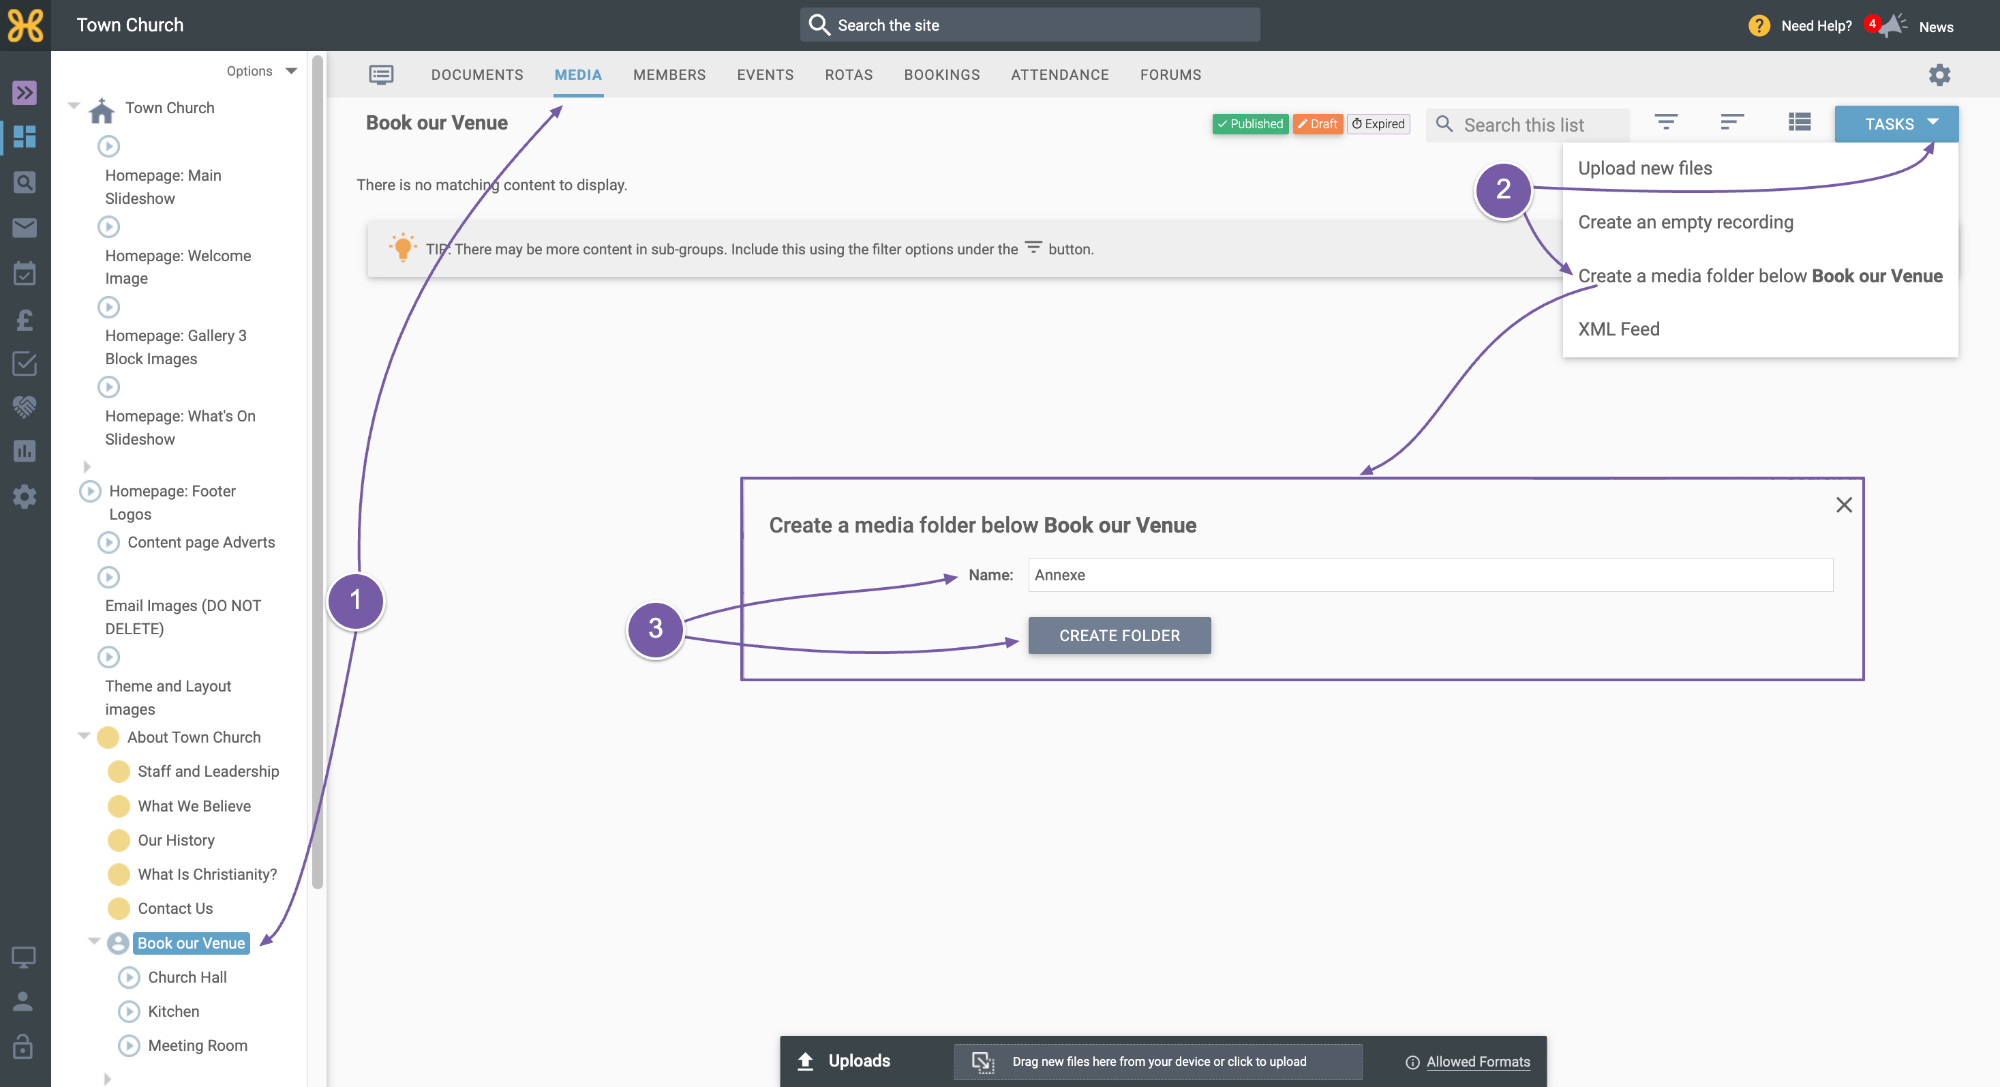
On the “Book our Venue” group, go to the “Media” tab
-
Click on the “Tasks” button and select “Create a media folder”
-
Give it a name (Annexe, for example) and then click “Create folder”.
-
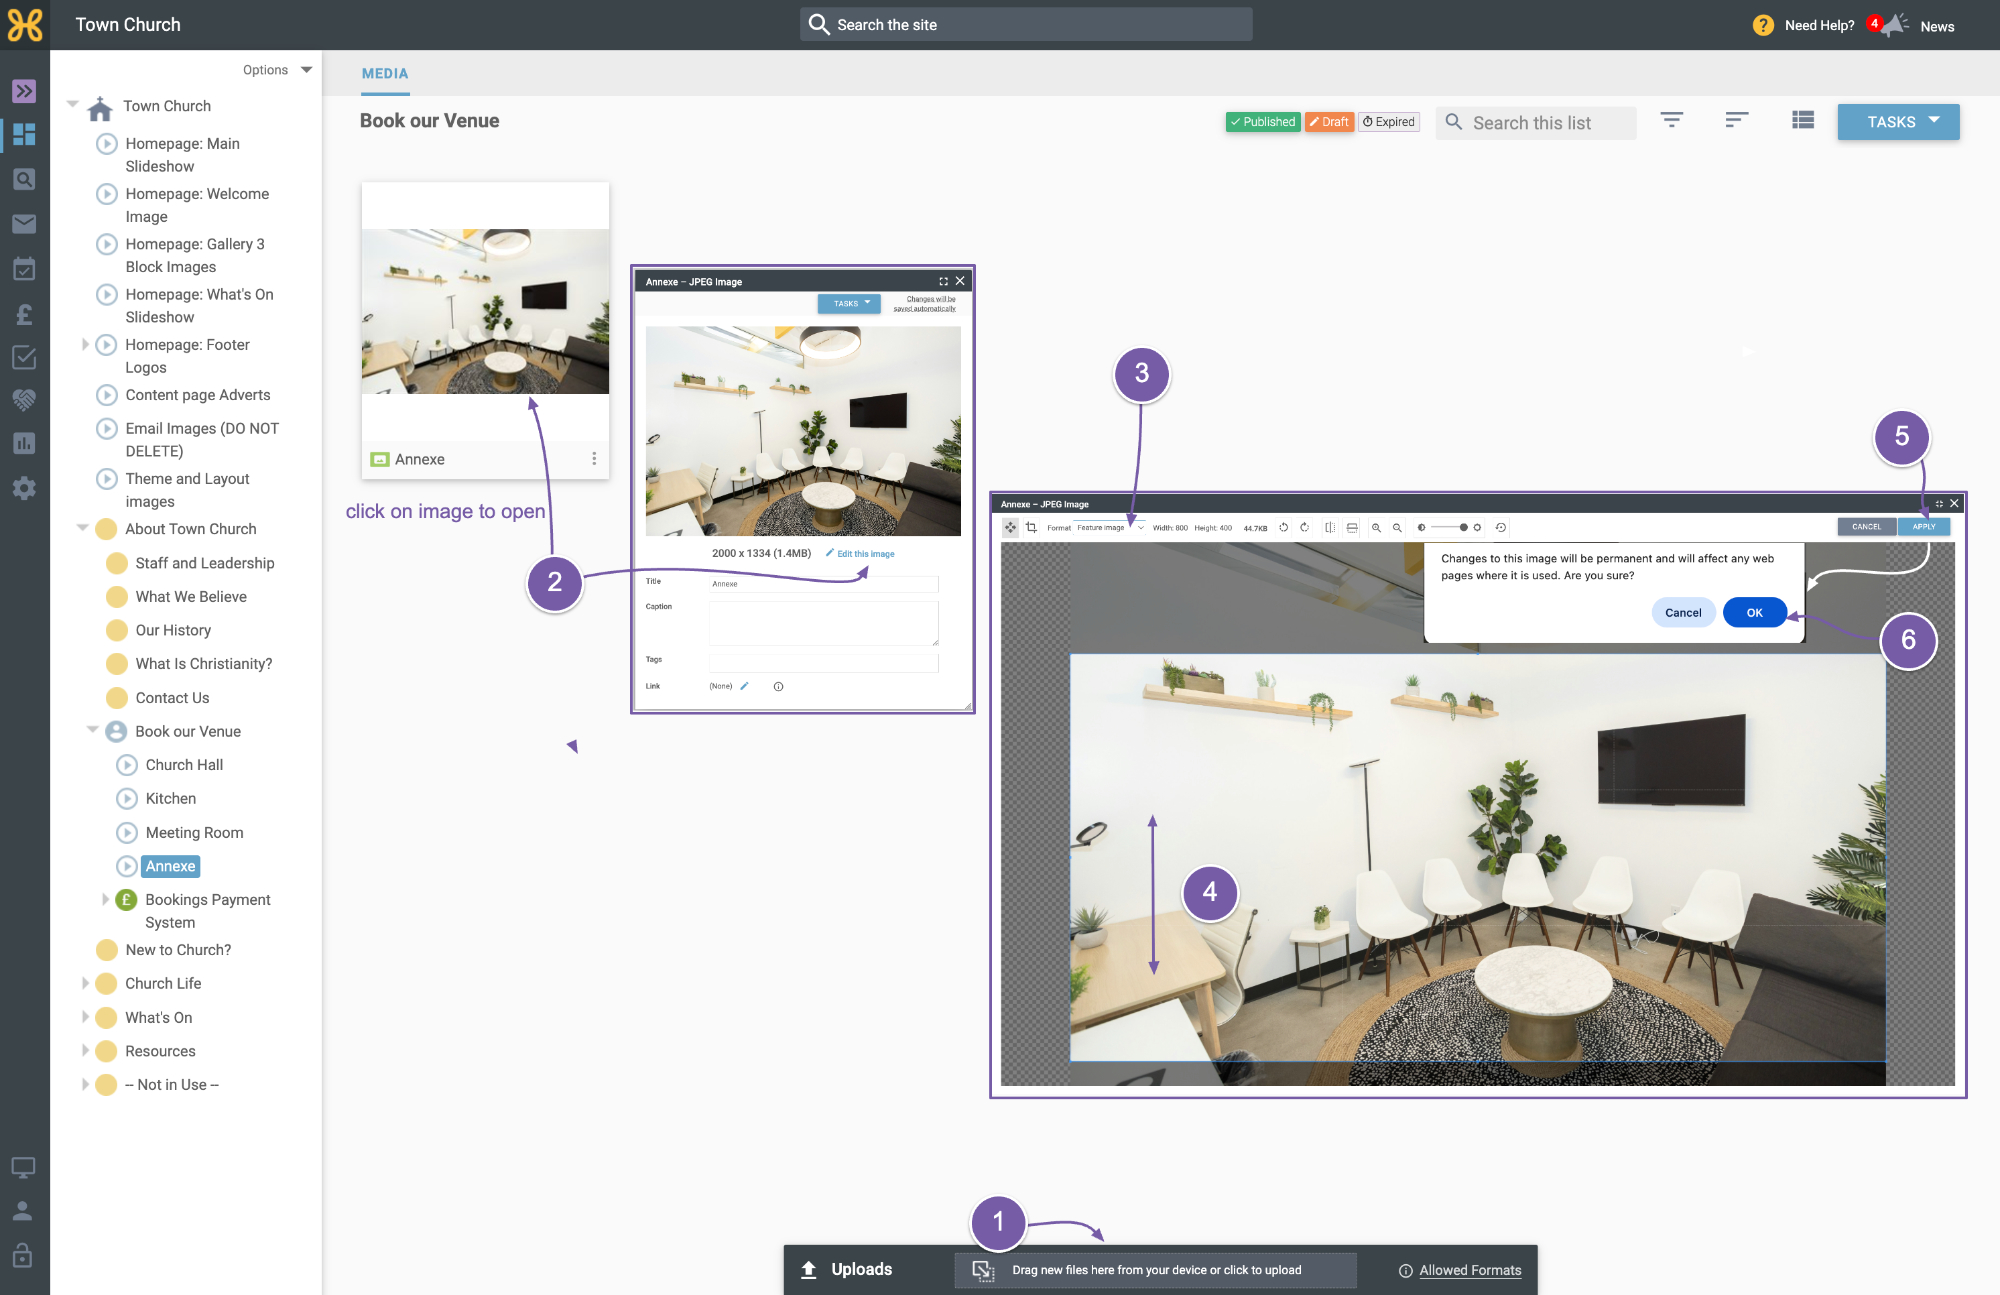
Just upload your images here
-
If you need to edit them to be the right size, open the image, click on the “Edit this image” link to go to the Image Editor
-
Select the Feature Image option on the Format dropdown.
-
Drag the light area to the part of the image you want to keep
-
Then click “Apply” when you’re happy
-
And “OK” to confirm the changes.
-
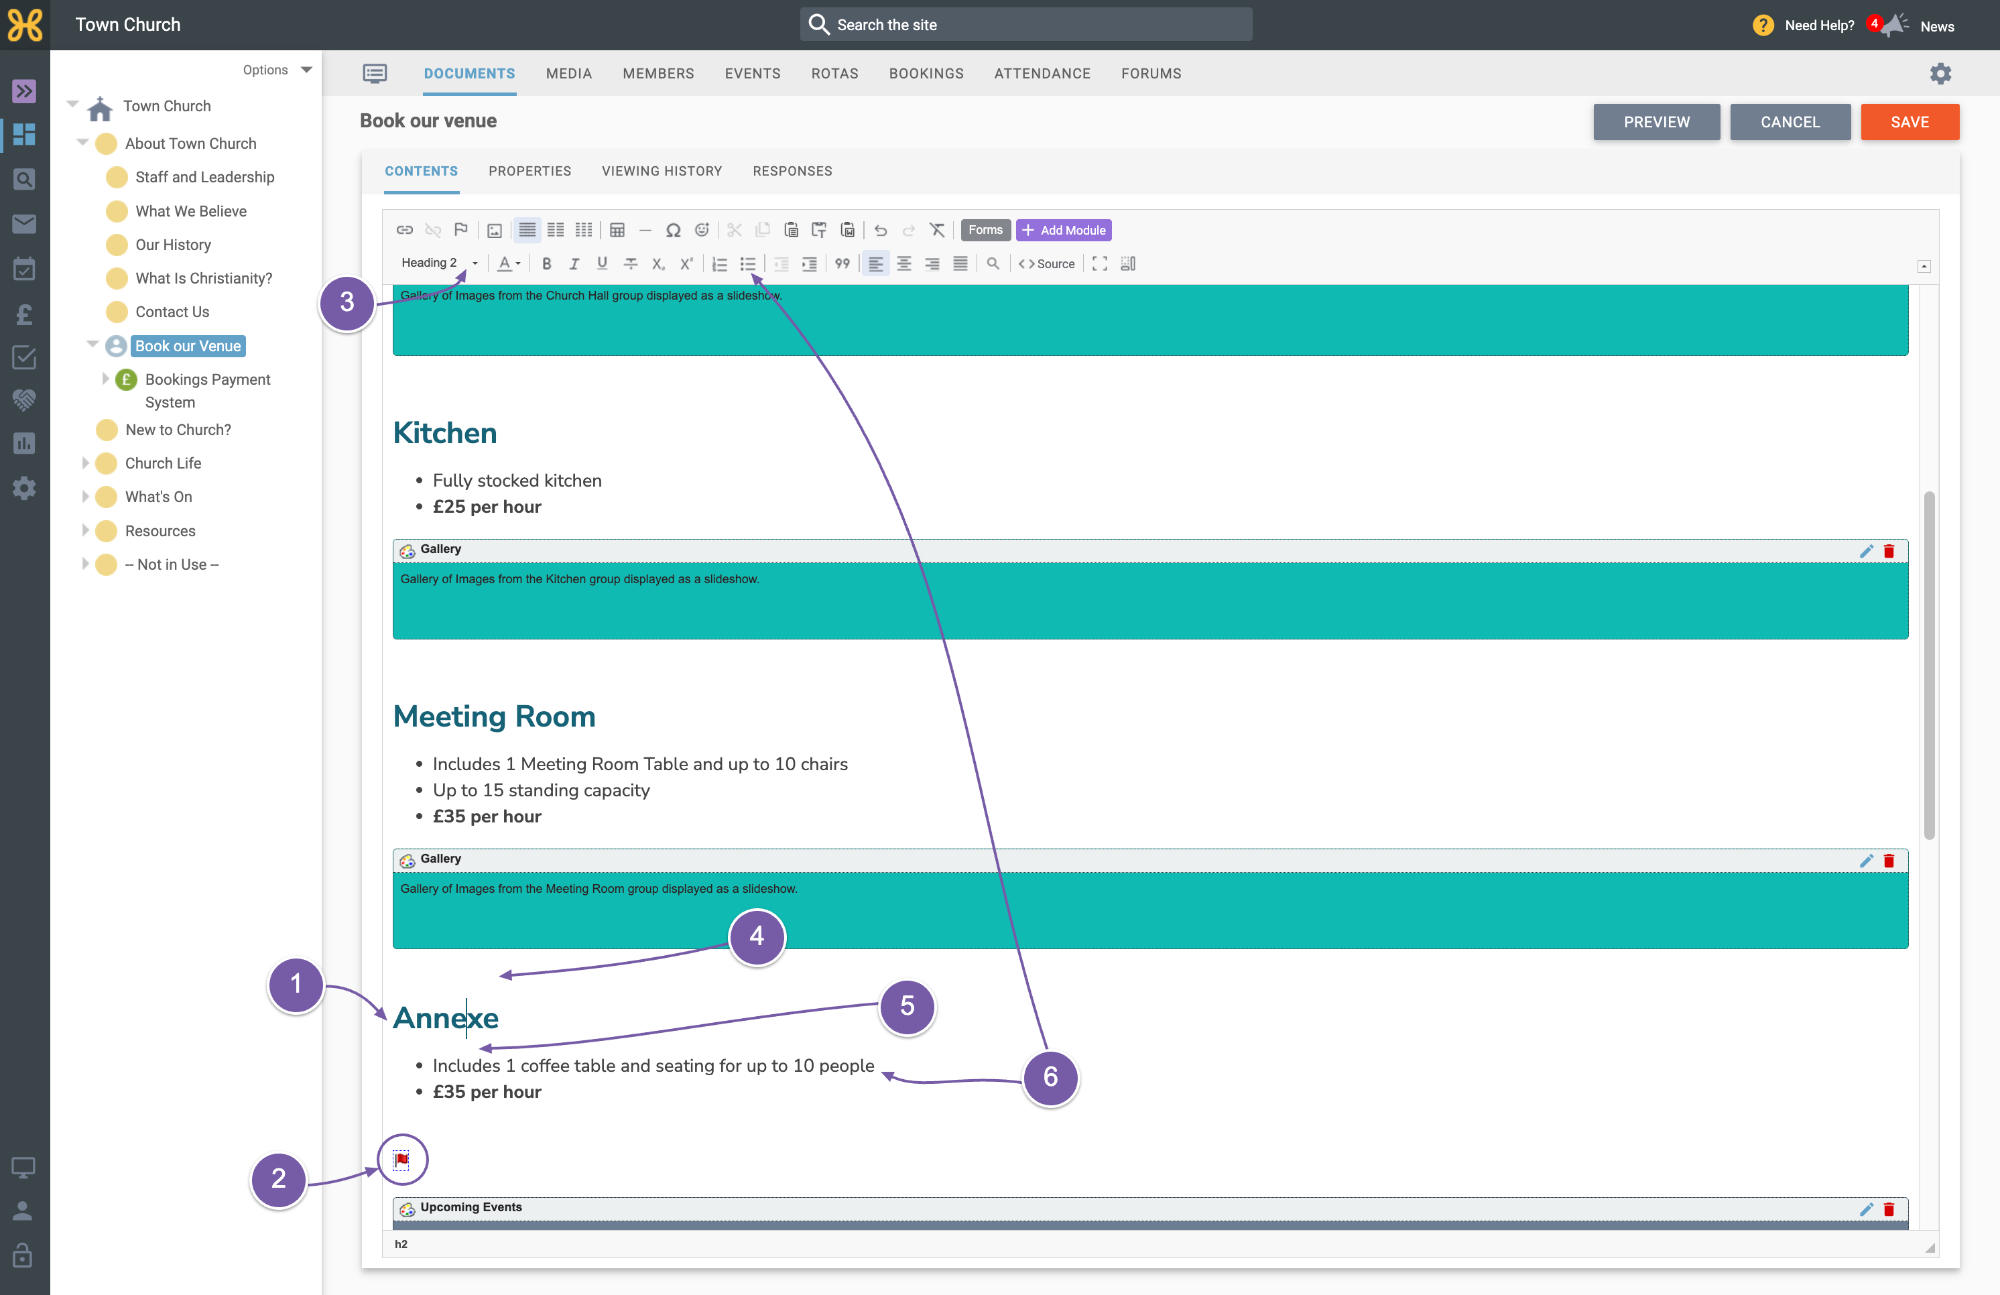
If we now go back to the article, you can scroll down to the end of the last room that is on the page and write the name of the new room.
-
FYI – you will see a little red flag icon. This is an anchor link that is set up for the page to scroll to that flag when someone clicks on the link at the top of the page for the Booking Form and Payment area. Make sure you don’t delete this flag.
-
We have used Heading 2 for the room title, so you can highlight the room name and pick Heading 2 from the Headings style dropdown in the toolbar.
-
Make sure there are two blank lines between the gallery module above and the new title.
-
Next, leave a blank line and write your information about the room.
-
If you want to use the bullet points like we have for the other rooms, just select the bullet point icon in the toolbar and start adding your text. To add a new line, just hit return on your keyboard.
To add a Gallery module and pull in the images from your new Media folder:
-
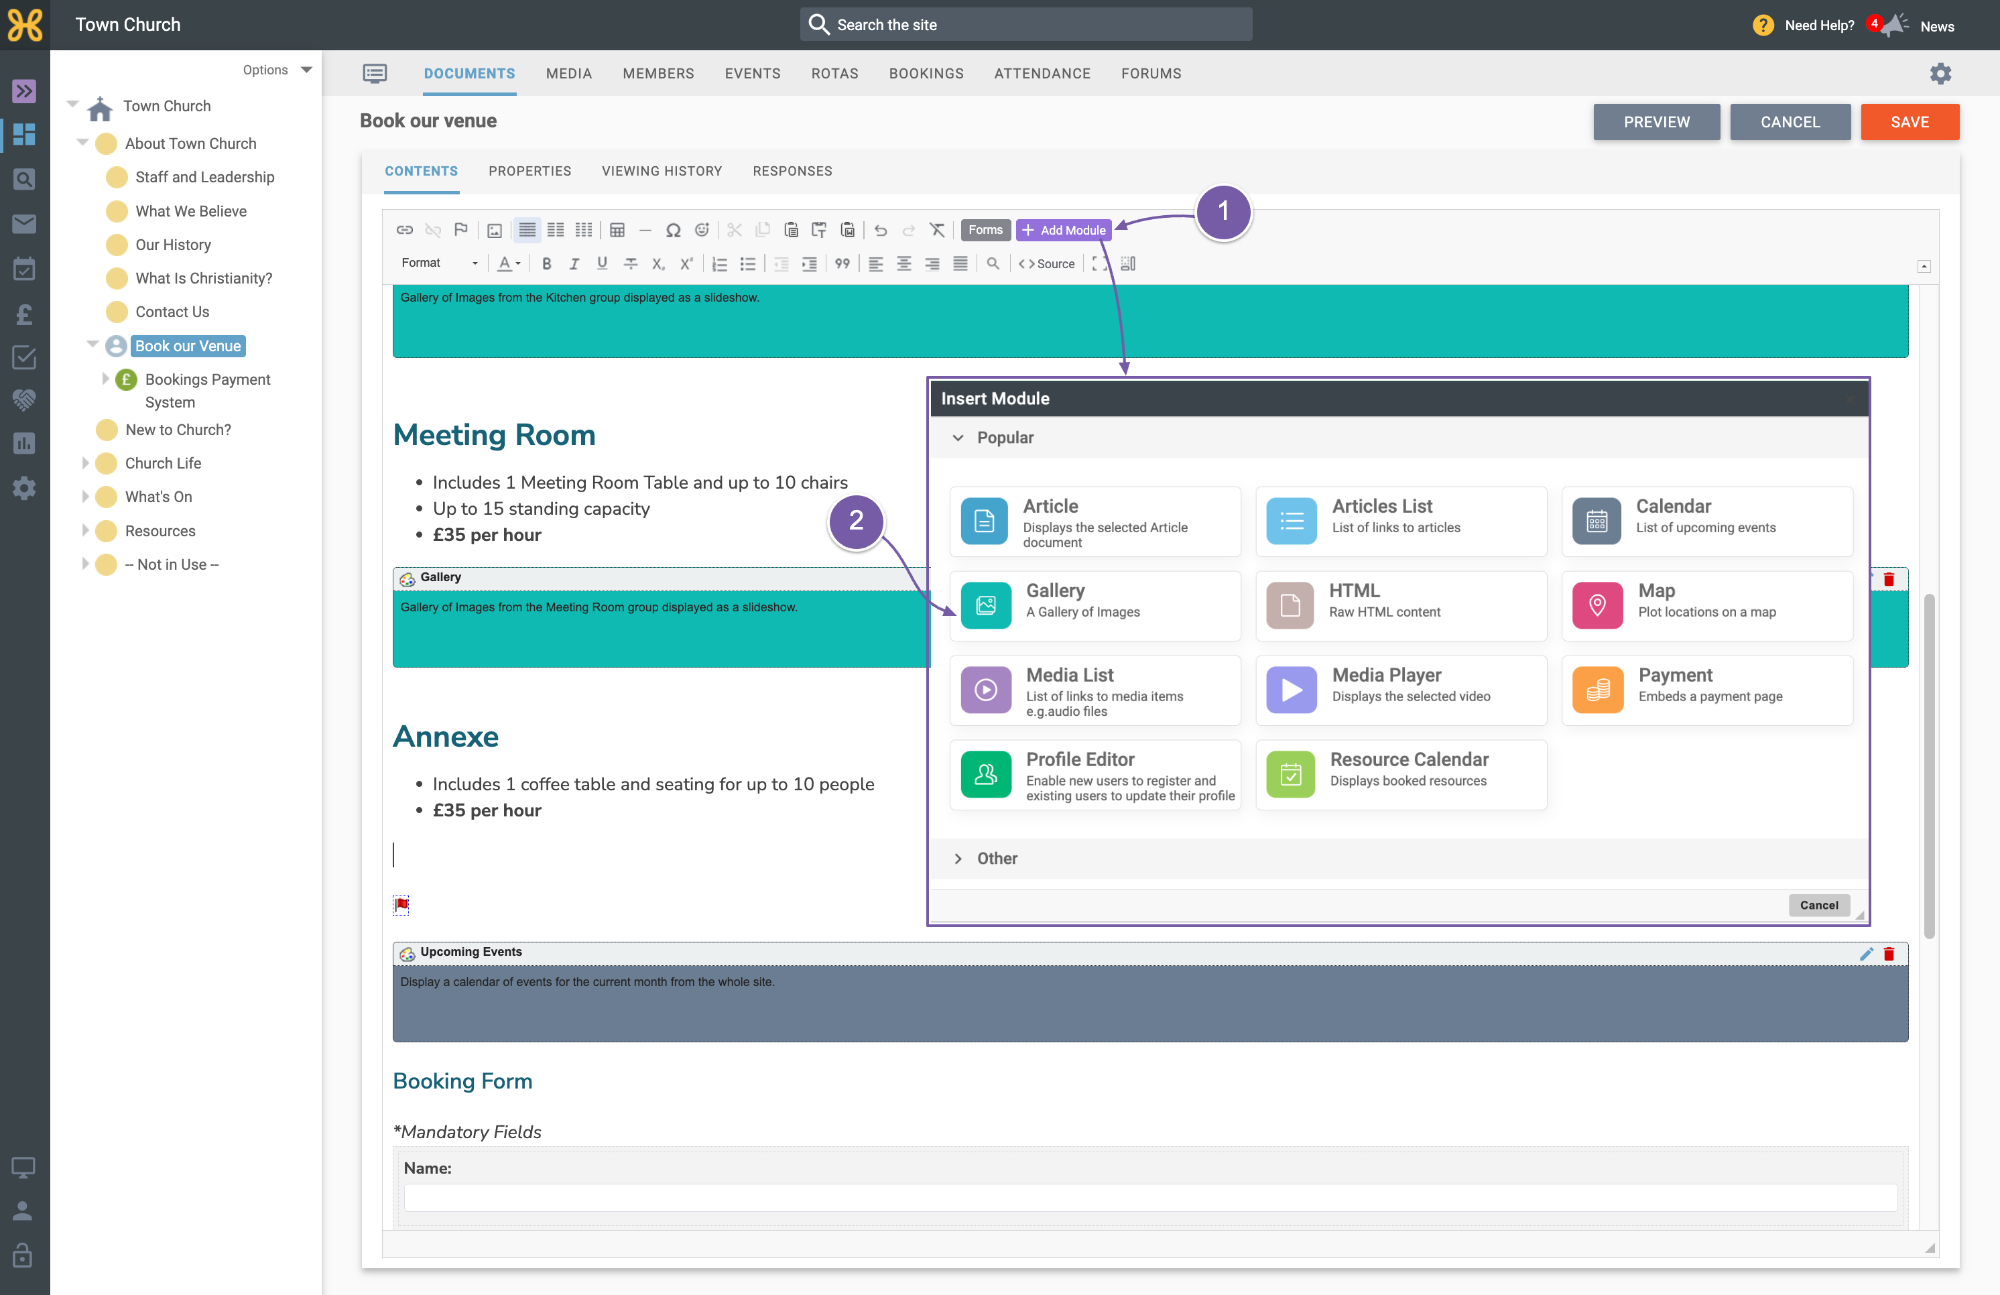
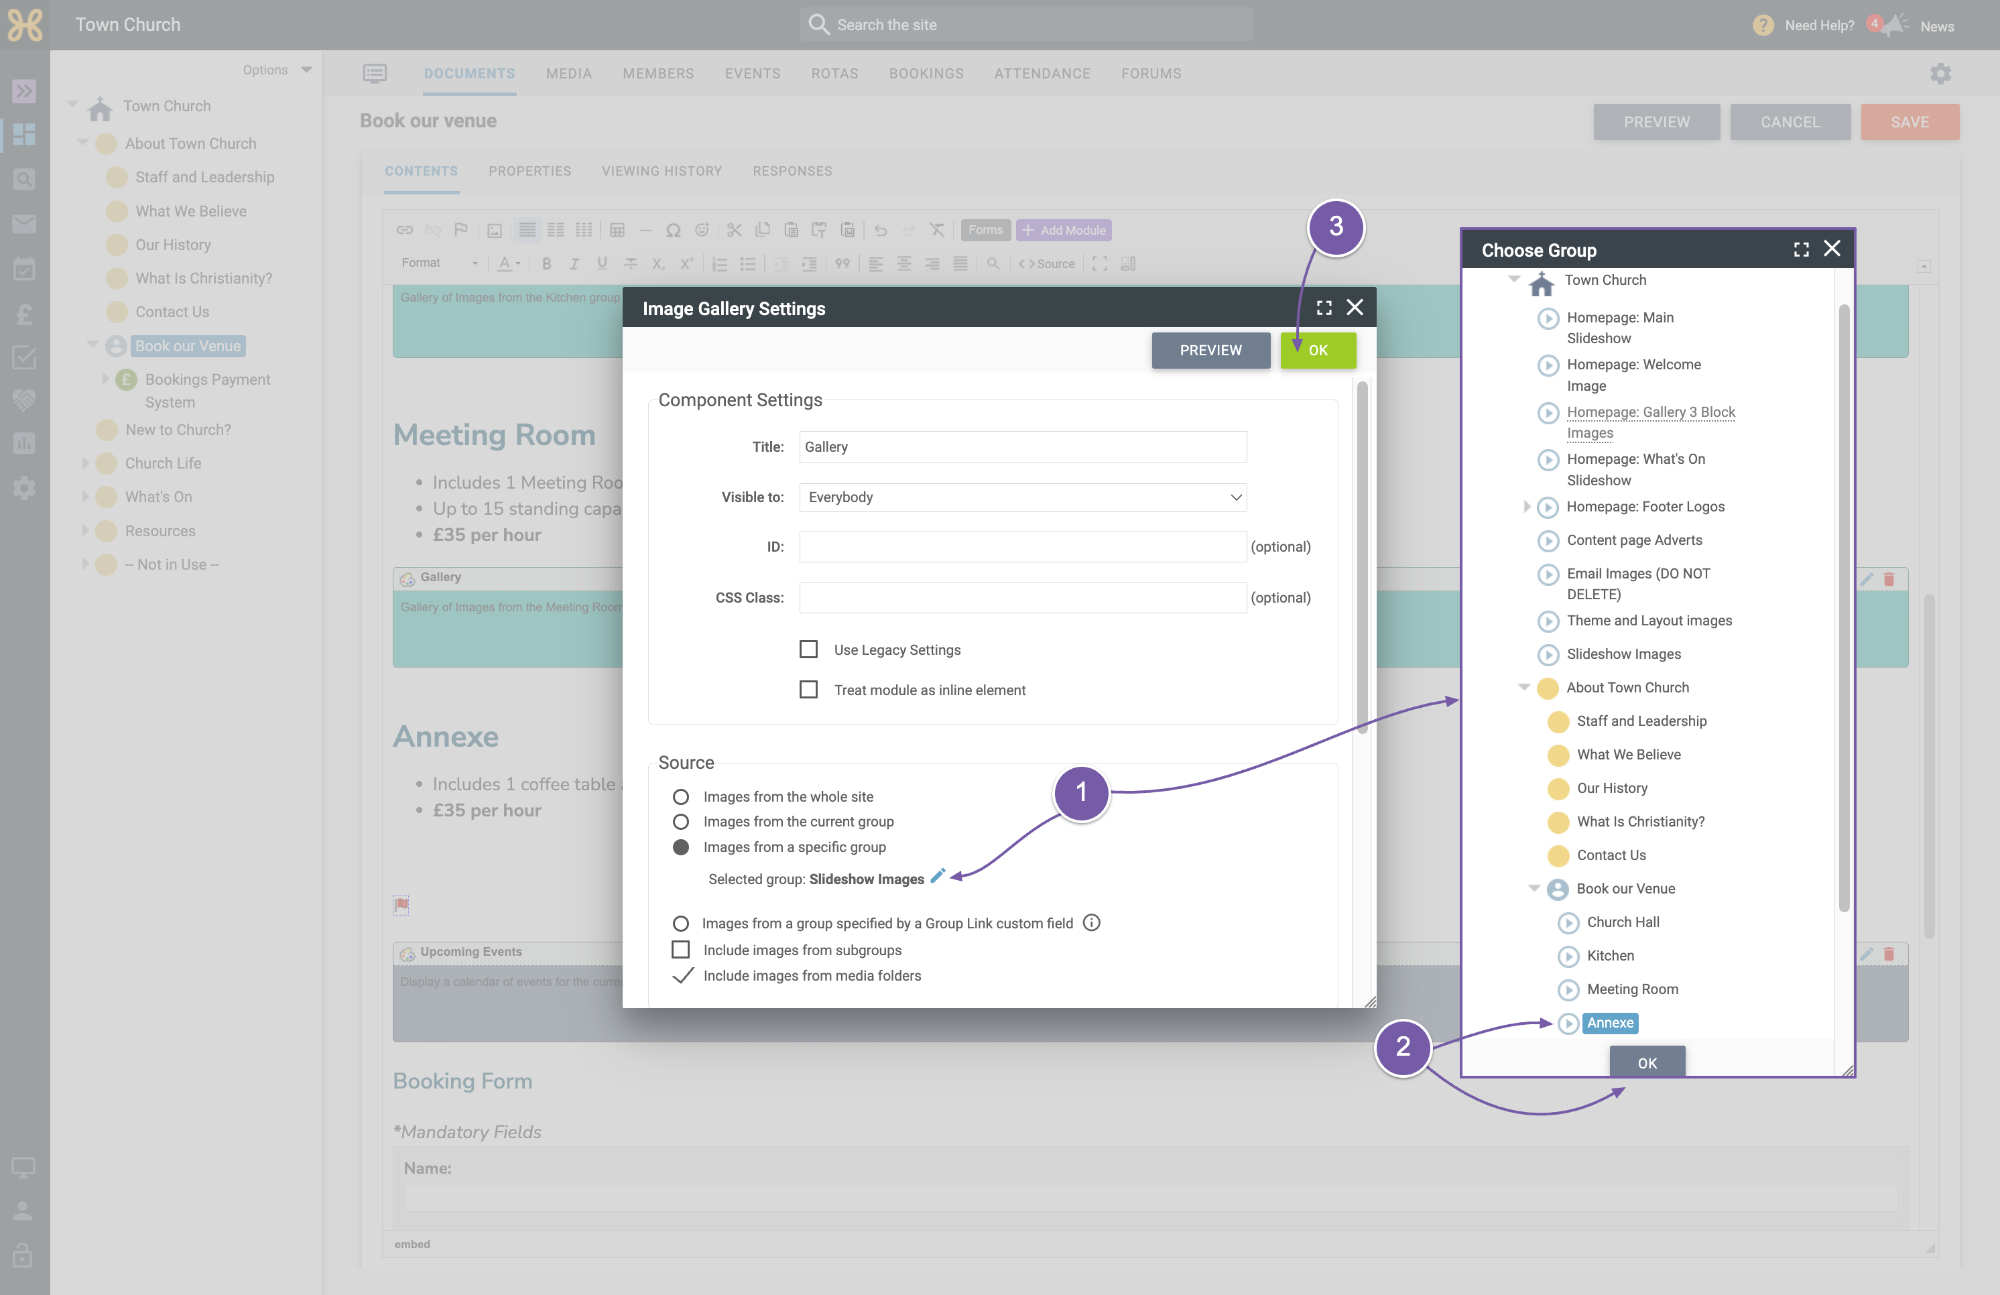
Click on the "Add Module" icon on the toolbar
-
Select the Gallery module.
-
All that you need to do here is click on the edit icon where the module is picking the images from. In the dialogue, find the Media folder under the “About Us” group.
-
Click on your group, click OK
-
Then save the changes in the Gallery settings.
You can repeat this to set up the rooms you’d like to advertise on your site.
Next, you need to decide if you want to use the bookings payment system.
-
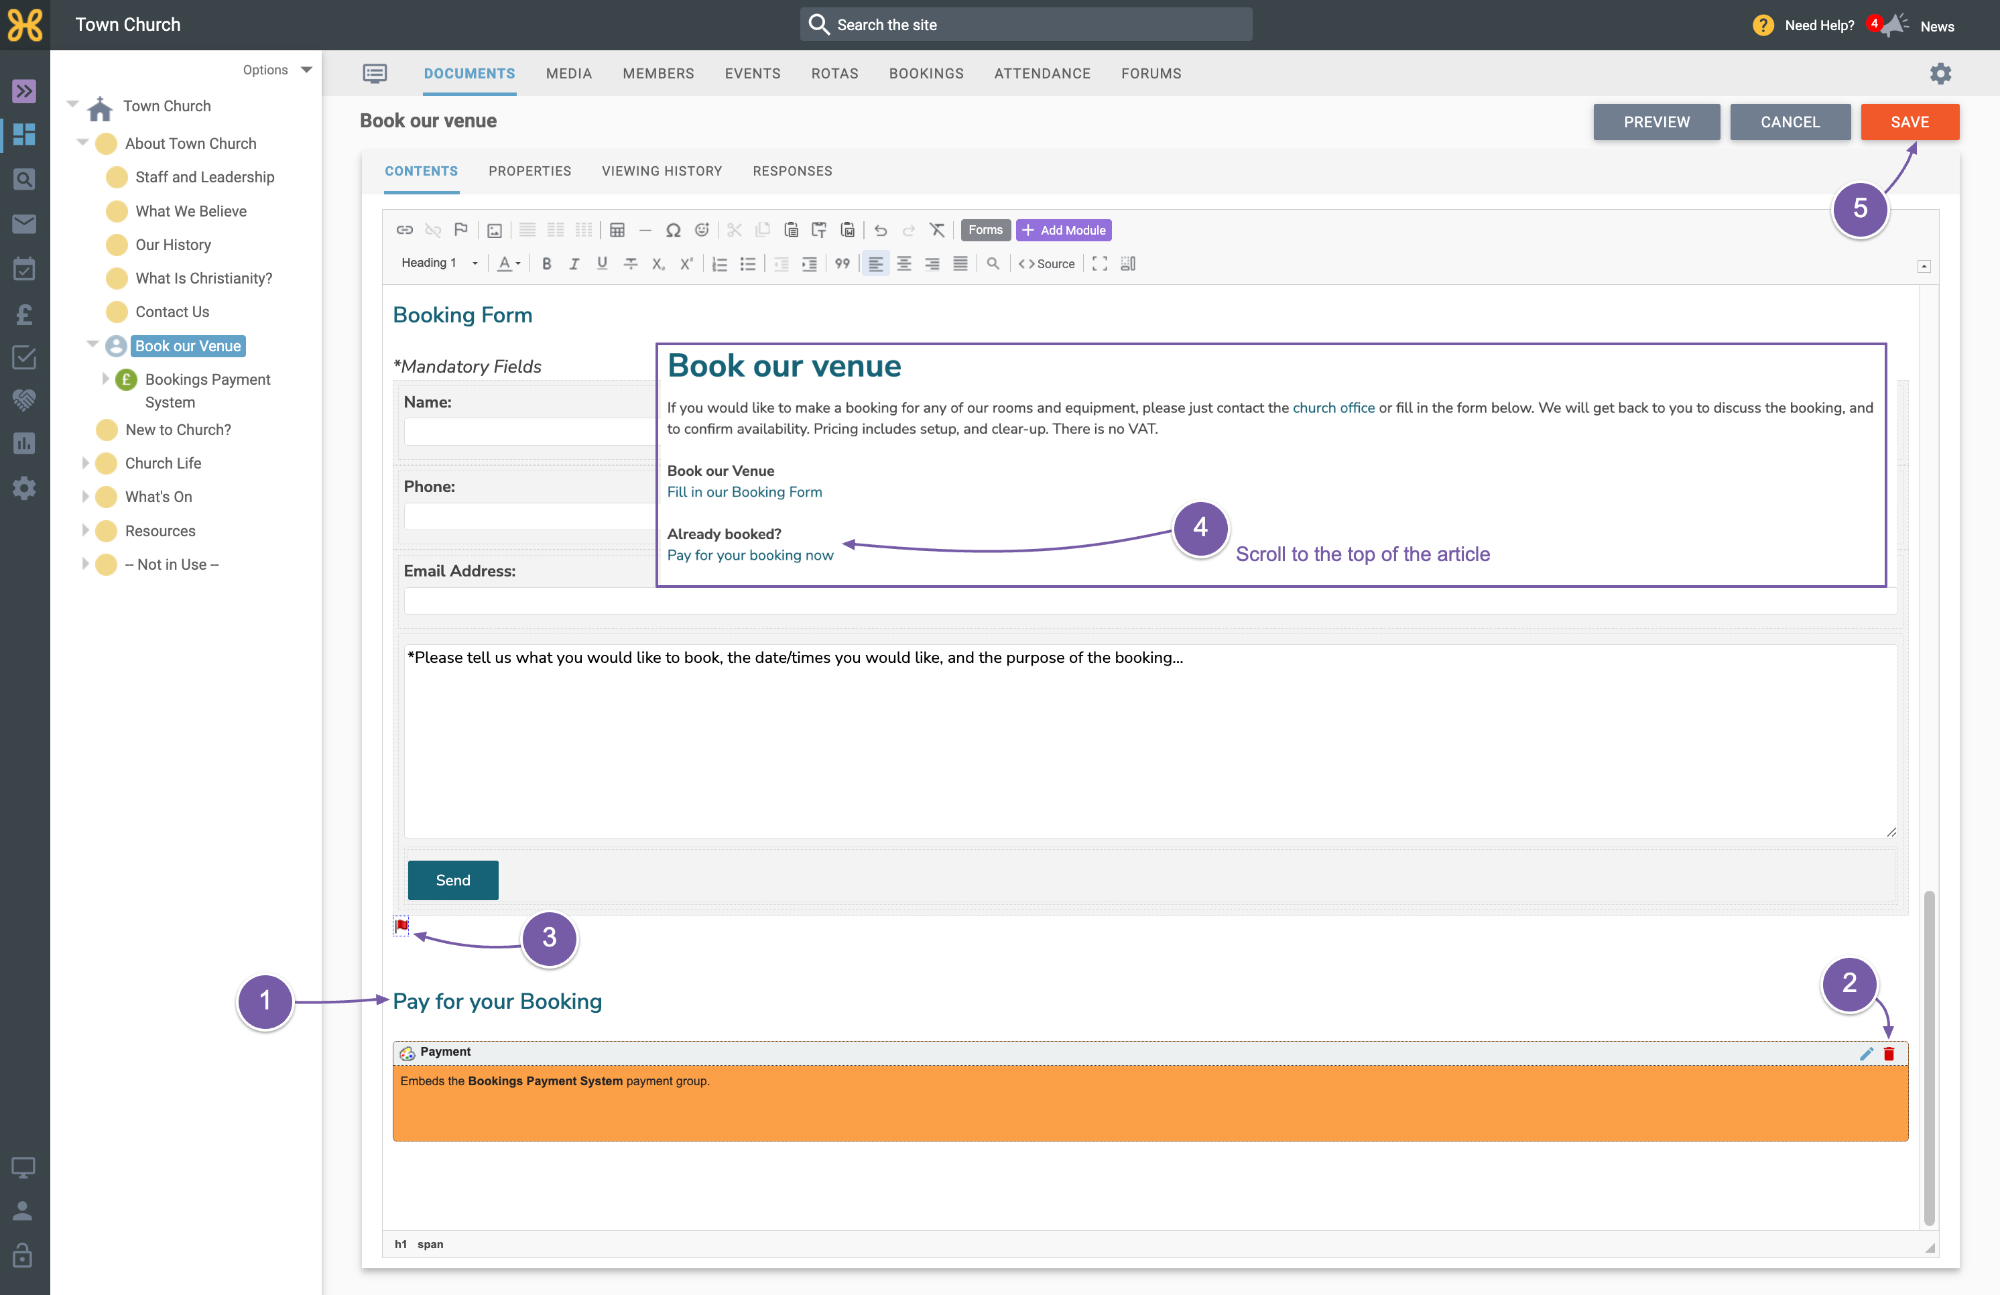
If you do not want to use the payment area on this page, then all you need to do is scroll to the bottom of the article, delete the title
-
Then click on the red bin icon on the module.
-
You will also need to delete the anchor link (which is the red flag)
-
Scroll right to the top of the article and get rid of the payment text with the link.
-
Save the page.
The enquiry form is all set up and ready to work, we just need to go and make sure that a notification is set up to let you know that someone has filled it in.
-
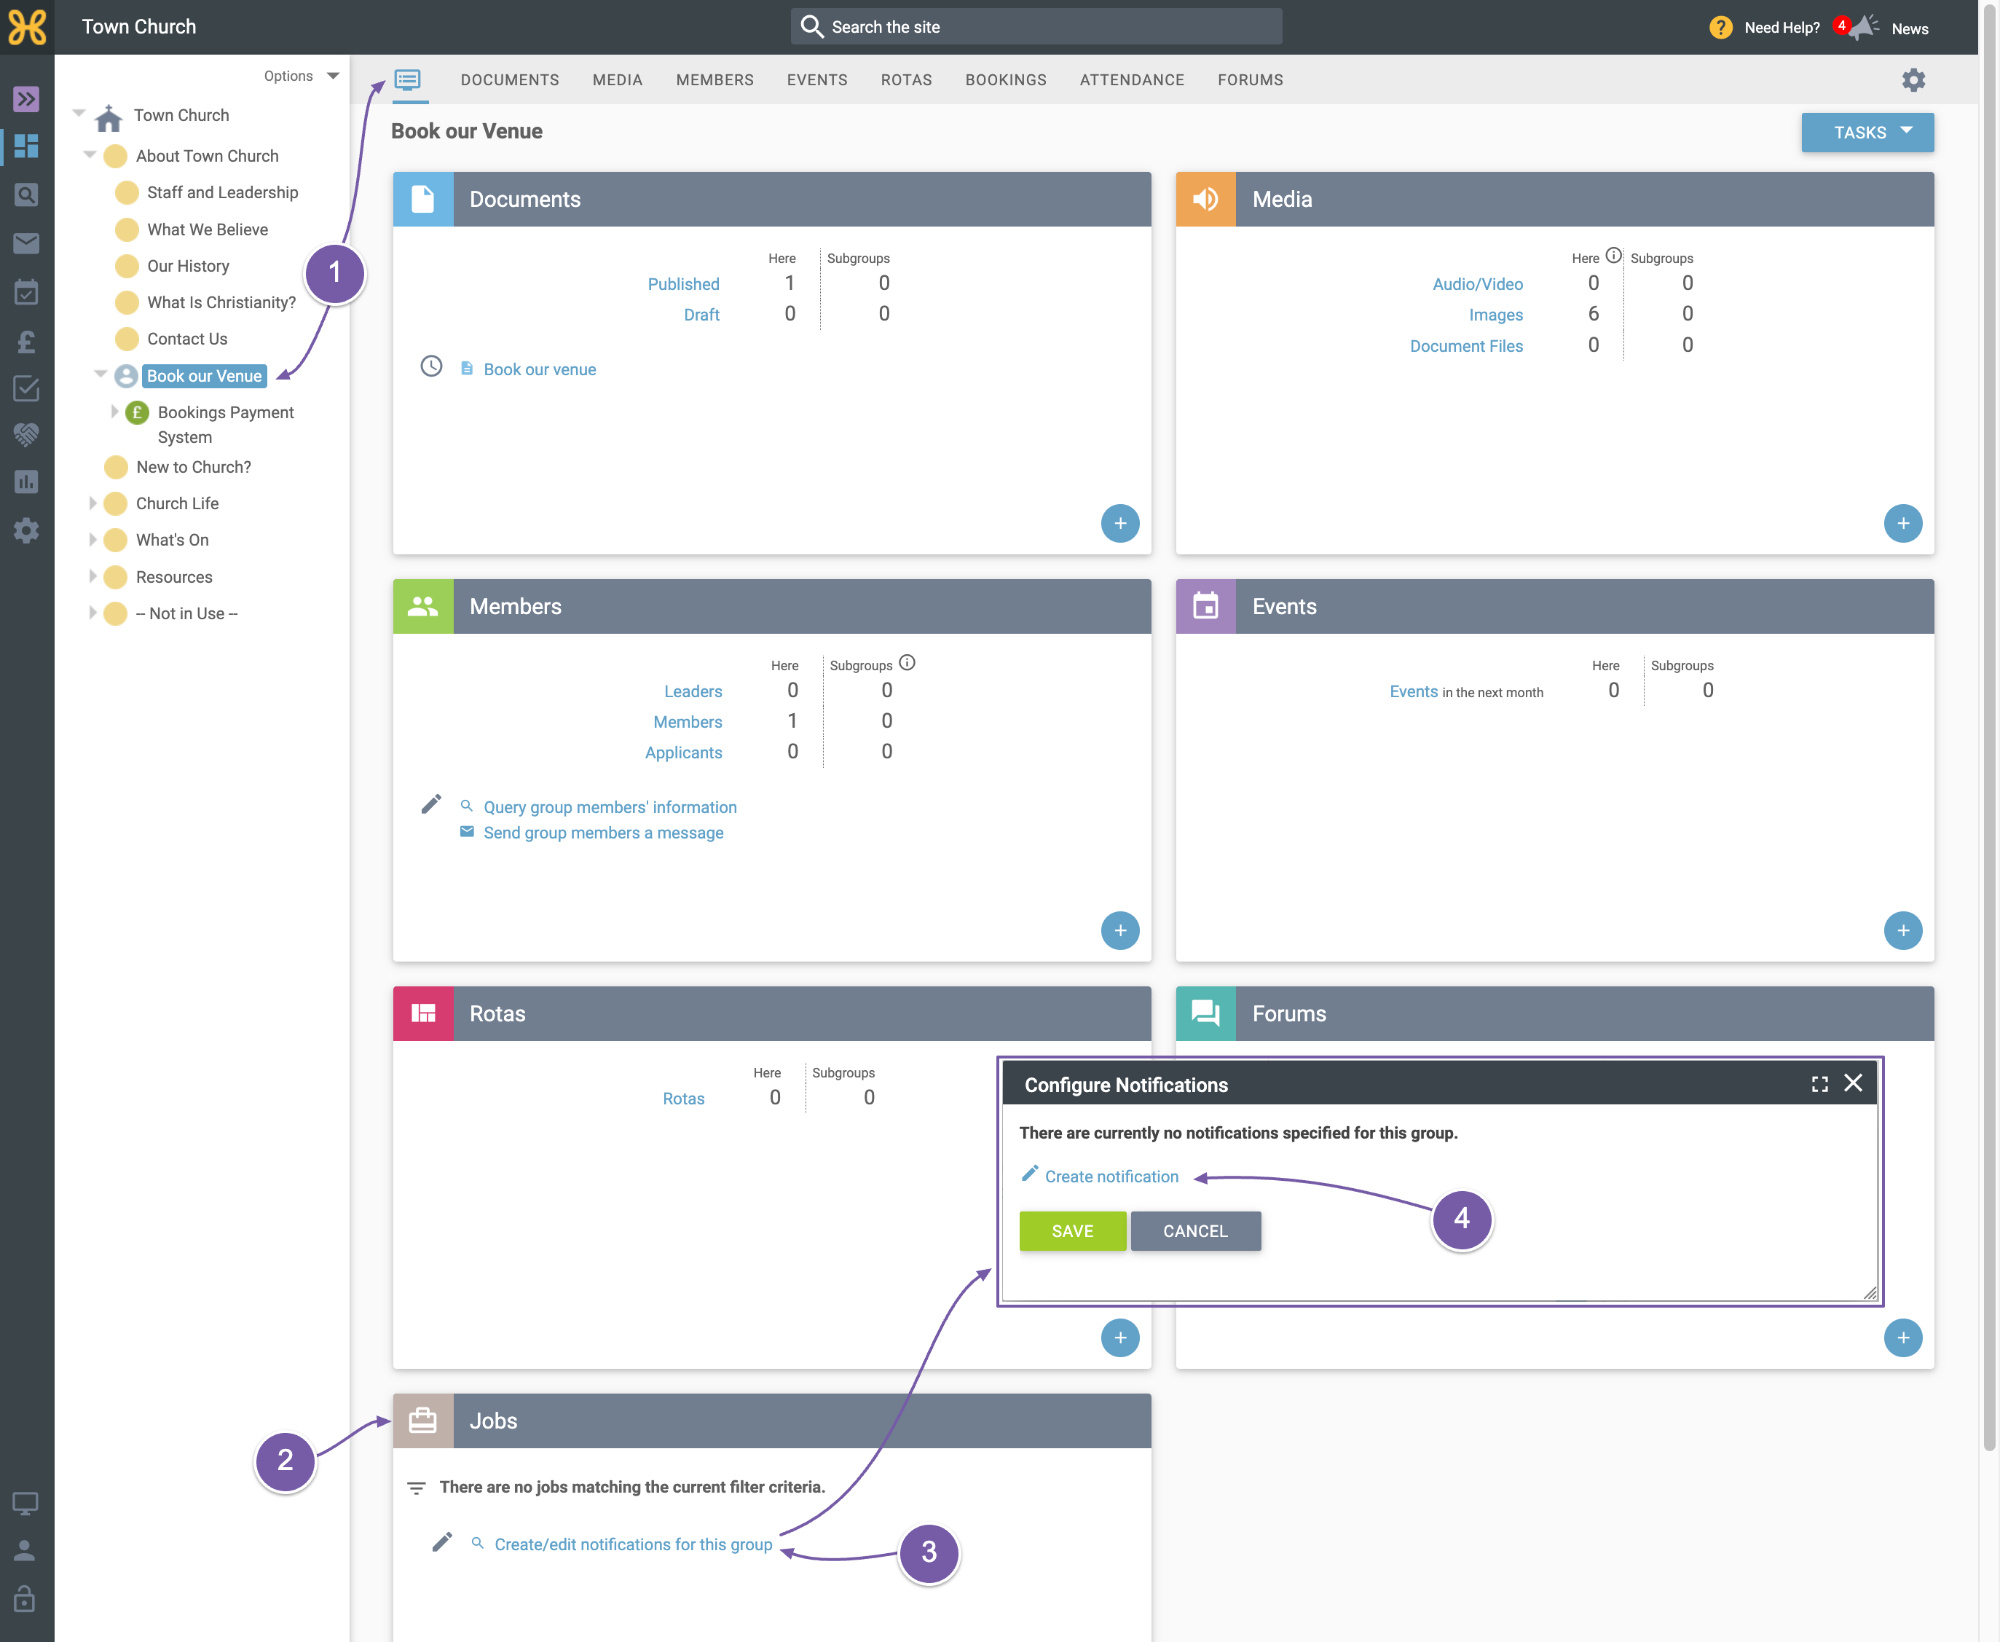
Go to the Group Summary tab
-
Scroll down to the Jobs area. This is where we can set notifications for when certain things happen.
-
What we need to do is click on the “Create or Edit the Notifications for this group” link. A box will display with any current notification that is already set up.
-
To add a new one, just click on “Create notification”.
-
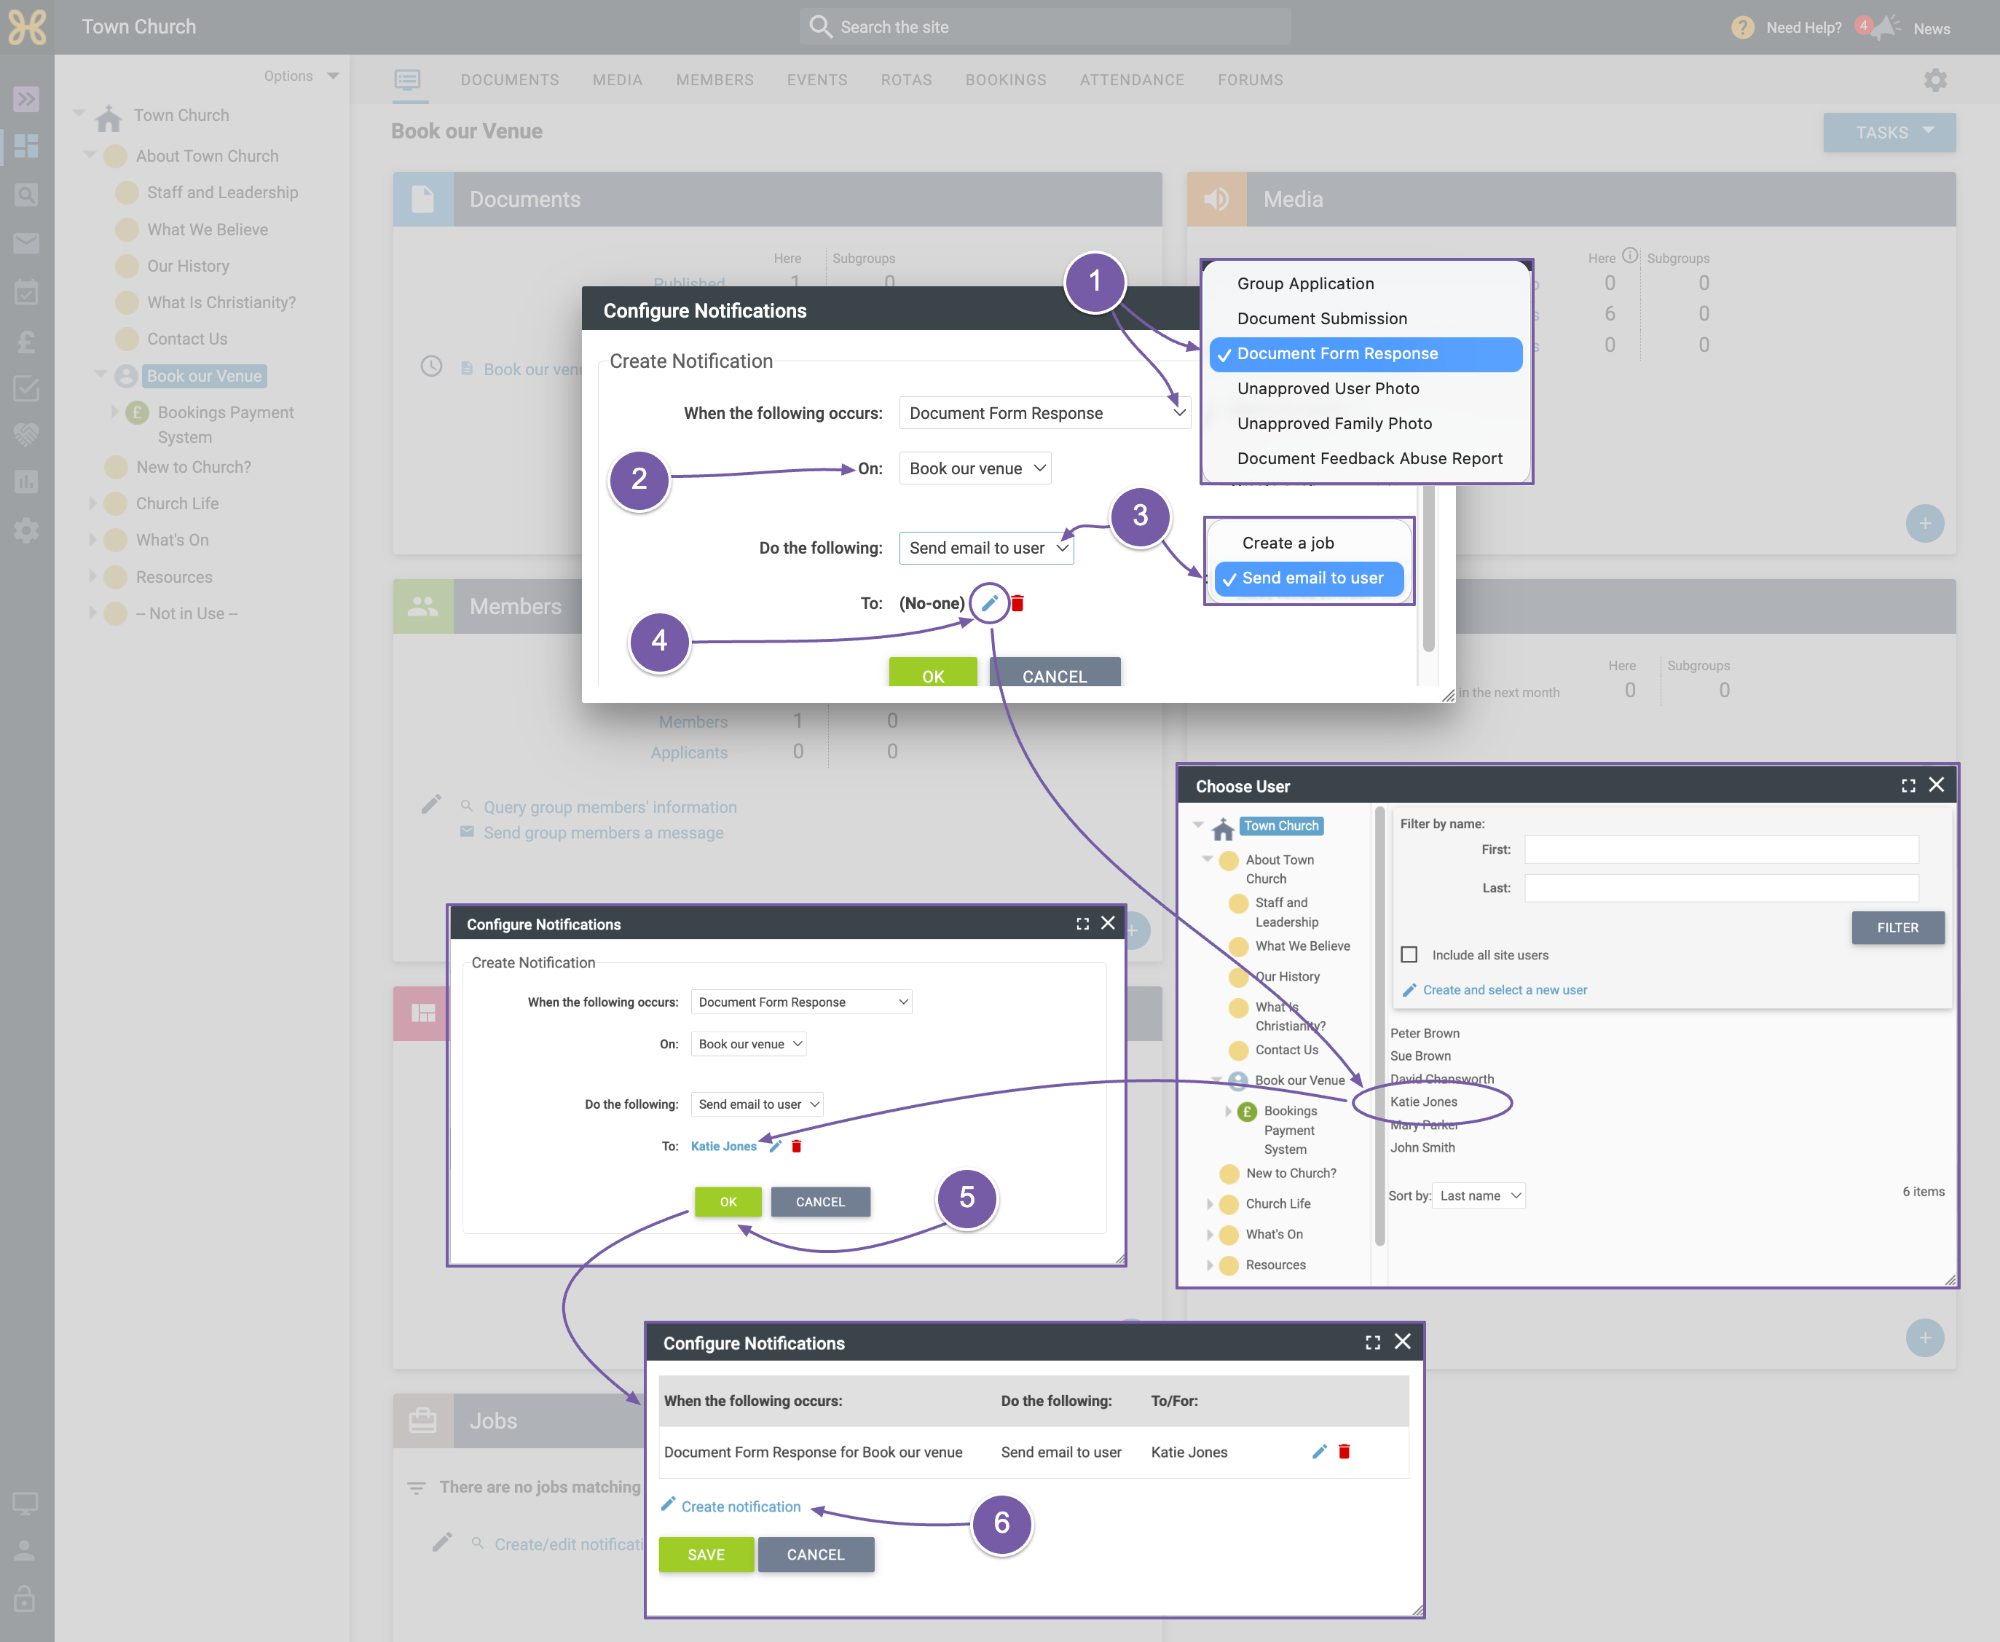
For the top box we need to choose what we are setting up the notification for, and it needs to be set to a “Document Form Response”.
-
Then we can choose which document we want to set this notification up for – which is “Book our venue”.
-
Then we need to choose between either setting up a job on the system, or setting up an email notification. It’s worth mentioning here that Jobs are basically tasks are things you need to do in the Hubb system, but we’ve found that in the past most people like to set up the email notifications. So for now, let’s stick with the email notification
-
Then pick who needs to get the emails, by clicking on the blue edit icon and finding who you would like to add.
-
When we have found that person, we can save this by clicking “OK” and reviewing the change we just made.
-
You can now go and add more people to receive notifications, and when you are done, click “Save”.
So that’s an introduction and guide about how the venue booking page works, with the added features of enquiry form and payment page.
If you need any help or advice, please get in touch with our Support Team at support@hubb.church who will be happy to help.